This was a roadside find.

It's from two doors up the street. The house was sold, and is being renovated. All sorts of trash was out in front, along with this remarkable cart.
The thing is constructed as if for combat duty -- it looks to be indestructible (except for the plywood top). My son conjectured that it may have been originally meant for some sort of institutional application -- in a hospital, perhaps. I think that may well be correct.
The cart appears to have provision for being foldable. Right now, it's too rusted up for that feature to operate.
I'm thinking to restore it as a gardener's patio cart. The height is ideal, and I can construct a new top for it with features useful to a gardener. It will be a fine winter project.
I've Brought It Inside
Between the cart, and the old table saw next to it, I've got work for the winter lined up.

First thing is to stash that loose aluminum edging. Then I want to see how the foldability feature works. Once I have that figured out and operational, I'll delete the ruined, plywood work surface.
Foldability/Collapsibility
A better word here than 'foldablility' might be 'collapsibility' -- I've discovered that the handles and the work surface can be removed entirely, then the frame can be folded.
Handle Removal
There's a turn-button affair at each handle that serves to retain or release a handle. Here is one in its retention position.

And in its release position.

And the handle removed.

Work Surface Removal
At the rear of the work surface there are two plunger rods. Pulling those rods outward unlatches the work surface's steel frame, and enables removal of the entire work surface, like so.

Frame Fold-Up
With the work surface removed, the cart's remaining framework can be folded very compactly.

The purpose of all that must have been compactness for storage or shipment. Once a cart had a home and a job, there'd be no more point to collapsing it.
Miscellaneous Points Of Interest
Restoring this item to something resembling pristine condition is going to be a huge job with many, many steps to be taken. For me to document it all would be too great an undertaking, and would probably lose the reader's interest in short order. But there are a number of things about this cart that I've observed that might be of interest to some readers, so I'll point them out for those who perhaps share my interest in such minutiae.
Handyman Cotter Pin Replacements
Where have I seen this sort of thing before?

Just about everywhere there was originally a proper cotter pin, that's where.
I like cotter pins, and I hate to see them replaced in the manner pictured above. Here's a brief post I wrote in 2012 about cotter pin replacement. And here's one from 2014 about a refinement to cotter pin installation that can be incorporated into new gear that one may be building.
Mystery Wheels
At the front of the work surface framework there are two small wheels (1 7/16" diameter). Here's a view of them.

And here's a close-up of one.

The wheels' purpose escapes me. I guess, when the work surface assembly is off the cart's frame, the wheels would enable one to roll the work surface assembly around like it was a wheelbarrow. That doesn't strike me as a much needed feature, but I can think of no other reason for the wheels' existence.
British Fasteners
The nuts and bolts that form the axles for the above mentioned wheels have British Standard Fine (B.S.F.) threads. Here's a view of one.
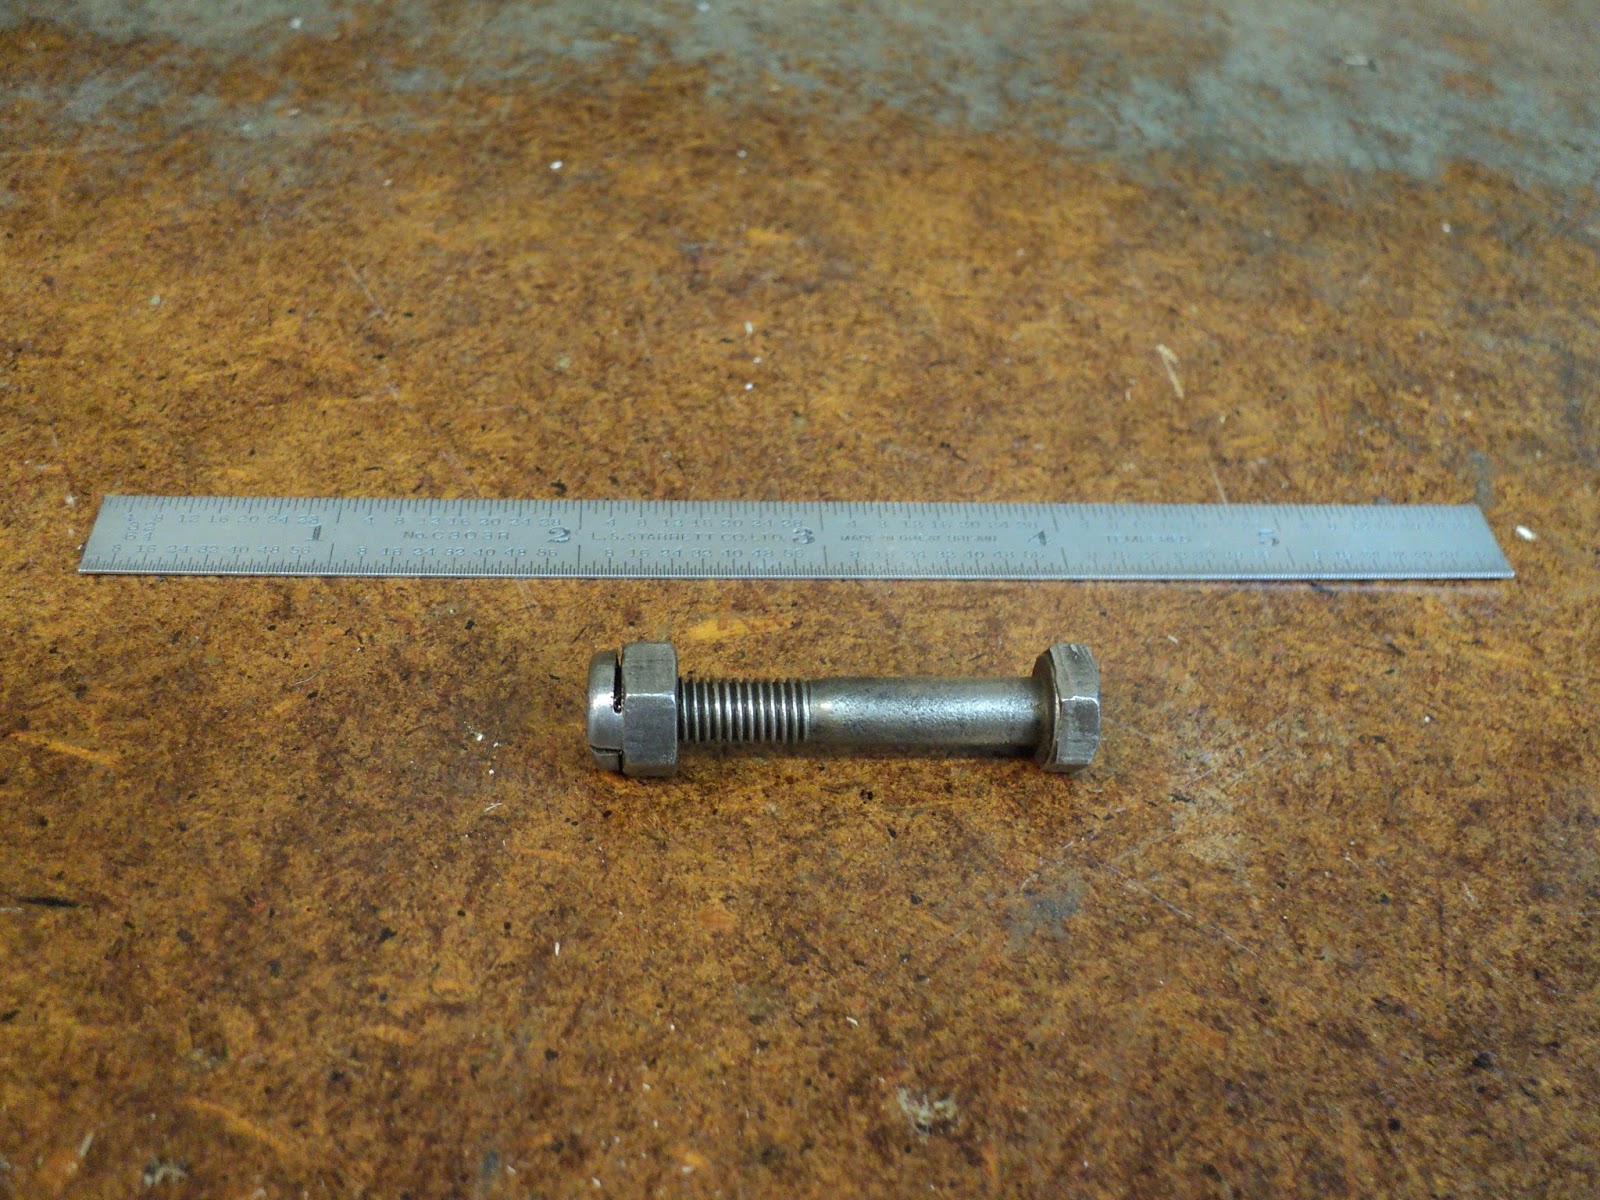
That's a 1/4"-26 nut and bolt. There is no 26 threads per inch 1/4" thread in North American inch fasteners. Also, the A/F (across flats) dimension of the hexes is not 7/16", as it would be for a North American 1/4" nut and bolt -- it's slightly over 7/16", and requires a B.S.F. 1/4" wrench.
1/4"-26 fasteners are used throughout the cart. I think it's safe to conclude that the cart was made in England.
A Paint Failure
The frame of the cart was painted a creamy white colour, and I meant to strip off what was left of that paint and repaint the frame John Deere green. My first attempt at doing the left side vertical frame member did not go well.
In my experience with chemical paint strippers, their effectiveness can vary widely. Some paint finishes prove to be impervious to the stripper, in whole or in part. (It's a curious thing, but sometimes parts of a finish will strip off readily, while other parts of the same finish will be impervious to chemical stripper. It's the same finish on the same substrate, yet it doesn't respond uniformly to paint stripper. That mystifies me.)
I've grown accustomed to encountering such behaviour from old paint finishes, and when I do encounter it I don't struggle with it -- I just paint over the parts of the old finish that resist being stripped off. My thinking there is that if the old finish is impervious to paint stripper, it should also be impervious to the solvents in fresh paint, so I can safely paint over it without risk of ill effects. Up to now, I've gotten away ok with that approach.
This time was different. Parts of the old, creamy white paint job resisted the paint stripper, but they didn't fully resist the solvents in the spray primer and paint that I applied over them. I was left with a blotchy paint job that would not dry in some places. I had no choice but to strip off my entire green paint job; what a waste of time and material.
Stripping off my paint job left me back where I'd started -- with an old paint job that resisted stripping. Instead of using spray paint again, which would have been futile, I tried using brush-on primer and paint. That worked, because brush-on primer and paint don't contain the same powerful solvents that spray paint does. Here's a view of the frame member with its first coat of John Deere green enamel on it.

(What an awkward thing to paint that is.)
It's not a great paint job. It has brush marks and a few sags, but it will have to do.
If there's a lesson to be learned here, I guess it's to do a spot check when spray painting over old finishes, before committing to the entire job. If the spot check reveals any evidence of bad behaviour from the substrate, then either strip the old finish by whatever means it takes, or try brush-on paint instead of spray. The last thing you need is to have to strip off an entire freshly applied paint job because the substrate was unsuitable.
- - -
Update -- SUNDAY, JULY 16, 2017
'Sorry. I've been remiss in keeping up this blog post.
After a great deal more work, I finally completed the cart. Here's a view of it almost a year later.

It's a far cry from what I started out with. I'm quite pleased with the outcome.
I made the new top for it from cedar fencing planks, and that's held up well so far to the elements.

So, there we are. A satisfactory rescue from landfill or the scrapyard. Instead, a useful and attractive gardener's patio cart.
# # #
# # #
It's a burns unit immersion wheel chair, for poor bastards' daily debridement of dead skin in a warm tank. The cream white ambulance paint makes it hospital gear (cream and eau de nil) and the BSF threads fix it in the 40's/early 50s. We had a nurse at school who had nightmares about her time with this during the war.
ReplyDeleteThank you for the information.
Delete