Sunday, June 30, 2013

Dremel Cut-Off Wheels


I make frequent use of these things, so I thought they should get a post of their own that I can link to whenever their use crops up, and I need to explain it further. Here's the line-up of Dremel cut-off wheel products that I'm familiar with.


The large, reinforced No. 426 wheels are 1 1/4" diameter x 1.1mm thick. They're remarkably tough and long-lasting; they're a formidable cutting tool. They're my 'go to' abrasive cutter for most tasks.

The smaller, thinner, un-reinforced wheels, No.'s 420 and 409, have their uses as well, but they're fragile -- a steady hand is called for.

- - -

So what do I use them for? All manner of things. Here's one small example.

I currently need a 3/32" diameter pin to secure the handle of a pin vise to its spindle. I have a broken 3/32" twist drill whose shank will provide me a fine pin, but I'll have to cut the shank to approximate length, before grinding it down to exact length. An abrasive cut-off wheel is about the only thing that will do what's needed, like so.


Rough though that may be, I've got my pin cut to approximate length. I know of no other tool that would do that for me so easily on steel that hard.

- - -

Safety

Eye protection is mandatory. The small wheels are prone to shatter if they're twisted at all while running -- pieces of them can be forcefully thrown off.

- - -

So there's my brief overview of Dremel cut-off wheels. You'll never regret having acquired a supply of them.

# # #


# # #


Thursday, June 27, 2013

A Visitor


This handsome devil was at the threshold, ready to launch himself inside. I persuaded him to turn around and face the other way, at least.


He seems disinclined to leave. Perhaps he's applying for the position of mascot.

# # #

FEEDBACK

# # #

Tuesday, June 25, 2013

A Leaky Hose Reel


* * *

Whoops! -- SUNDAY, JUNE 30, 2013

The post that originally opened up here, and which is still in place below, was all well and good so far as dimensions and methodology were concerned, but the material I used (laminated DVDs) proved not to be up to the forces involved -- my repair failed today after a brief period of use. I have just enough 1/8" thick aluminum material from which to make replacement parts that will be up to the job for certain.

- - -

The Failure -- TUESDAY, JULY 2, 2013

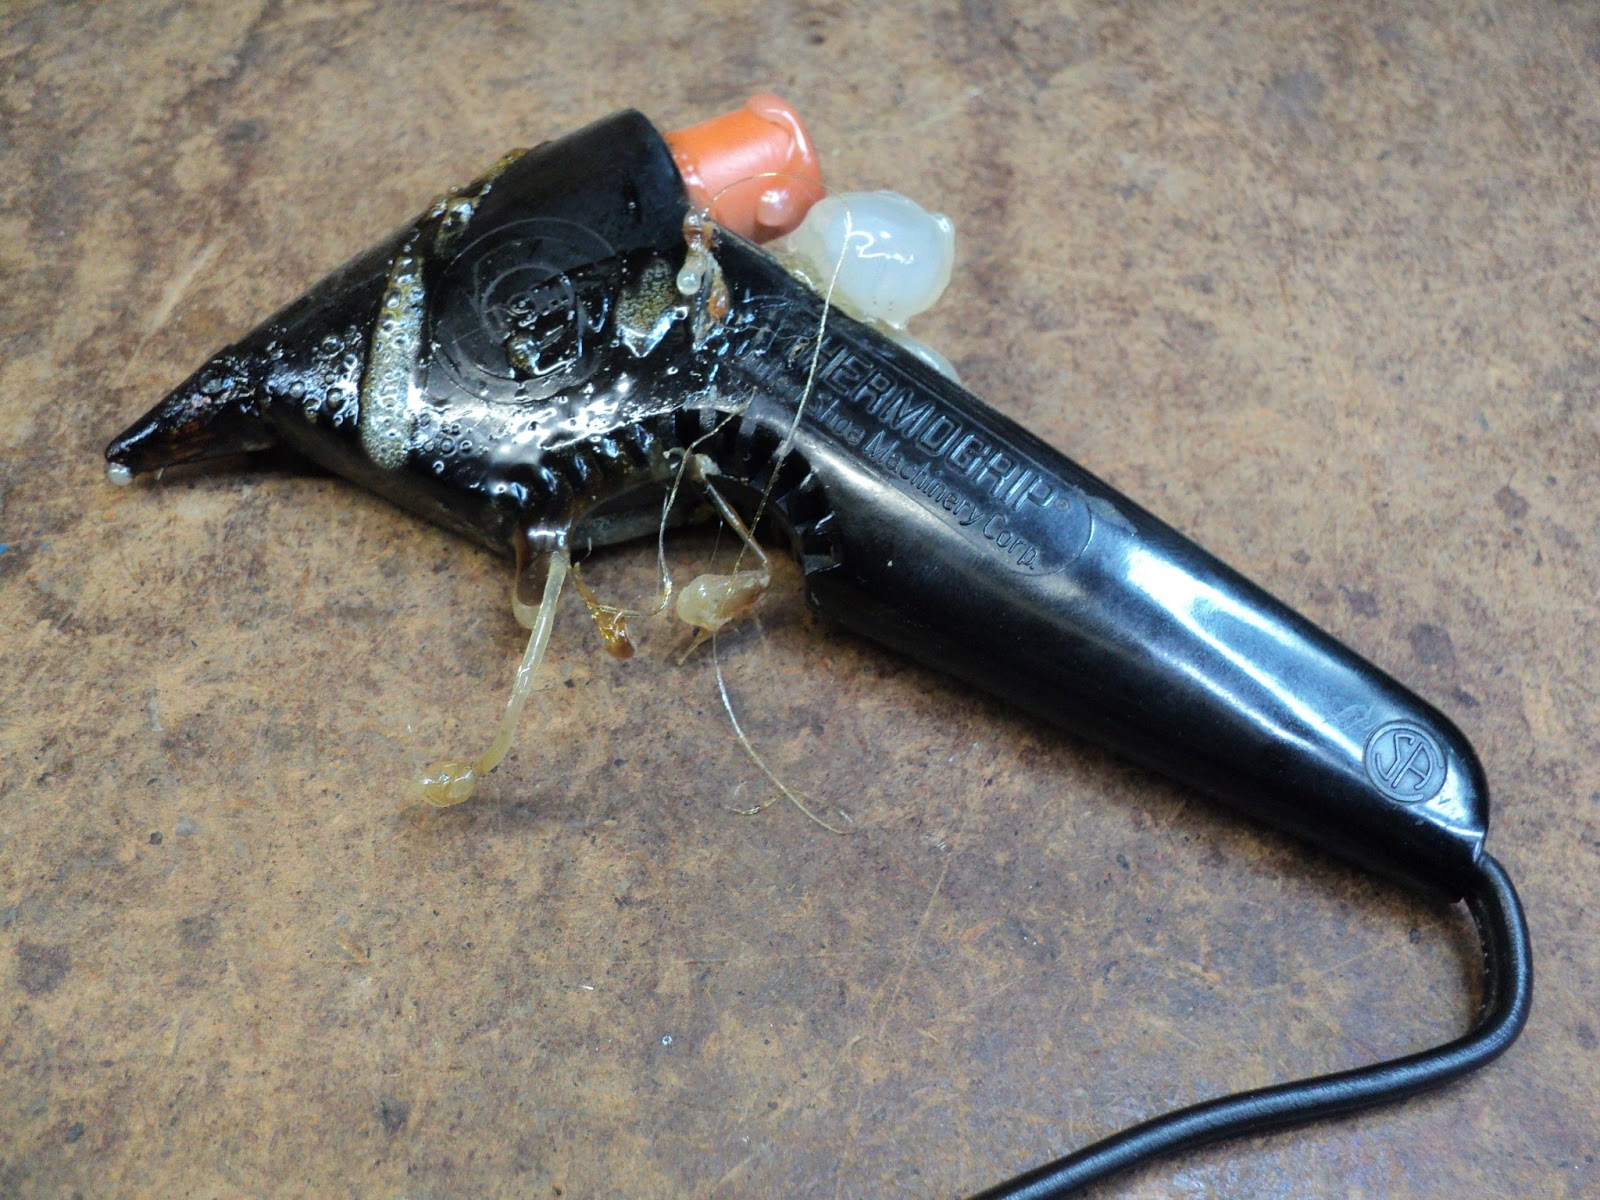
Here's what became of my repair.


I understand now what I failed to fully consider at first. With the nozzle on the end of the hose closed, and full water pressure applied, those two projecting retention nubs on the rotating water supply tube are forcefully pressing on the inner edge of the retention 'ring'. The material I chose to use just wasn't up to the job -- it shattered completely. (If you scroll down to the third last and second last photos in this post, you'll see how the parts look and relate to one another when installed.)

I suspect that retention 'ring' failure on these hose reels ( Ames ReelEasy) is pretty common as the units age, and the original plastic parts become embrittled.

- - -

New Aluminum Part(s) Nearing Completion -- THURSDAY, JULY 4, 2013

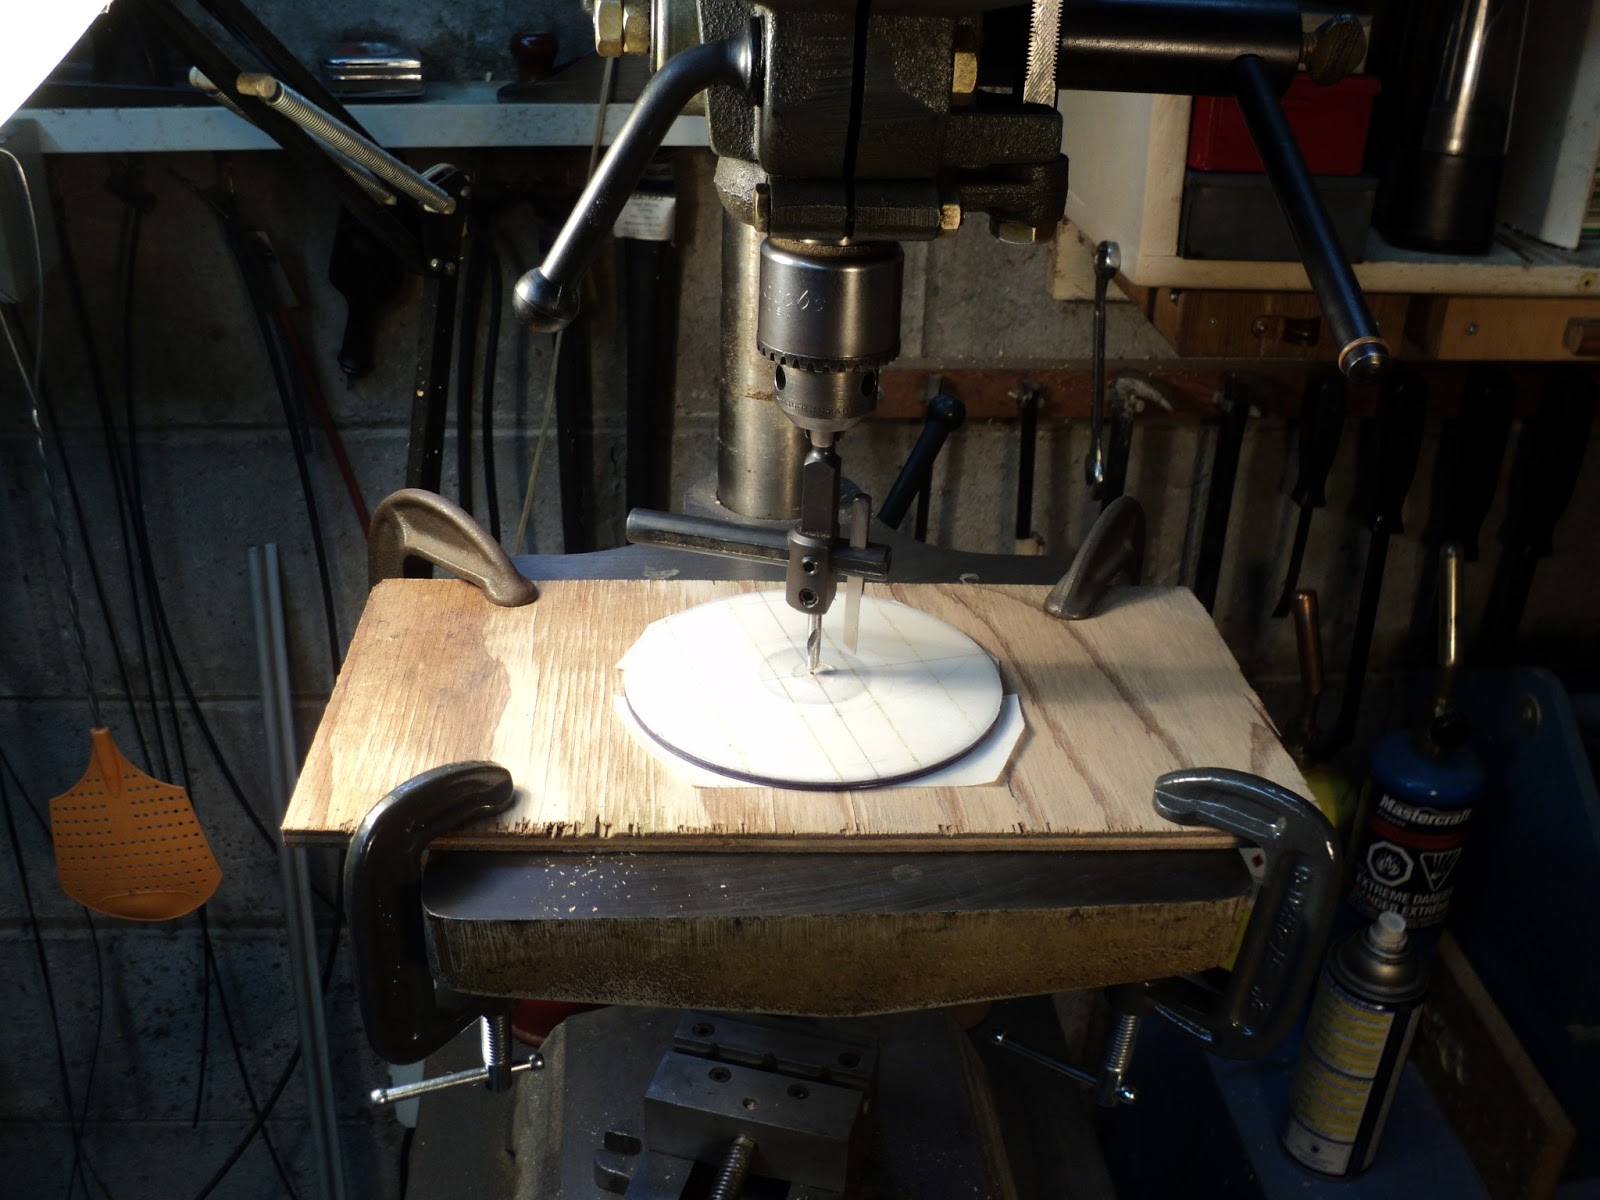
Here's the fly cutting just completed.


The procedure here was really no different than that for the plastic part(s), but the harder material does introduce a bit of difficulty at times.

Note the steel flat clamped across the work. The double-sided tape holding the work to the plywood backing began to come loose near the end of that final cut, so I had to rig that work-holding arrangement to be able to complete the cut.

Now I just have to drill and countersink the four fastener holes, and cut the ring in two.

- - -

New Aluminum Part(s) Ready For Installation -- FRIDAY, JULY 5, 2013

Here's the new retaining 'ring' ready to go.


There's a reason for the asymmetrical cut -- it's so that the two nubs on the water supply tube are never simultaneously at a juncture. That's not an essential feature of the 'ring', but I thought it couldn't hurt to do it that way.

- - -

All Done -- SATURDAY, JULY 6, 2013

I installed the new part(s) and rewound the hose this morning. It works fine now. The final photograph of this post is once again true, and should remain that way for a long time.

* * *

Original Post

[Following is the whole story of my first, ill-fated repair. Everything below is true and correct, except that I had made a poor choice of material for the job. That's been corrected, as per the above.]

- - -

We went to get a hose reel set up this spring, and it had two mystery plastic chunks lying under it.


I really couldn't make out where they came from, and the reel still spun properly, so I thought, "Maybe they're nothing of any consequence, and the hose reel is still usable."

Then I hooked up the water supply and turned it on.


Hmmm. It appears that whatever broke is of some consequence after all. Further investigation is in order.

- - -

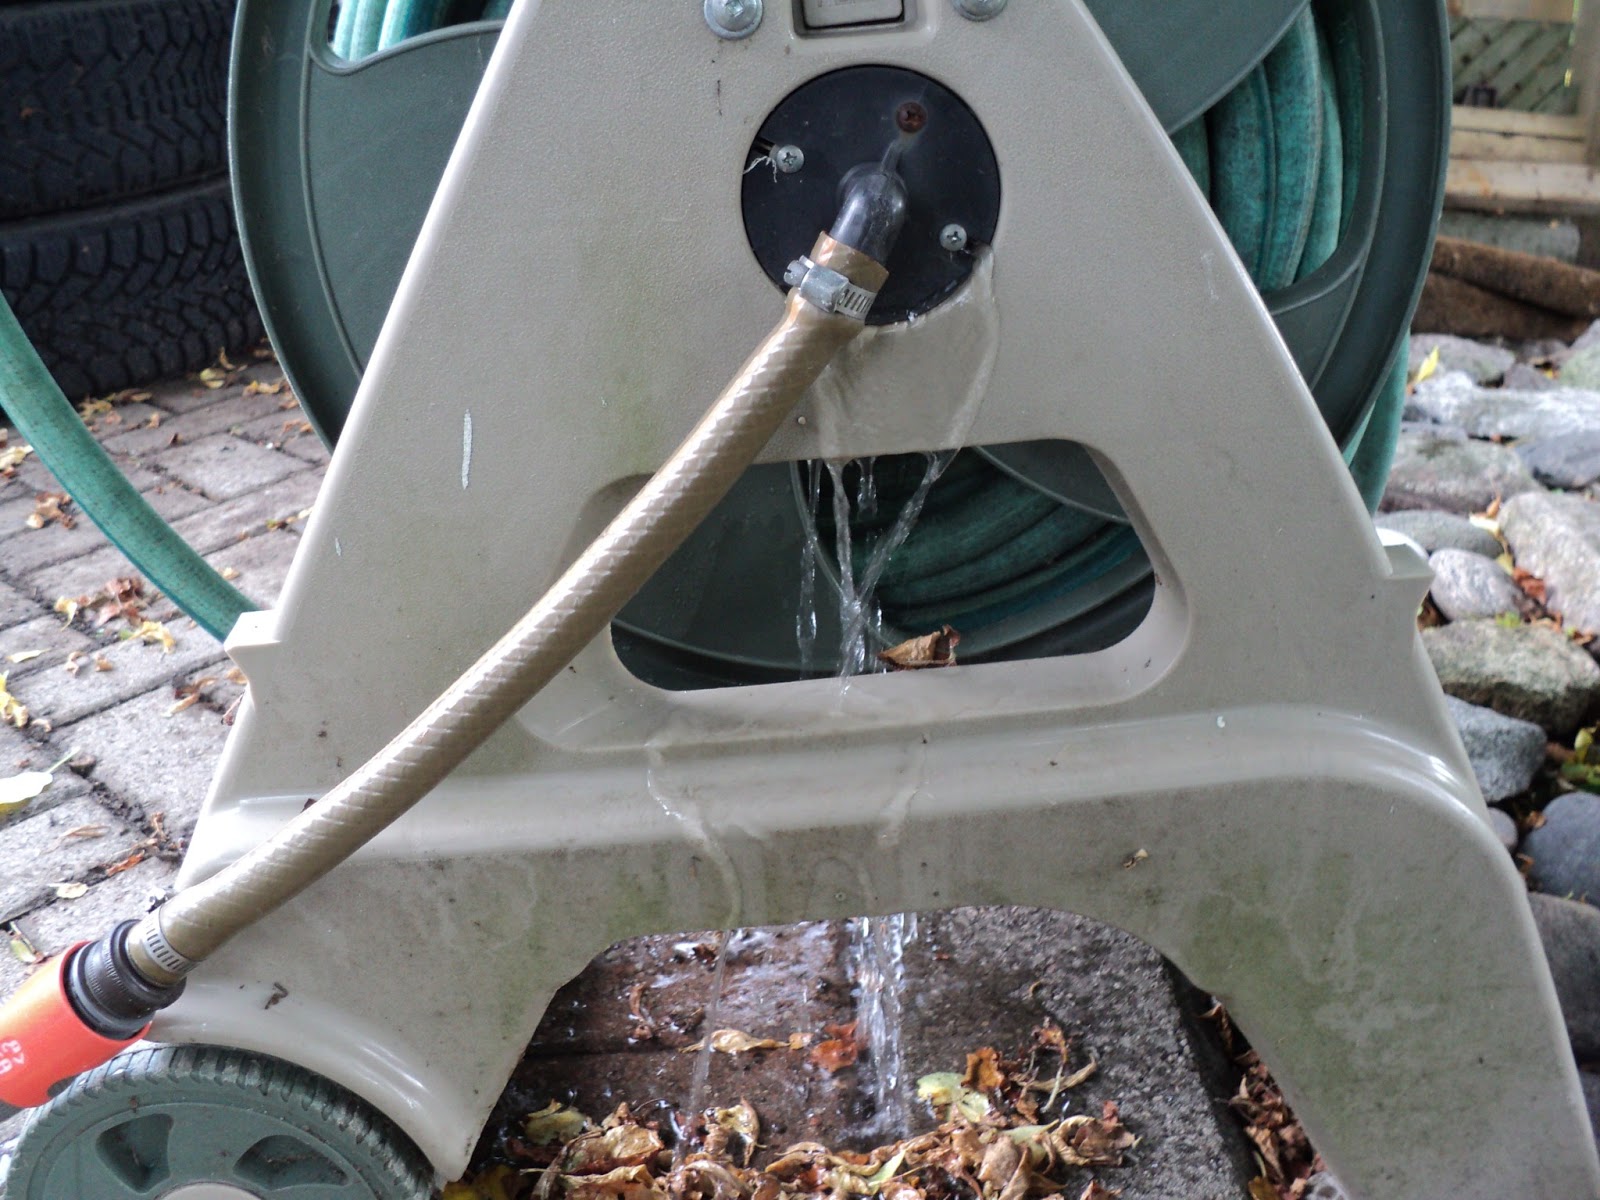
Here's where the two chunks of plastic came from.


Those exposed screw heads were the fasteners. Those two pieces that fell out are the two ruined halves of a retaining 'ring' that keeps the water supply tube fully seated in its hub. With the retention gone, the water supply tube dislodged enough that its rotating seals no longer seated correctly -- hence, a big leak.

If I can scrounge up some suitable material, I can fabricate a functional replacement that should work fine.

- - -

Repair Material

Here's some fine, smooth, waterproof material from which to fabricate replacement parts.


I'll laminate those together with CA adhesive, and I'll have just the blank I need from which to make a new pair of retaining ring halves.

This will be a lovely, happy marriage of high tech and low tech.

- - -

Here's my laminated blank all laid out and set up for machining with the fly cutter.


The blank is adhered to that plywood with double-sided tape. First is the 1 1/16" bore. Then, without disturbing the setup, I'll cut the 3 1/4" diameter perimeter. With those two cuts made, I can unclamp the setup and drill and countersink the four fastener holes.

- - -

Fly Cutting Done


That material machines easily. That was the smoothest fly cutting I've ever done.

- - -

A Curious Snag -- FRIDAY, JUNE 28, 2013

The oddest thing happened while I was drilling the 13/64" fastener holes -- the uppermost disc de-laminated.


At first I thought an entire disc had de-laminated from the stack of three, but it hadn't. The disc itself is what de-laminated. Oh well, I'll get the part freed from the plywood, and see what I can do with this.

- - -

Nearly There

I re-laminated the layer that came away with CA adhesive, and I've sealed all the edges with the adhesive. The countersinks are done.


I've checked it for fit, and my layout was exactly right. All that's left is to cut it in two places -- it has to be in two pieces to be installable.

- - -

DVDs In Place And Ready To 'Play' -- SATURDAY, JUNE 29, 2013

Here's the completed repair.


The retention is restored, in effectively the same manner as the factory parts provided it. I'll get everything back together and try it out.

- - -

And here we are, hooked up and fully pressurized.


I think I can call that a success.

# # #


# # #

Sunday, June 23, 2013

An Elderly Thermogrip Glue Gun Bites The Dust


This thing is old. I got it in the mid 1960s, I think, not long after the tool was first introduced to the market.


From what I can gather, the 'Thermogrip' name currently belongs to Bostik, Inc., but this gun, a Model 200, was made by the United Shoe Machinery Corporation (USM). In its day, USM was a huge industrial concern. There's some interesting historical information about the firm here.

- - -

Anyway, the pictured glue gun may be done for. The second last time I used it, I thought it was behaving a bit oddly. The last time I used it, there was no doubt about it -- it wasn't just melting the glue, it was boiling it back up out of the orange input tube.

Evidently, the thermostat has failed closed -- it's not cycling, it's just keeping the heater on constantly. The odds of this being repairable are slim to nil, but it can't hurt to take a look inside.

- - -

Hmmm.


There comes a point where even I consign some things to the landfill, and this appears to be at that point.

Oh well, this glue gun certainly outlasted its warranty period. New ones are probably less than I paid for it in 1960s dollars.

# # #


# # #

Wednesday, June 19, 2013

A Hydraulic Press Ram Adaptation


There's a bit of a back story to this.

Yesterday afternoon, it dawned on me that parts of my workshop have become something of a shambles -- too much stuff stashed away here and there that's of no real use to me, that's just cluttering up the place. I decided that it's high time for an unshambling. As for where to start, 'anywhere' seemed about right.

I started in on the bottom shelf of my wood lathe's stand, and came across this marvel of human ingenuity.


It's a flailing paint stripper that's due for retirement.

It did work, more-or-less, but it tended to litter the place with broken-off flails. It has few flails left -- there's really no point in hanging onto it. I'd like to salvage the 1/4" spindle, though, and that's where my hydraulic press comes in. (I could just hammer out the spindle with a pin punch, I suppose, but the press is way more fun.)

What I have in mind is a method of fitting a 6mm diameter 'nose' to the press' ram, to bear down on the spindle to press it out. Here goes.

- - -

Here's the setup, ready to go. (The lighting I was using made the camera produce some odd colouration effects -- the press is actually entirely red.)


That ram-end adapter is a 1 1/2" length of 1 11/32" diameter hardwood dowel. I bored it 1" diameter, 1" deep, and cut two slots in that bore's walls. Then, drilling through 15/64" gave me a light interference fit for a length of 6mm diameter steel rod. We'll see how this goes.

- - -

That worked nicely.


I can easily punch that spindle the rest of the way out, now that it's broken loose.

I can foresee variations on this method being useful again and again in future.

- - -

Addendum -- THURSDAY, JUNE 20, 2013

It was brought to my attention today that I did a poor job here of showing what it was, exactly, that I was salvaging. Quite so. Here's a view of what I was after with this endeavour.


It's an almost 3" length of hard, 1/4" diameter steel rod, with a knurl at one end.

To an amateur machinist, such things are invaluable -- they do not go into the landfill.

# # #


# # #

Wednesday, June 12, 2013

An Elderly Right Angle Drive Attachment


I brought this over from the garage.

It's very old, but it seems to be in fine condition. It probably never saw much use.

I'll dismantle it, clean it thoroughly and pack it with fresh grease.

- - -

The screw securing the rubber disc has a 7/16" hex head.


That came off easily.

The handle can go on either side -- the usual arrangement on these things.

Five 8-32 x 1/2" screws hold the casing together, and here we are.

The grease is in better condition than I expected it to be. Regardless, I'll give this a thorough cleaning and grease repacking.

- - -

Here it is all cleaned up.


That looks better.

There's some evidence of wear on the gear teeth -- not a lot. The shafts and bearings are in fine condition. I'll repack it with the pictured grease and reassemble it.

- - -

All Done --THURSDAY, JUNE 13, 2013


I wire-brushed and painted the disc's clamp washer. The casing is no longer grimy, but it still looks pretty bad. I don't imagine that anything short of sandblasting, or some chemical treatment I know nothing about, would restore the good appearance of the casing.

This can go in my storage room for now. I could acquire a buffing bonnet for it, and go polish the truck. Somehow, though, the thought of doing that just doesn't fill me with gleeful anticipation.

Anyway, I already have one of these that I use for drilling in tight spots.


That one's casing is made of nylon, I think. It's a decent piece of gear -- it's helped me out many times.

# # #


# # #

Tuesday, June 11, 2013

An Ill-Kept Sheath Knife


It's quite a nice knife. On the blade it says, "RICH A. HERDER SOLINGEN GERMANY". That firm appears to be no longer with us.

It looks like the knife and sheath got soaked with water, and then neglected. I'll give the sheath a good scrub, set it outside to dry and apply some leather treatment stuff to it.

The knife's handle laminations appear to have shrunk. It looks like the handle can be dismantled. I'll look into that further.

- - -

The sheath cleaned up quite well. It's outside drying.

Here's what I'm up against with the knife's handle.


That round brass item appears to be a nut of sorts that was threaded on to complete the assembly of the handle. The snag is that the end of the male thread appears to have been peened over to lock the nut in place forever.

- - -

It's not the most elegant job that I did of it, but I got it apart without utterly botching it.


I centre punched the threaded 'stud', and drilled away the peening (somewhat -- the drilling ended up being imperfectly centred). The shrunken laminations allowed me to compress the handle and expose enough of the nut's perimeter that I could get a small pair of Vise-Grips on it and start it turning off.

The nut is brass, 10mm in diameter. The thread appears to be M5 x 1.0mm pitch.[!?][1] Here's a view of the entire blade/shank/threaded stud.


At least now I can wire-brush the blade and clean up everything. Reassembly will be straightforward, except for the iffy nut -- getting back to a good appearance at the end of the handle may be a bit challenging.

- - -

Reworking The Threaded Stud

The uncommon thread is a complication. I'll need to make a new nut, but acquiring an M5 x 1.0mm tap is likely to be more expense and aggravation than I'd care to deal with, and I'll be unlikely to ever need the tap again. The thread is so close to 10-24 that I can chase it with a 10-24 die, and give it a 10-24 nut; I'm well-enough equipped to deal with cutting 10-24 threads.

The Nut Blank

Here's a view of the nut blank in the vise about to be threaded.


That's a 28mm length of 10mm diameter steel rod. I've bored it clear through No. 24 (a hair oversize for 10-24 threading). I've bored it out to 7/32" diameter for a depth of 18mm; 7/32" is clearance diameter for the shank of my tap. So, what I have is a blank for a 10mm long nut with built-in guidance for the tap. When the threading is done, I'll cut off the 7/32" bore portion, and I'll have the makings of the nut I need.

10mm is a long way to cut a thread with a tap. I'll need to be extremely careful, and back out the tap and clear away the chips frequently. Here goes.

'Got It


The tap has emerged -- the threading is done. Now I can cut the nut to length, and figure out how to make it 'wrenchable'. (Note the Vise-Grips I had to attach to keep the work from turning in its protective sheet metal in the vise.)

Grinding Parallel Flats

Here's what I came up with to grind two parallel flats on the nut.


That worked remarkably well. The nut now takes a 5/16" open-end wrench. Here's a view of the finished nut.


And here's a view of the nut installed, with the laminated handle properly tightened up.


The downside to this is that I've lost the truly 'finished' appearance of the factory's brass nut. The upside is that I now have a handle termination nut that I can always snug up as needed, should the need arise. The slightly protruding nut doesn't detract from the knife's utility, in any way, shape or form; so I'm not at all ashamed of this repair -- not one little bit.

- - -

All Done


It's back in respectable condition. I'll put it away safely with my camping gear.

- - -

Note:

[1] M5 x 1.0mm pitch is a very uncommon thread. This is the first time I've ever encountered it; it doesn't even appear on my threading data wall chart. It's a bit treacherous, because it looks for all the world like an inch 10-24 thread, and a 10-24 screw runs into an M5 x 1.0mm nut just fine, albeit a bit loosely.

# # #


# # #

Gravity Clamping


No one really understands gravity, but no one really needs to. One can make good use of all manner of things that one doesn't actually understand -- e.g. magnetism.


No one really understands magnetism, either, but that doesn't get in the way of people making good use of the phenomenon. (Yes, there are 'theories'. Theories are a dime a dozen. I could come up with some specious theory that would serve as well as the 'legitimate' theories.)

It's a similar thing with gravity, and 'gravity clamping'. I don't need to understand gravity to put it to good use, as in gravity clamping.


Pictured above is a gravity clamp. The little stepstool needed 3mm thick shims added to its 'feet' at one end to level it. It's been sitting overnight with that gravity clamp holding it down firmly on the glued shims. Here's the outcome.


That turned out fine. My repairs to that stool are done.

So there we are. That's not the first time I've made use of a gravity clamp, and it won't be the last.

- - -

Addendum -- TUESDAY, SEPTEMBER 17, 2013

Here's a view of a gravity clamp application that just arose recently.


That's a simple frame being made up to contain some rack-mountable networking equipment. In the photo, the vertical member at the left has just been glued up and left clamped.

The post that that's from is here.

# # #


# # #

Saturday, June 8, 2013

A Very Old, Very Rough Stepstool


Something about this wretched thing appeals to me. I can't part with it, even though it's basically a hunk of firewood.


It's very old; there's evidence of cut nails in it.

There's also evidence that it may have been upholstered at one time, for use as a small ottoman, possibly.

I could take it to pieces and do a full-blown restoration of it, but that could turn into a career, and there's really no point. This thing probably looked old and rough when it was brand new. What might be worth doing is reinforcing the attachment of the two 'legs'. They're just nailed in place, and consequently they tend to 'give' a bit under load. I can install wooden dowels to make the assembly rigid. Then, I can at least have use of the thing as a knock-about stepstool in the basement. That sounds like a plan to me.

- - -

Here's how I'll go about it.


(Note the rectangular head of a cut nail just above the dowel hole.)

That fluted dowel is 5/16" diameter x 1 1/2". I've bored a hole deep enough that the dowel sets below flush. I'll cap the hole with a cross-grain plug that I can chisel off flush. (That makes for a better appearance than having the end-grain of a dowel showing.)

One of those per leg at each side, and two per leg through the top should give me a rigid, sturdy little stepstool.

- - -

A Complication

I've got the leg that's at its correct angle doweled on each side.

The other leg is off at an incorrect angle. Here's what I rigged up to coax it to approximately the correct angle.


It's still not right, but I've tightened that clamp about as much as I dare, so I'll drill and dowel with the clamp in place, and hope for the best.

- - -

Both Sides Pinned and Plugged


Tomorrow, I'll pare those plugs down flush, and get on with the dowels through the top.

- - -

Drilling Through the Top -- SUNDAY, JUNE 9, 2013

Sometimes, you have to find ways around a machine's limitations.


Note the masking tape. That stuff is a great layout aid in many situations.

Here it is with the four topside dowels installed and plugged. (I decided to go with 2" long dowel pins here.)


That's going to be a sturdy little stepstool.

This was a good example of how dowels are often far superior to any metal fastener in wood. Another one is this planter repair. (On that, I didn't bother with cross-grain plugs as I did here.)

One can make do by cutting one's own dowel pins from lengths of plain doweling, but whenever possible, I prefer to use these expansible dowel pins.


Their diameter dimension is very tightly controlled -- you'll never encounter an undersize one. Lengths of plain doweling can be a little iffy for true diameter dimension at times.

- - -

All Done -- TUESDAY, JUNE 11, 2013

All the plugs have been pared flush, and I shimmed up the 'feet' at the low end (right side in the photo) by 3mm to level the stool.


That piece of a clementine orange crate down in front is what gave me the 3mm thick material for shimming the feet. See this post to see how that was done.

Anyway, the stepstool is now as repaired as it's going to get. It's still ugly, but at least it's no longer wretched.

# # #


# # #