Friday, June 7, 2013

A Screw Bottle Jack With An Oversize Base


This spare tire-changing jack is so old I've long forgotten how I came by it.


Its base is small, and 'tippy' from side-to-side -- a feature that I found a bit annoying. The jack mostly just languished for years, until I got the bright idea to make a big, flat base for it. That turned out to be a very good move. Here's a view of the jack mounted on its hardwood base.


All I had to do was drill a hole at each corner of the jack's steel base; then a few tee-nuts, washers and hex socket head screws got me a much-improved jack.

One of the first uses I found for it was on vehicle exhaust system work in my driveway. I had a rusted-out muffler hanger to replace on a Pontiac Sunfire, and this jack was just what I needed to support and position the muffler, while I installed a replacement hanger.

- - -

Adapting 1/4" Square Drive to the Crank Socket

The great, long crank for the jack proved to be pretty clumsy for my purposes, so I made a 1/4" square drive adapter for the crank socket from a 12mm socket wrench, like so.


The 12mm socket wrench was a cheap, no-name one, and it proved to be relatively easy to cut and file. It fits that 'rectangular' crank socket perfectly.

With that adapter, I can easily hand crank the jack when delicate positioning is called for, or I can apply a variable speed drill when a fast, lengthy ram excursion is needed.

- - -

Accessorizing the Ram

I drilled a hole in the centre of the ram's face, and tapped it 10-32; that made it possible to attach helpful accessories for specialized applications.

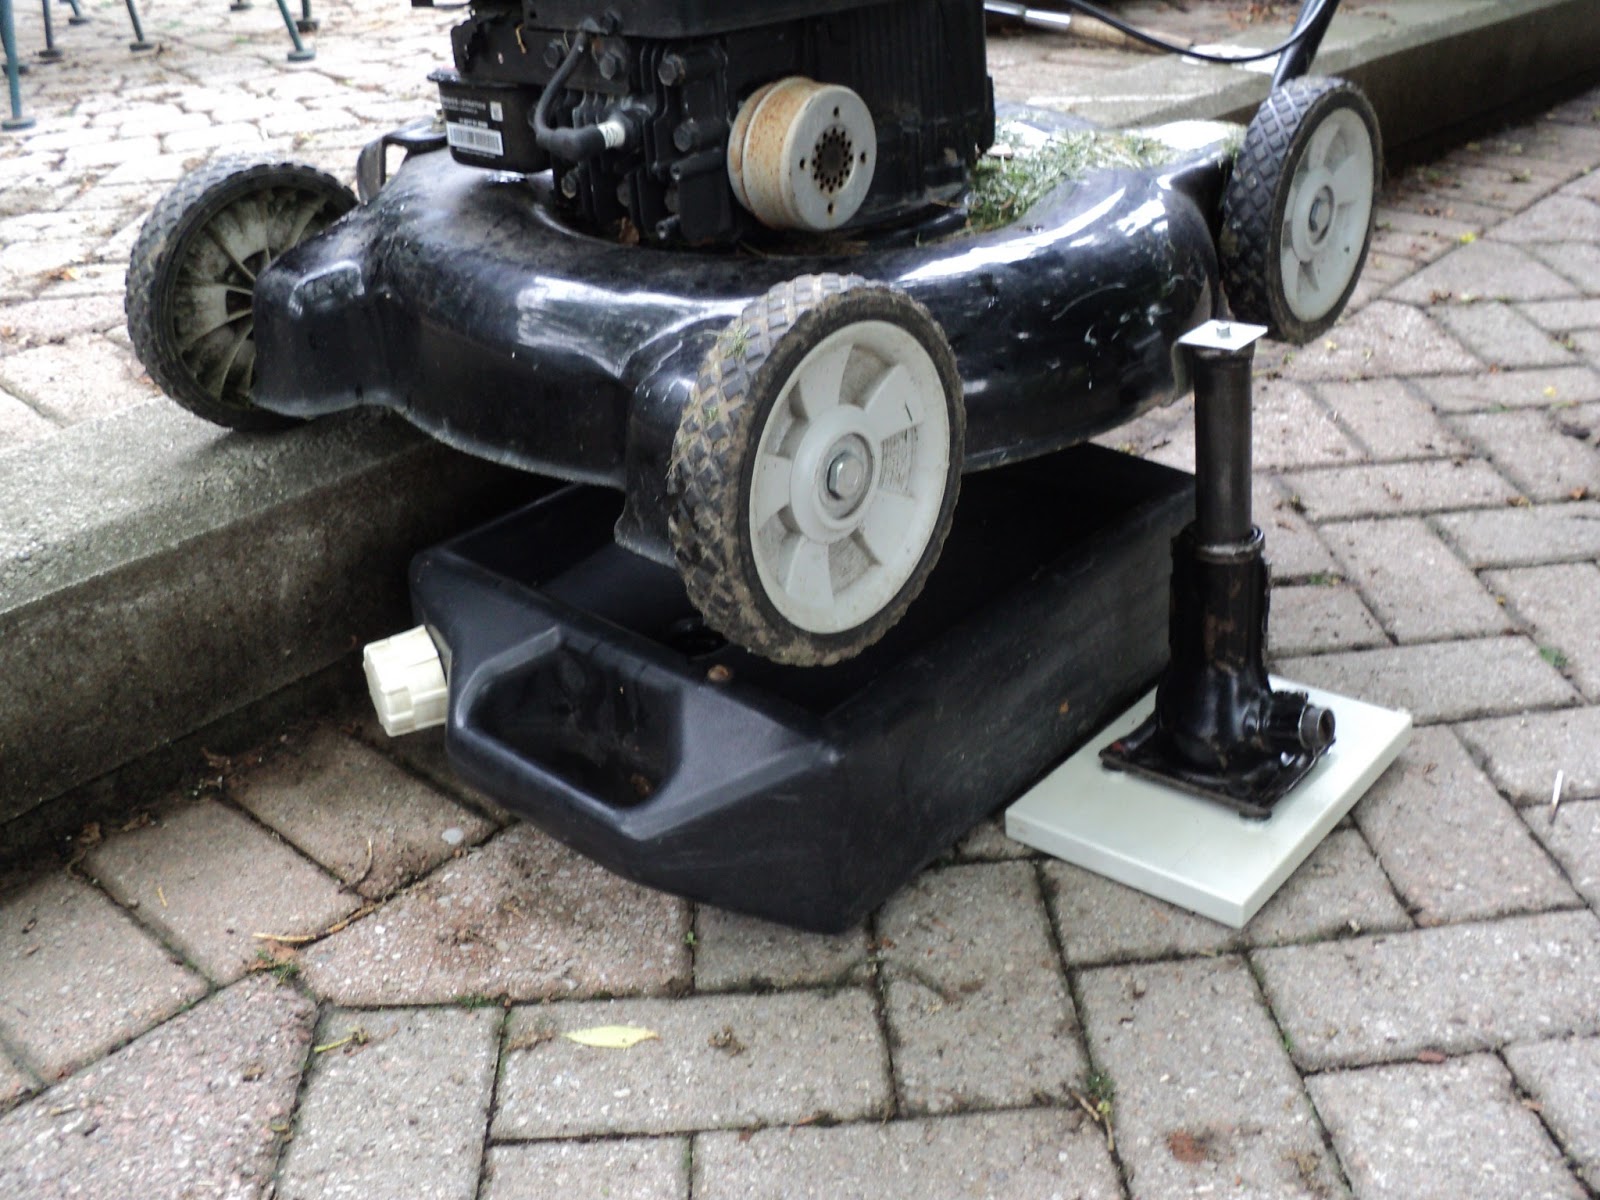
Adding a hook gave me a way to elevate a lawnmower for changing its oil, like so.


Adding a rectangle of Ikea flooring material gave me a spray-painting stand for the upturned hopper of a fertilizer spreader I was restoring.


- - -

Idle Storage

When the jack's not in use, it stashes away nicely overhead between a couple of joists, on cleats that I made for it.


- - -

Obtaining a Screw Bottle Jack

No retailer that I know of sells these things -- hydraulic bottle jacks, yes; screw bottle jacks, no.[1]

The local auto wrecker is likely to have a zillion of them. My '99 Ford Ranger came with a very similar jack. I suspect that virtually all production of this style of jack gets sold to car makers.

- - -

In Closing

This jack is a good example of how creating/acquiring an item with no immediate 'payback' to it, merely because it's a good thing in principle, can end up 'paying back' over and over again as uses crop up and suggest themselves.

When I was working, I noticed that the bosses would never 'invest' a dime in anything that they couldn't see an immediate, right-this-instant payback from. Maybe, to be profitable, there can be no other way to operate a business. I don't know; I'm no businessman.

But I do know a bit about tools and physics and getting work done and what it takes to get work done. And I know that all those profit-making outfits that I worked for over the years were the shabbiest, most ill-equipped hell-holes on the face of God's earth.

- - -

Note:

[1] 'So why even bother with screw bottle jacks, when hydraulic bottle jacks are readily available?'

Good question. Answer -- for several reasons:

a) Lighter weight. A screw bottle jack is just less 'stuff' to have to grapple with.

b) Orientation insensitivity. A screw bottle jack can operate in any orientation -- from 'right side up' to 'upside down'; the jack couldn't care less.

c) Ruggedness. An extended hydraulic jack's ram has little tolerance for abuse. You could accidentally saw a small notch in the extended ram of a screw bottle jack, and the jack would just 'shrug' and say, "Oh, ouch.", and carry on working.

# # #


# # #

Sunday, June 2, 2013

A Trimmer For Protruding Dowel And Plug Ends


This modified Dremel router attachment makes a great trimmer for protruding dowel and plug ends. It's a real worksaver.


(Unfortunately, Dremel appears to have discontinued the model 230 attachment. There should still be some way to rig an equivalent, though.)[1]

I made an offset base for the router attachment from a scrap of 7/16" poplar plywood. With the cutter height adjusted to just barely above flush, the tool makes short work of dowel and plug ends left protruding from flat surfaces, like so.


What slight protrusion remains can be sanded, or pared away with a very sharp chisel.

If you're trimming oak plugs with it, you have to be mindful of each plug's grain direction and angle to the surface. Oak is brittle, and it's easy to tear a notch out of a plug if you approach it with the cutter from the wrong side.

- - -

Safety

Needless to say, wear eye protection.

When I first started using this tool years ago, I caught myself being tempted to upend the tool, and sweep off the underside of its base with my hand at times while it was running. Thankfully, I had the good sense to let that temptation pass. Keep a banister brush handy for sweeping away dust accumulation, and never have the tool running when you're not actually applying it to its work.

- - -

Friday, June 7, 2013

Note:

[1] I emailed Dremel about that, and they did reply to me decently. It seems that they have nothing in their current product line that can replicate the trimmer function shown here. Progress, eh?

# # #


# # #

Saturday, June 1, 2013

Wooden Planter Repairs


Here's a fine piece of wreckage that I found stashed away by the apple tree.


It was held together by wood screws at the corners. The screws were driven into end-grain, and that's seldom a sound practice -- it tends to lead to exactly what happened here.

I'll blow all the bugs and muck off it outside with compressed air before I bring it into the workshop.

- - -

Here it is brought in.


Down in front you can see a screw end protruding. The thing was built to last one season, maybe. I think I can do a bit better.

There doesn't appear to be a bottom for it. I must ask my wife if it ever had one, or if the thing was simply meant to be a 'surround' for a potted plant.

- - -

On closer inspection, I see evidence of there once having been a bottom in it. My wife tells me that she got the thing second hand without a bottom -- she just used it as a surround. That suits me fine; it saves me having to fabricate a bottom for it.

Here it is reassembled and cinched up with a band clamp.


I left the screws in place as I knocked it back together, so they'd at least act as locating pins. I'll delete the screws as I go along with what I have in mind.

Note the two fluted dowels perched on the near corner. What I'll do is I'll install two of those at each corner, cross-wise to one another. If that works out as I expect it to, the thing will be indestructible.

(The dowels are 5/16" diameter x 2" long. I'll use an outdoor-grade glue.)

- - -

Here's the first corner done.


That went well. When I have all the dowels installed, I'll chisel them off flush, and seal their ends with CA adhesive.

- - -

One of the bottom corners exhibited a fair bit of dry rot inside when I put the drill to it -- the drill didn't meet with much resistance at all. I installed the dowels there with plenty of glue.

A couple of the bottom corners wanted some extra clamping up before the drilling, like so.


Many of the screws were so far gone they wouldn't readily unscrew; I had to wedge a small screwdriver under their heads as a pry bar, so I could coax them to start out to where I could get a pair of side-cutters on their shanks, and help them come all the way out. Here's what's left of the screws.


Whoever manufactured this planter didn't even bother to use the appropriate coated screws. That screw in the middle is really far gone -- it's a 'screw' in name only.

Anyway, aside from the one 'iffy' dry-rotted bottom corner, this has turned out well. Tomorrow, I'll trim and seal the dowel ends, and this planter can return to 'active' service.

- - -

Finishing Up -- SUNDAY, JUNE 2, 2013

Here's a view of two dowel ends trimmed flush.


I have a modified Dremel router attachment that's a great help for that sort of work. See this post for a look at that.

All that's left is to seal the ends of the dowels, and this planter can return to work.

- - -

All Done -- MONDAY, JUNE 3, 2013


With that  planter out of the workshop, I can start in on this one.


I swear the makers of these things make it their business to ignore every known rule of sound construction with wood.

This planter's construction doesn't lend itself to the repair method I used on the first planter. I've got half a mind to just give it two bandings with stainless steel wire. The appearance of that won't be the best, but the alternative is to devote a huge amount of time and effort to an item that just doesn't deserve it.

- - -

That thought reminds me that I have a ClampTite tool stashed away that I don't think I've ever used. It might be just the thing for this.

- - -

Here it is,


along with plenty of stainless steel wire that my dad left me.

- - -

Safety

Before I proceed with this, a note about safety is in order.

Wire can be a dangerous material to work with. Eye protection is strongly advised. The free end of a length of wire can flail about in unpredictable ways, and a tensioned loop of wire that breaks can do great harm.

- - -

Here's the tool's initial setup.


Someone who's skilled at knot tying would probably find this easier than I'm finding it. I'm pretty good at spatial visualization, but I find this challenging.

What I have to do next is crank that wingnut to begin tensioning the loop of wire. I may run out of travel, and have to reset the wire's anchoring on the tool. We'll see how this goes.

- - -

Here's the outcome.


The wire broke off before I could cinch up the ends more, but it looks like it's going to hold. The tool does work as advertised, but I need to learn how to use it more skilfully. I've got one more loop to install low down. I'll see if I can do better with that loop's termination.

Here's the second loop done.


On that one, I took the tool away before I could break the wire, and twisted the ends some more with pliers. I'll tuck that termination inward so it's not a hazard.

I hate watching videos, but I may have to to better learn the use of the ClampTite tool. The printed instruction sheet that comes with the tool is pretty lame.

Anyway, I appear to have accomplished what I meant to, and the result is not too hideous.


- - -

Addendum -- Good ClampTite Instruction -- TUESDAY, JUNE 4, 2013

I watched as much as I could bear of two videos, and learned nothing useful. Then, I got lucky and found an excellent sequence of photos showing how to do correctly what I was trying to do here. Photos 15 through 18 illustrate correct termination nicely. What I didn't understand clearly before is that the single twist of the tool at the end of tensioning is the termination -- that's it; any further twisting is done with the tool taken away, and is only for the sake of tidying up the termination.

Note that while the photos show multiple turns of wire, the job is still considered a 'single' wrap because of its termination method. This page clearly shows the difference between 'single wrap' and 'double wrap' terminations.

- - -


Addendum II -- Embellishments To The First Planter -- WEDNESDAY, JUNE 5, 2013

We decided that a proper planter really ought to have a bottom, so I installed one, like so.


Also, it dawned on me that if the planter had feet, even small ones, its bottom would dry out a lot faster after a rainfall, and wouldn't be nearly so prone to rot. I happened to have eight little furniture feet on hand that looked ideal, so here they are installed.


The feet are only 7/32" tall, but that's all that's needed to elevate the planter enough that it will dry out quickly underneath.

And with that, I'm calling this repair a done deal.

- - -

Update -- WEDNESDAY, JANUARY 28, 2015

I was walking past the wire-bound planter the other day, and something didn't look right. I looked more closely and could see that the thing was collapsing -- it's rack inside the bottom had fallen away, and the wire bindings were loose. I was able to twist the upper wire tighter to some good effect, but the lower wire broke when I tried to twist it tighter. I didn't want to have to replace an entire length of wire, so I repaired the broken lower wire binding with a small turnbuckle I had on hand. Here's how that came out.


It's certainly not as discreet a wire join as you get from the ClampTite tool, but it's much easier to execute and much more robust.

I'll reconstruct the planter's rack inside, and the planter should have another season in it at least.

# # #


# # #

Friday, May 24, 2013

Vandals!


Between the squirrels and the raccoons around here, it's hard to keep a bird feeder in one piece. I'll dismantle that wreckage, and see if there's a way I can reconstruct the shattered tray/platform.

- - -

It's a start.


There are all the pieces I could find, reassembled and glued together with CA adhesive. I'll make a sheet aluminum disk for the underside. That will serve to at least cover the voids, and as reinforcement for the glue-joined pieces.

- - -

Here's the disk cut to size.


The masking tape was for marking the perimeter with a pencil in a compass, so I'd have a nice, high-contrast line to follow with the snips. The centre-hole was cut with a small fly cutter. That aluminum is 0.024" thick, so it was pretty easy material to work with.

I'll get everything clean, rig a gravity clamp and bond the metal disc to the underside of the pan with clear silicone sealant.

- - -

Here's the underside repair completed.


As a further reinforcement of my lamination job, I drilled through in several places and tapped the holes for short 6-32 screws. I installed the screws with CA adhesive applied as a threadlocker. I also drilled through the aluminum at all of the original drainage hole locations, and deburred all of those holes. Here's a view of the top side.


I'll fill those two voids with slow-setting epoxy. When that's fully cured, I'll repaint it, and I'll have a serviceable bird feeder base pan again. I doubt that the birds will mind the flaws.

- - -

Here it is, almost paint-ready.


The epoxy fill turned out fairly well. The reddish stuff is autobody spot putty that I'd smeared over all the seams and sanded. I have a little more of that to do on the outside of the rim, then I can repaint the thing. It won't be flawless by any stretch of the imagination, but it'll serve.

- - -

All Done -- FRIDAY, JUNE 7, 2013

Here it is fully repainted and reassembled.


All I need now is a good photograph of 'customers' dining at it, and this post will be well and truly done.

# # #


# # #

Sunday, May 19, 2013

A Garden Ornament With Broken Spot Welds


It's quite a nice ornament, but it's well and truly broken. The only practicable way I can think of to repair that is with a couple of twists of wire through holes drilled in the pan on either side of the 'ring'. I have a fine hank of stainless steel wire that I inherited from my dad that will provide me with suitable wire. Here goes.

- - -

That turned out reasonably well.


The only downside is the appearance of the twisted wire ends that there's no concealing, but they're not too objectionable.

Stainless steel wire is ideal for this sort of repair because it's so tough. You can really twist it tightly without fear of breaking it. Copper and steel wire are also useful at times, but you have to be more careful about how tight a twist you make. Toward the left side of the above photo you can see where I used some 20 AWG enameled copper wire to reattach a 'bee' that broke loose. I added some CA adhesive to those two repairs to strengthen them.

Anyway, it's as done as it's going to get -- 'time to get it out where it belongs.


And there we are. That ornament won't be coming apart again.

# # #


# # #

Wednesday, May 8, 2013

Advice About Locking Up


If you take your workshop seriously, as I do, arrange to be able to LOCK IT UP SECURELY!

Family members are liable to treat it as a free tool rental outlet, whose tools grow back in the night like mushrooms. If you value your tools, your peace-of-mind, and your good relations with family members, LOCK UP YOUR WORKSHOP LIKE IT'S A BANK VAULT!

# # #


# # #


Saturday, May 4, 2013

A Band Clamp Application


I bought this band clamp long ago at Princess Auto, and it sat in a drawer unused until today.


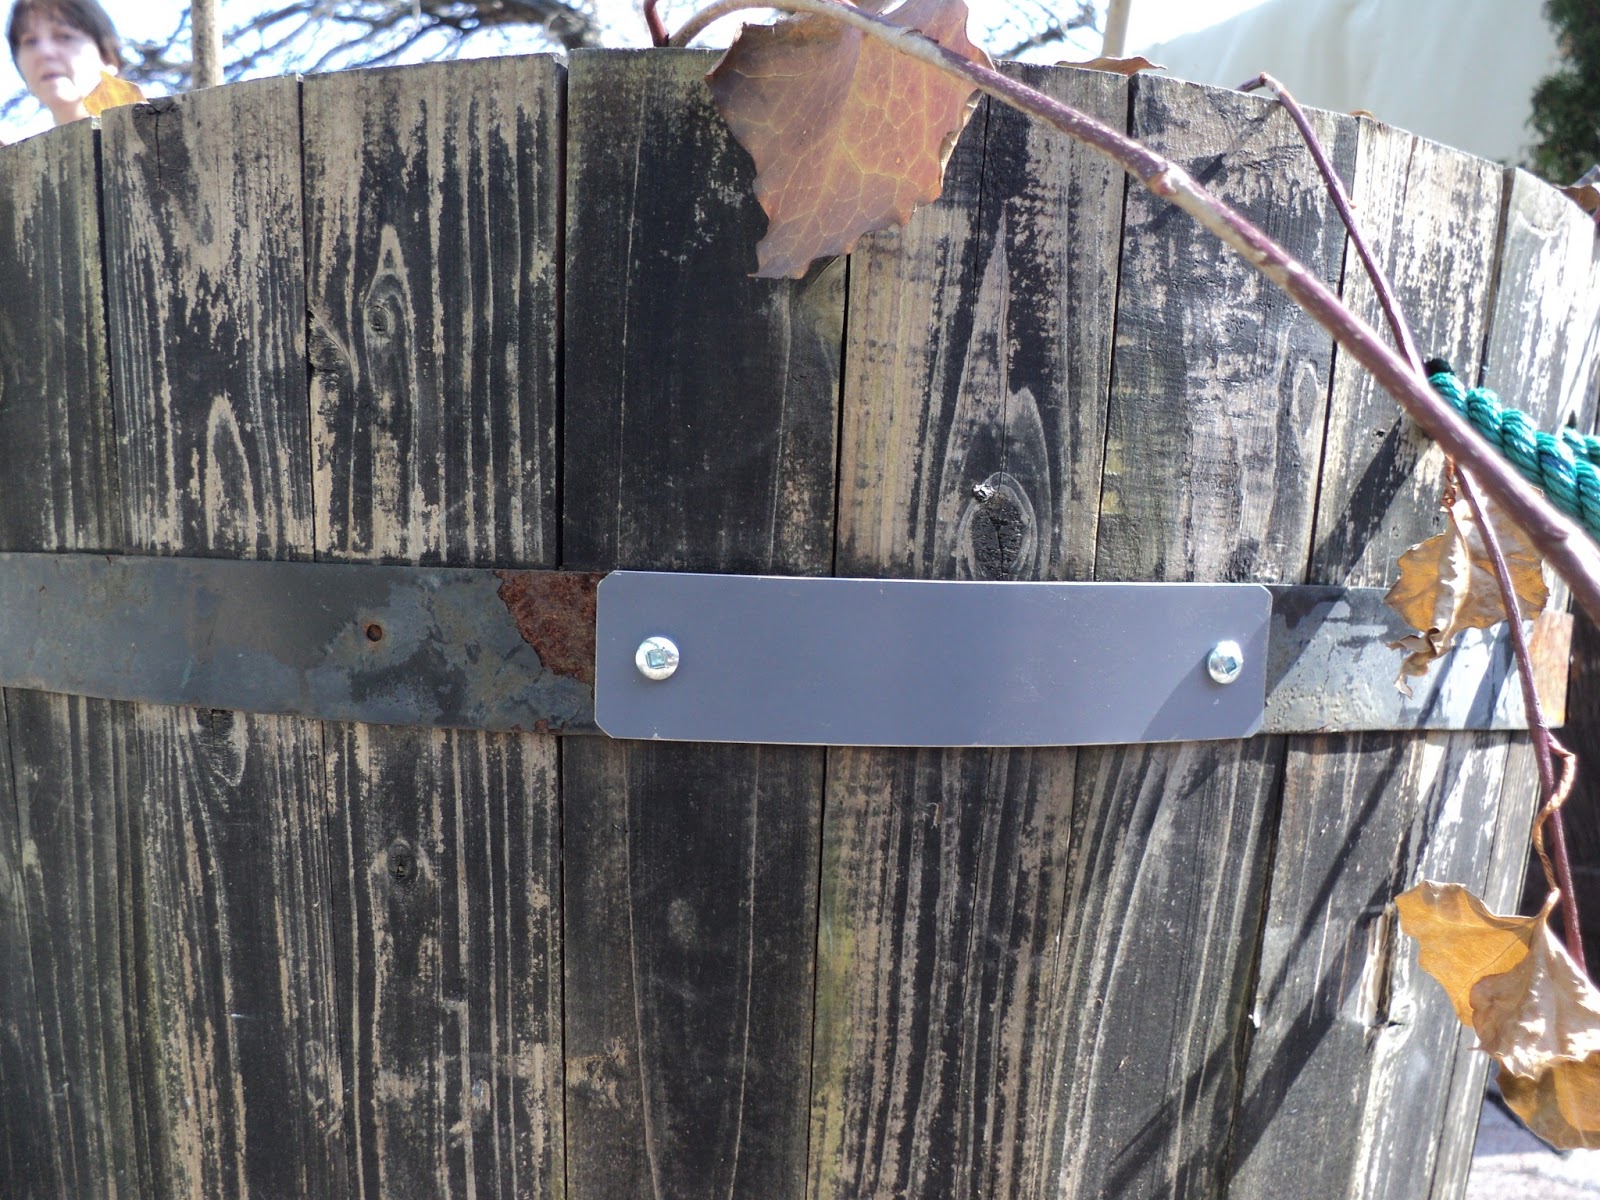
Today, a little repair job came up that put the band clamp to work to fine advantage. One of my wife's planters had a steel band rust through at one place, and this clamp was just the thing to cinch up the planter's perimeter, while I fabricated and installed a repair patch. Here's a view of the clamp on the job.


(Needless to say, the three corner braces that came with the clamp weren't needed for this.)

After using up all of the clamp's screw travel, I still wanted to cinch up the planter's perimeter more if I could, so I applied a ratchet strap lower down, tightened that, and then reset the band clamp and retightened it, like so.


That got me as satisfactory a cinch-up as I was ever likely to get, so I proceeded with the patch job, and ended up with this.


It'll do. If my wife gets two more years from that planter, she'll be happy.

Anyway, the band clamp proved to work as advertised. It's a well-thought-out, well-made tool.

- - -

Band Clamp Specs

Princess Auto Catalogue No. 8088767.

Strap Width: 15/16".

Strap Length: 10' nominal; actually almost 11', but some length is, of course, 'lost' to the clamp's mechanism.

Clamp Screw Travel: 2 1/8".

Note: For stressful applications like the one outlined above, keep the screw well oiled.

# # #


# # #