Saturday, May 26, 2012

Paving Stone Retention Strip

I'm not a stonemason, and I didn't know this stuff existed.


Pictured is the foot of a newly repaved ramp that leads away from my workshop's door. ['Sorry for the poorly lit photo. Sunlight can make for wicked shadowing effects.] The mason left that gap for drainage -- I just have to add some spikes to the retention strip, and fill in the gap with clear gravel.[1] (The mason ran out of spikes; I found I had a few suitable ten-inch ones on hand.)

At first glance, I thought that retention strip was made of iron, but it's a black plastic material. The barrier edge is 1 5/8" tall; the anchoring tabs extend 2 7/16".

Neat stuff.

- - -

SUNDAY, MAY 27, 2012

Update

We got something called 'river stone' for filler. It's all rounded, eroded stones rather than pointy-cornered, angular gravel bits. We got the 3/4" size of stone. Here's a view of the gap filled with 3/4" river stone.


- - - 

Note:

[1] 'Clear gravel' is gravel that's free of sand or tiny pieces of rock -- it's just chunks of gravel of a certain size. It seems that the sizes available are 1/2" and 3/4".

# # #


# # #

Refitting a Big Gate's Crossbar

We had some retaining wall work done at the back of the house, and the stonemason had to remove a crossbar from a big gate so he could get his Bobcat backhoe in. The retaining walls are done, so now I have to reinstall the crossbar unassisted. (There's also a run of downspout that I have to reattach properly.) It's a pretty safe bet that the gatepost that's not bolted to the house has leant a bit while the crossbar was missing. We'll see how this goes. Here's a view of the unemployed crossbar lying by the fence.


And here's where it has to go to get its job back


A big c-clamp provided a way to 'park' one end of the bar while I got a bolt in place at the other end.


I'll get both bolts in place at the house side, then I can see what I'm up against at this end.

- - -

That was too easy. It went back together no sweat, it closes properly and the latch-bolts still fit.


I was expecting that to be an ordeal. Some sort of reverse Murphy's Law must have been in effect; I hope it sticks around.

# # #

FEEDBACK

# # #

Monday, May 21, 2012

Pleasantly Surprised by the Home Depot's Plumbing Section

The plastic flush lever in my basement bathroom's American Standard toilet tank broke a long time ago. Here's a view of the broken lever out of the tank.


'Not much chance of repairing that. I replaced it with a salvaged metal lever that I had on hand, like so.


That repair job served its purpose, but it was a finicky thing to deal with when the bead chain would periodically break and need repair, and I could never get the action quite right -- the lever needed to be held down for awhile for a flush cycle to fully execute[1]. I finally got fed up with it and went shopping for a proper replacement lever. (And getting me to go 'shopping' is like getting a cat to go fetch the paper, so you can be well and truly assured that I was fed up with the salvaged, jury-rigged lever.)

Owing to the toilet's age, I had the notion that a replacement lever might not be easy to come by. I figured I'd try the plumbing trade supply outfit near where I work -- that they'd be more likely to have one than the Home Depot would.

I went there after work one day with the old, broken lever, and they didn't recognize it; couldn't supply me with one. Their attitude was that something that old may well be obsolete and unobtainable.

I had nothing to lose by trying the Home Depot, so I went there a week later and they had it, like so.


They had them in white and chrome, but not in grey. I took a chrome one.

- - -

Installation is pretty straightforward. One little wrinkle is that the threaded ferrule is a left-hand thread, which is always a bit disorienting. Also, it's easy to get the plastic nut started cross-threaded. The ferrule has flats on it so it 'indexes' to its hole in the tank's wall, but the indexing is sloppy and ambiguous. Biasing the thing fully CW looked like the way to go -- the left-hand thread makes it want to go that way anyway. Attach the ball/bead chain[2] so it has slight, but minimal, slack when the flush valve's flapper is seated, and the lever's action will be correct. Here's how it looks when it's ready to go.


That works fine now; the lever's action is 'press-and-release' as it ought to be.

Anyway, I must give the Home Depot credit where it's due -- they came through for me on that when the plumbing trade supply didn't. I'll revise my opinion of the Home Depot upward accordingly.

- - -

Notes:

[1] It's a very simple looking mechanism, but it's remarkably difficult to adapt another lever to; the geometry and dimensions of the lever/chain arrangement have to be just so, else it will not work as designed.

[2] Some call it 'ball chain'; some call it 'bead chain' -- whichever.

The chain used here is stainless steel. Ball/bead chain is one of those things that's sized according to some arcane, arbitrary numbering system. This chain has 1/8" diameter balls, which makes it #6 chain. There's an excellent table of chain sizes/specs here.

# # #


# # #

Sunday, May 20, 2012

A Muffler Hanger Repair

This is the best thing I know of for rigging a muffler hanger when a welded-on hook rusts away to nothing.


The screw is 10-24; that fits easily through the chain's links. A #10 SAE flat washer goes under the screw's head and under the nut. The nut is a nylock self-locking nut. (1/4"-20 just fits through the chain's links as well, but the fit is too snug, and it will jam when you begin to tighten it. M6 might work, but I don't have any M6 screws that are long enough.) There's more chain there than I'll need; I'll just lop off the extra when I've got the installation partly done.

Installation on my '99 Ford Ranger was easy. The hanger affair above the muffler that's attached to the underside of the box gave me a secure place to drape the chain over. Then, it was just a matter of getting the 2" long screw in place and the nut started on it. At that point, I lopped off the extra chain with a bolt cutter. I tightened the screw just to the point where the chain was beginning to take the load off the other hangers in the system, and I was done. Here's how it looks on the truck.


I'll check the chain's tension in a week, tweak it if need be, and that'll be a long-lasting, trouble-free repair.

# # #


# # #

Expanding Foam Gap Filler

We're having the house's back door stoop reconstructed. When the stonemason dismantled the old stoop, some mortar voids in the masonry block basement wall were revealed, like so.


'Not the sort of thing that one ought to leave as is. A can of expanding foam gap filler is in order.

I probed in those voids with a length of coat-hanger wire, and the voids appear to be bottomless. We'll see how this goes.

- - -

The voids swallowed a whole can of filler. Had I aimed the nozzle downward, I probably would've needed a case of twelve or twenty-four cans. I aimed the nozzle to the sides and rear of each cavity, so the stuff would cling and build at the top of the cavities.  Here's the outcome.


No one will accuse me of having done that neatly.

It says on the can that the stuff fully cures in eight hours, so tomorrow morning I can trim off the excess and make it look right.

- - -

I took a look at it about half-an-hour after that last photo was taken, and the stuff had 'grown' some more.


It's just as well that the job took the entire can. The instructions printed on the can warn you that you're only likely to get one use out of it -- the nozzle will clog when the can gets set aside after use. That may be the single most important thing to know about the foam. When you have need of a little of it, try to find use for the entire can, else you can waste a great deal of it. Once the nozzle clogs, you'll have no way whatsoever to salvage the remainder of the can's contents.

- - -

MONDAY, MAY 21, 2012

All Done

The cured material is easily trimmed flush with a small,sharp utility knife. Here's the finished job.


# # #


# # #

Backyard Archaeology

We've had some excavation work done at the back of the house for new retaining walls, and the backhoe unearthed this paleolithic[1] wheel.


And if you think that looks rough, here's the other side.


I'm itching to see what's underneath all the crud. I'll leave it to soak in a bucket of water for awhile, and clean it up.

- - -

MONDAY, MAY 21, 2012

More Crud


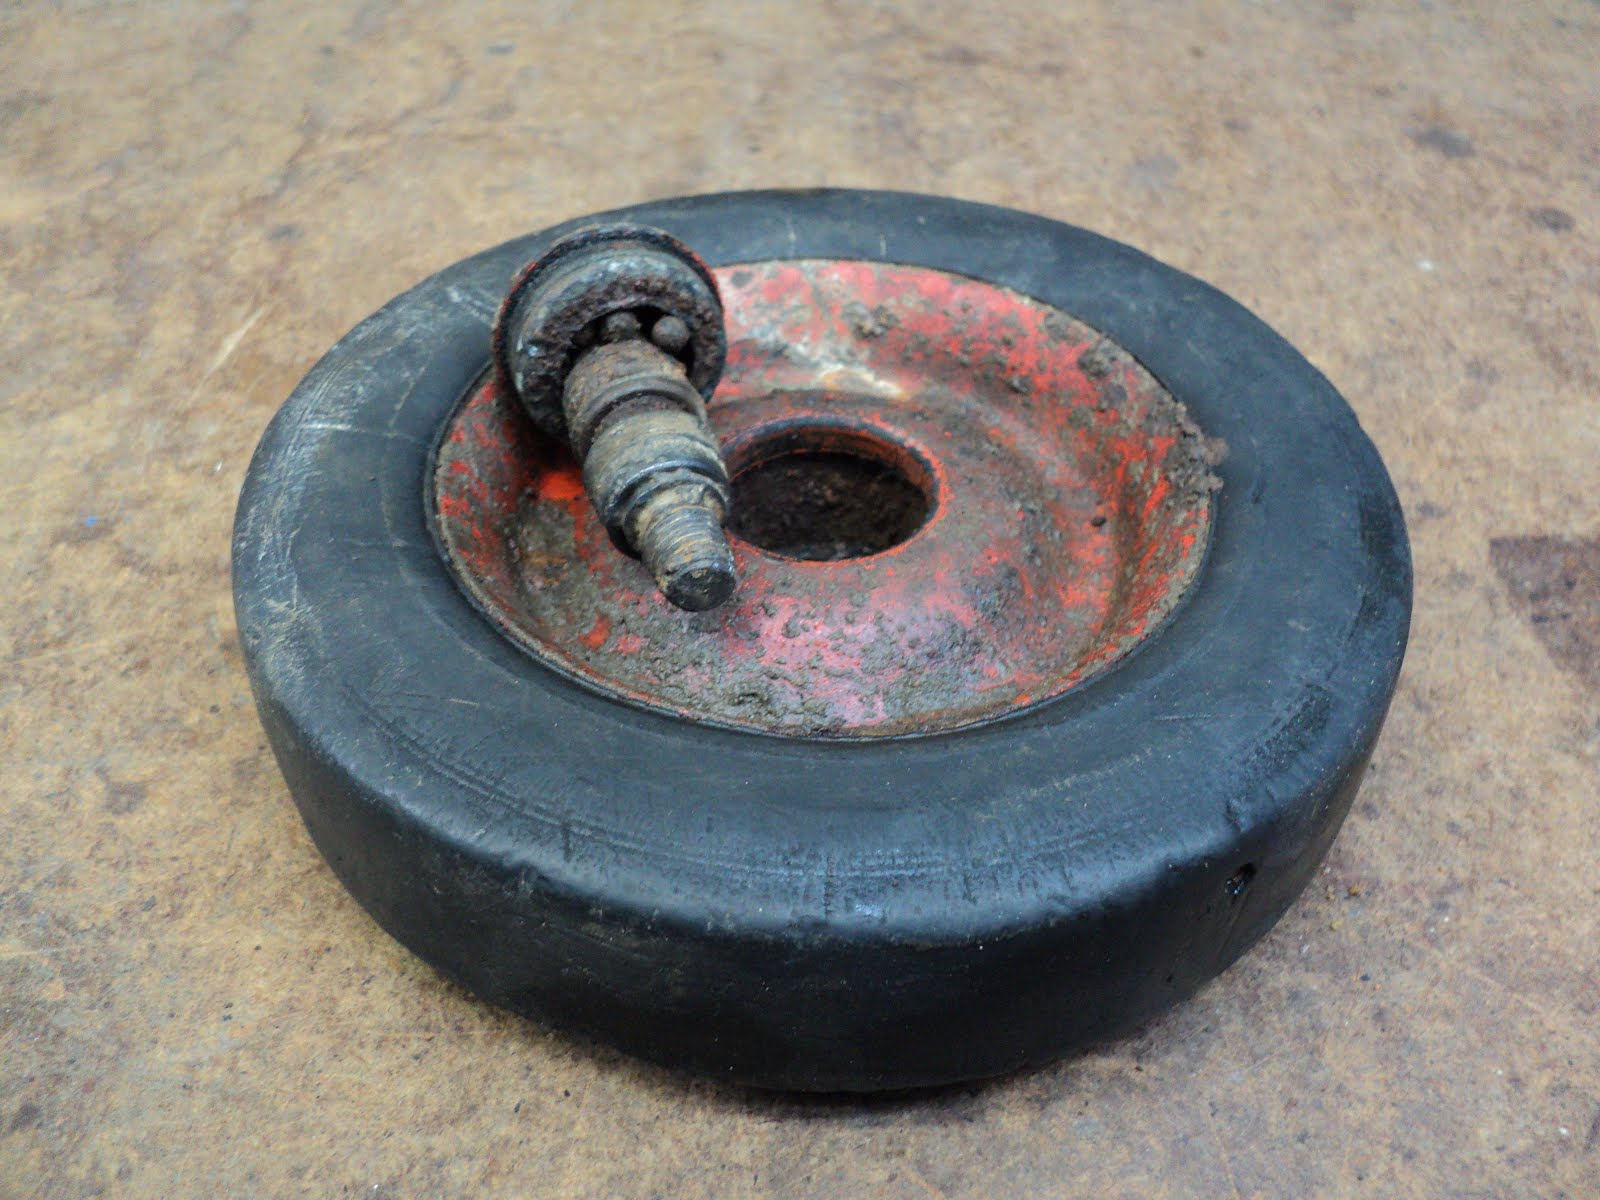
The soil washed off easily, but the remaining crud appears to be some sort of weird, hard deposit.

The tire's diameter is 6"; width is 1 7/16". There's no maker's name on it anywhere. Further progress will be by chiseling and scraping.

The Axle

I had to apply my impact wrench to the axle's 3/4" hex head to get it to budge. Then knocking it with a hammer got me to here.


That bearing is a ruin, and the balls for the other side's bearing are nowhere to be seen.

That style of flanged, pressed-steel bearing is still manufactured; Freeway Corporation is one maker I'm aware of.

I'll press out the outer bearing race that's still in the other side of the wheel, and see if I can get the inner races off the axle. That may be a bit of a challenge.

- - -

TUESDAY, MAY 22, 2012

The Axle Stripped Naked

[Whoops! I appear to have momentarily confused this with my porn blog. 'Sorry.]

I got everything off the axle, and the axle wire-brushed and its thread chased. Here's a view of that.

'Tricks' are for dogs to do, so I won't say, "There's a trick to that." I will say that there's a method.

I set up my hydraulic press to press the races a tiny bit further onto the axle. By doing that, I was able to break them free of their 'freeze'. Then it was possible to coax them off little-by-little with a hammer and chisel, nudging them along first one side, then the other. The key to getting rust-frozen parts apart is to get them to budge, even just a little, in any direction. Once a rust-frozen part has budged, odds are good that you can get it loose

The axle is 1/2" diameter, with a 1 1/2" bearing length. The thread is 3/8"-16. That shim washer was under the hex head of the axle. Freeway Corporation's part number ASF-132-1B looks like it will do for replacement bearings.

- - -

MONDAY, JULY 2, 2012

Further Progress

It turns out that my lathe's four-jaw chuck has adequate capacity to accept the wheel, like so.


That will be most helpful.

- - -

SATURDAY, JULY 28, 2012

Some  More Progress

Here's the 'good' side of the wheel after various abrasion methods, and a swabbing with lacquer thinner.


That's probably going to have to do for that side. I'd have to make a career of this thing to get it perfect.

By the way, I cheated a bit to get the wheel well-enough centred in the chuck. I used a bull-nose centre in the tailstock to position the wheel, then I carefully tightened the chuck's jaws onto the tire, like so.


That didn't result in a perfect centring job, but it was good enough for what I was doing, and it saved a lot of fiddling.

The other side of the wheel is in worse condition, and it has some rust holes that will have to be filled. I'll see what I can do with it.

- - -

Painting the Hub -- SUNDAY, DECEMBER 2, 2012

I've filled the rust holes with five-minute epoxy and re-sanded that side of the hub. The thing is as paint-ready as it's going to get, so next is to mask one side for painting. At first, I tried applying masking tape all the way around, like so.


When I trimmed around the hub and removed the unwanted tape, what I had was a botched masking job. Without an unambiguous visual cue for beginning to cut the tape, I'd done a surprisingly poor job of keeping the cut exactly at the edge of the hub. So I started over, applying and cutting tape one section at a time, like so.


That went well, and got me a fully masked wheel after five successive applications of tape.


When the cutting is done, you have to tuck down the cut edge of the tape all around with a fingernail and the back edge of the knife blade, so the tape is tightly down on the tire.

Here's a view of the wheel fully masked and just painted.


And here it is with the mask removed.


I can't claim that it's an absolutely flawless job, but it's pretty good.

Now I just have to repeat the procedure for the other side, leave it for a week for the paint to harden, and I can install the new bearings.

- - -

All Done -- SATURDAY, DECEMBER 8, 2012

Here it is with its new bearings installed and the axle painted.


The bearings dealer cross-referenced the Freeway part number I gave him to a General Bearing P/N 31863-88. That's an exact match for the original bearings, whatever make they were.

With the bearings installed, I was finally able to get the width dimension of the hub at the axle bore -- it's 1 15/32".

So, there we are; quite an improvement over the first few photos.

- - -

Note:

[1] That may be the first time in my life that I've ever used the word 'paleolithic'.

# # #


# # #

Saturday, May 19, 2012

PPAt -- The Portable Personal Ashtray

Meet PPAt -- the Portable Personal Ashtray. Here's PPAt open for business.


And here's PPAt closed for carrying.


That truss head 8-32 screw has a nylock self-locking nut on it, so I can tension the shutter's closure swing-action.

Where I work, my ashtray was a five gallon empty steel paint pail with a lid with a small hole in it by the outside door where my smoking lounge is. The other morning, the lid was gone. Some bozo must have been 'shopping' for a pail lid, and liked the price of that one. Since the aesthetics of a wide open five gallon ashtray leave a bit to be desired, I decided to functionally replace the pail with this item.

The tin is the small (32g) size of shoe polish tin. It fits nicely in a vest pocket. The hole in the lid ought to be a little bigger, but I only have two sizes of chassis punch, 1/2" and 1", and 1" was way too big.

Anyway, this'll work. Come Tuesday, the pail gets consigned to the big green bin out back.

- - -

Update -- TUESDAY, JUNE 19, 2012

The 1/2" diameter hole size has proven not to be a detriment at all. The ashtray does its job beautifully.


# # #


# # #

Sunday, May 13, 2012

Cotter Pin Replacements

This sort of thing appalls me.


Pictured is the end of a bucket pivot pin on a Bobcat backhoe. That may be the lamest cotter pin replacement I've ever seen in my life. (The backhoe is in my backyard for a retaining wall job.)

That big pin wants a 7/16" diameter cotter pin through it. I have an assortment of pretty big cotter pins on hand, but no cotter pins that big.

The best I can do here for a proper replacement is a 3/8" diameter bolt, with a nylock nut on it. Here's a view of that fix.


As ersatz cotter pin replacements go, that's a pretty good one. It sure beats a length of insulated copper wire. Here's a more contextual view.


I'll leave the other 'cotter pin' be. At least it has some substance to it.

- - -

Cotter pins are a favourite hardware item of mine. Any machine with a cotter pin in it somewhere is ok by me. Any machine with a cotter pin in it is likely to be accessible; by 'accessible' I mean comprehensible to a human being of normal faculties and intelligence -- accessible without several kilobucks worth of microprocessors and software.

The laptop computer I'm writing this on has no cotter pins in it. Its workings are inaccessible to me. At the same time that it connects me to the world with this fabulous blogging software, it alienates me -- it renders me powerless to set it right should it go wrong. Should my laptop computer fail on me, I sure as hell won't be able to fix it with a cotter pin.

- - -

Anyway, Machinery's Handbook (21st edition) has a nice summary of fractional inch cotter pin specs on page 1114. Here's a photo of the table.


I hope that doesn't get me arrested for copyright infringement.

- - -

By the way, the name 'Cotter' is from Dr. Rudolph Cotter, who introduced the pin to the world in 1834.

# # #


# # #

A Failed Birdhouse Hanging 'Eye'


Pictured below is the roof-peak of an ornamental 'birdhouse', with a failed hanging 'eye'.


When I see things like that I wonder, "Why did they even bother?"

That 'eye' for hanging the thing is just a bit of twisted wire that was force-fitted into the peak of the roof. It couldn't possibly last. I'll replace that with a proper screw-eye, installed with epoxy in the hole, and smeared on the screw-eye's threads.

- - -

And here we are. A No. 7 screw-eye with a 1/2" threaded length fit nicely, and the addition of five-minute epoxy seals and secures the screw-eye's thread in that end-grain installation. (End-grain screw thread installations are always an iffy proposition -- best avoided if possible.)


It's also a good idea to add a swivel, as I've done here. The swivel ensures that torque forces don't get applied to the screw-eye when there's a wind blowing; the birdhouse is free to spin instead.

- - -

And here is is back on its hook in the garden.


# # #


# # #

Saturday, May 12, 2012

A Belt Repair

One never ceases to be amazed at the rubbish that gets mass produced and sold for actual money. This belt is a fine example.


The tongue has delaminated. The thing is useless in that state. I'll lop the ruined portion off and make the belt a new tongue from a scrap of leather belt material.

- - -

Here's the new tongue with its rivet hole locations laid out on masking tape.


(Masking tape is an excellent lay-out aid for difficult-to-mark surfaces.)

Even with accurate lay-out markings, punching leather accurately is not easy. The punch conceals your exact centre point as you're getting the punch in place, so you sort of have to interpolate centre from the punch die's relation to the cross-hairs.

Here's the punching done for the rivets.


It's not a perfect job, but it's pretty good. It'll do.

Now I'll clamp the punched tongue to the cut-off end of the belt, and use it as a template for punching the belt-end's holes, like so.


I'll be riveting this with 1/8" 'Pop' rivets. Rivet holes in leather should always be sized so they're a snug fit for the rivets. Leather punch dies are typically metric dimensioned, so using a 3mm punch for 1/8" rivets works nicely; 3mm is just shy of 1/8".

- - -

And here it is all done and ready to go.


And here's a view of the back side.


The riveting was done a little differently from normal practice. The standard back-up washers for 1/8" rivets are 10mm outside diameter and 1mm thick. I didn't care for the appearance I got from that at all; the washers were much too prominent.

GC Electronics' No.4 plated steel flat washers fit 1/8" rivets perfectly, and they're smaller and thinner than standard back-up washers. I used them under the rivets' heads, as well as at the 'peened' end of the rivets, and the appearance was much better. After setting the rivets, I punched out the mandrel ends and peened the rivet ends over some more with a hammer, to minimize the projection of the rivets at the back side.

I'm quite pleased with how that turned out. I wouldn't wear the thing to dinner at Buckingham Palace, but the odds of me being invited there are slim to nil, anyway. For work-wear with my jeans, it'll serve fine.


* * *

Update -- FRIDAY, MARCH 29, 2013

The repair has held up fine through almost a year of wearing the belt, but a new problem has come up -- the buckle has torn away at one of its two anchor points, like so.


I'll have to cut off the ruined end of the belt, and restore the length of the belt by riveting on a short length of proper belt leather, Then, I can reattach the buckle and get further service from the belt.

- - -

The buckle is an exquisite piece of hardware. Here's a view of it off the belt.


Two M3 setscrews anchor the end of the belt in the ferrule, and the buckle is reversible -- it can swivel around 180 degrees. (The belt was meant to be black/brown reversible.) If the synthetic, laminated belt material were as good as the buckle, the whole belt would last forever with no attention.

- - -

Here's the replacement belt-end cut to size, laid out and punched. It's 1 1/8" x 2 1/2" x 3.8mm thick. (That's masking tape on it that I applied as a layout aid.) It's not a great match for the original belt material, but I really don't care; this is never going to be a 'Sunday-go-to-meetin' belt.


- - -

A Small Defect In My Riveting Job

I used the small diameter back-up washers on both sides, just as I did for the first repair to this belt, but I got a poor result on the softer side.


The small washers result in too much squeeze-down of the resilient material, and it's not possible to do a satisfactory final peening job. I'll remove those first two rivets I installed at the right, and redo them as at the left.

The end of the belt has to be notched to accommodate the head of the swivel pin inside the buckle's ferrule, and two small holes punched for the setscrews. Here it is with that bit of work done.


The notch was most easily made by using a 5mm gasket punch to create a rounded bottom for the notch, then cutting the two straight sides of the notch. I drove in the two setscrews far enough that they made pronounced dimples to guide a 2mm leather punch die. It's ready for final assembly.

And here it is, ready to wear.


The belt's effective length dimension is unchanged from what it originally was, so it fits fine.

# # #


# # #