Sunday, April 29, 2018

Bosch Colt Model PR10E Palm Router


I've acquired a Bosch Colt Model PR10E palm router. It was on special at Canadian Tire, and I've long been meaning to get a palm router, so I snagged one while it could be had for $119.99 CDN. It'll be just what I need for all the rounding over of edges on the rocking horse that I'm building. Here's a view of the router just out of its box.


Note the rectangular sole plate. It's attached to the router's base casting by four M4x8mm pan head screws in oversize holes, so the sole plate can be 'floated' about to centre its circular opening around the router's spindle axis.


If, like me, you're fussy about sole plate centring and you dislike guesswork, Bosch offers a centring cone, P/N RA1151. I got one from Amazon for $11.38 CDN.


Inside the bag are two pieces -- a steel spindle and a plastic cone.


Press the two pieces together by hand and you have this.


A jig for centring a router's sole plate to its spindle. Here's a view of the jig installed.


I can't say that I'm all that impressed with the centring cone; I found it a bit awkward to put to use.

My main reason for acquiring the centring cone was that I wanted to be able to be certain of having the sole plate's edges centred around the router's spindle axis, for the sake of straight-edge guided cuts. But there's a fly in that ointment -- the sole plate is metric dimensioned,[1] not fractional inch. Setting up such cuts with fractional inch router bits could be a little challenging.

Anyway, perhaps I'm being too picky about a tool that is essentially just a trimming router[2] for use with bearing-piloted bits. For that sort of work, an 'eyeballed' sole plate centring is entirely adequate.

- - -

NOTES:

[1] The sole plate is 88mm x 96mm. That works out to about 3 15/32" x 3 25/32" -- not the tidiest of fractions to work with. 3 1/2" x 3 3/4" would be nice.

[2] That's a little unfair of me. There's an awesome array of accessory bases available. The tool's potential versatility is amazing, as is the amount of money that one could spend.

# # #


# # #

Friday, April 27, 2018

A Reciprocating Electric Engine


'Not sure why I'm posting this -- nothing better to do at the moment, I guess.

Years ago I built this reciprocating electric engine as a lark, and an exercise in electronics design.


Here it is running.


Engine speed is in the neighbourhood of 800 rpm. All moving parts want plenty of WD-40 lubrication for the engine to run smoothly and fast.

And here's a view of the interior of the power supply/control box.


I got the idea for the engine from an old industrial arts[1] textbook. (Copyright date is 1964.)


My physical execution of the engine isn't as elegant as that in the book, but it works.

My first iteration of the engine was functionally pretty close to what's in the book. Power was from a six volt lantern battery, and coil switching was mechanical by way of a lever-fitted microswitch. That worked after a fashion, but the mechanical switching tended to 'float' from inertia at top engine speed. So, I decided to give the engine fully electronic coil switching, and a line-powered power supply that would do away with the lantern battery. The result is seen in the first three photos above.

I have a rough, half-baked schematic sketch for the thing. I really ought to clean it up and publish it here. If anyone is interested, let me know and I'll get right on that.

- - -

NOTE:

[1] There's a term that you don't hear anymore, 'industrial arts'. The school I attended for grades seven and eight had industrial arts courses -- woodworking and metalworking. The shops were well-equipped and the teachers were superb. That's about the only part of my 'education' that I look back on fondly. The shops are abandoned now. Progress.

# # #


# # #

Thursday, April 19, 2018

An Arduino Metal Detector


Casting about for metal detector circuits, I came across this plan at circuitdigest.com. I have only the dimmest understanding of the circuitry, and I don't understand the Arduino sketch code at all.

I fabricated a coil and breadboarded the circuit. It does work after a fashion, but it strikes me as a peculiar, flaky device. Here's a view of what I have so far.


Never mind the presence of metal, the least disturbance of the coil is apt to set the buzzer sounding off and the LED flashing.

Placing the coil on a metal object yields a hearty buzzing and flashing for a few seconds.


If the coil is left undisturbed on the metal, the buzzing and flashing cease.

If the coil is then removed from the metal object, the result is intense buzzing and flashing for a few seconds.


Eventually, the buzzing and flashing settle down and the thing goes quiet, except for the occasional, random buzz and flash for no perceptible reason.

The device doesn't so much respond to the presence of metal as it responds to disturbance by metal either entering or leaving its field.

I'm thinking to do up a halfway proper prototype with a long shank and a handle and all, that I can take out in the backyard and probe around with, to give the circuit a fair trial. We'll see.

- - -

A Prototype -- FRIDAY, APRIL 20, 2018

Here's what I came up with for a quick-and-dirty prototype.


I took it outside for a trial, and my verdict is that the thing is useless. The device is always randomly sounding off -- a random noise generation circuit would yield about the same effect. The device is just too flaky to be of use.

Anyway, I now have a basic framework on which I can try out other approaches. There are surely better ways to go about constructing a metal detector.

# # #


# # #

Wednesday, April 18, 2018

An Arduino Temperature/Humidity Monitor


I wrote a brief post a while back about my new Smraza Arduino kit. In all the projects that accompanied the kit, I finally came across one that looks useful to me -- a temperature/humidity monitor. Here are views of that breadboarded up and working.


Next up is to get it working with an Arduino Nano, then I'll see about packaging it up into a hard-wired, enclosed unit that I can put to permanent use in the house.

It's too bad that the DHT-11 sensor's range only goes down to 0°C; I'd like to have a unit for outdoor temperature sensing as well.

- - -

Update -- WEDNESDAY, APRIL 18, 2018

I got the monitor to work with an Elegoo Arduino Nano from Amazon.


At first, I could not get the Nano to accept an upload; I'd get an error every time I tried. I fiddled and monkeyed about with the software, not really knowing what I was doing, then out of nowhere it started to work properly. Pure voodoo.

Anyway, now I can get on with designing a power supply and packaging arrangement.

- - -

Power Supply Built -- WEDNESDAY, MARCH 13, 2019

See this post for the regulated power supply that I made from a 9V AC adaptor and an LM317L three-terminal regulator.

- - -

A Finished, Packaged Temperature/Humidity Monitor

Here's a view of the unit installed and working.


The enclosure is an enamelled steel storage bin that I got from the dollar store. The bin is about 5 1/2" square by 4" deep. That's a generous size that makes for relatively easy prototype construction. I added 3mm threaded inserts and screws at either side for lid fastening. The unit is attached to the wall by a couple of 3/4" steel corner braces.

The DHT-11 sensor is attached to the plenum of the house's furnace, so I can observe conditions right at the exterior of the furnace plenum. I thought that might be a little more interesting than monitoring living quarters temperature and humidity. Here's a view of the sensor.


For a sensor mount, I used a small rectangle of aluminum sheet. The DHT-11 is glued to the aluminum with CA adhesive.

Here's a bare-bones schematic of the Arduino/display interface.


And here's a schematic of the DHT-11 wired to a 1/4" stereo phone plug.


Here are two views of the monitor's innards.


Messy, eh? Getting from a nice neat schematic to a functioning piece of gear is quite a journey.

Anyway, following is the code:

/*
   Author: SMRAZA KEEN
   Date:2016/6/29
   IDE V1.6.9
   Email:TechnicSmraza@outlook.com
   Function:
*/
#include <LiquidCrystal.h>
#include <dht11.h>
dht11 DHT;
const int dht11_data = 6;
int temp = 0;
int hum = 0;
LiquidCrystal lcd(12, 11, 5, 4, 3, 2);
int inPin = 6;
int val = inPin;

void setup()
{
  int inPin = 6;
  lcd.begin(16, 2);
  lcd.print("  Rouge River ");
  lcd.setCursor(0, 1);
  lcd.print("   Workshop   ");
  delay(2000);
  lcd.clear();
  Serial.begin(9600);
}
void loop()
{
  DHT.read(dht11_data);
  temp = DHT.temperature;
  Serial.print("Temperature=");
  Serial.print(temp);
  Serial.println(" degrees Celsius");
  hum = DHT.humidity;
  Serial.print("Humidity=");
  Serial.print(hum);
  Serial.println(" percent");
  lcd.clear();
  lcd.print("Hum=");
  lcd.print(hum);
  lcd.print("%");
  lcd.setCursor(10, 0) ;
  lcd.print(" Rouge");
  lcd.setCursor(0, 1);
  lcd.print("Temp=");
  lcd.print(temp);
  lcd.write(0xDF);
  lcd.print("C");
  lcd.setCursor(10, 1);
  lcd.print(" River");
  delay(500);    
}

Note the following:
  • I left in the original author's name, of course, so no one can accuse me of plagiarism. I have made changes, though.
  • I've deleted all comments, aside from the opening one with the author's name. I find that most comments in Arduino code aren't all that helpful; mostly they just clutter up the code.
  • I changed the start-up herald to read "Rouge River Workshop", and the running logo to read "Rouge River". Those items are easily changed to read whatever one might wish.
  • The code outputs the temperature and humidity readings to the serial monitor, as well as to the 1602 liquid crystal display.
So there we are, a halfway useful Arduino project. I'd like to get hold of a DHT-22 sensor; that would enable construction of an outdoor conditions monitor. We'll see.

- - -

Update -- SUNDAY, MARCH 17, 2019

I modified the code to report Fahrenheit temperature as well as Celsius. Here it is:

/*
   Author: SMRAZA KEEN
   Date:2016/6/29
   IDE V1.6.9
   Email:TechnicSmraza@outlook.com
   Function:
*/
#include <LiquidCrystal.h>
#include <dht11.h>
dht11 DHT;
const int dht11_data = 6;
int temp = 0;
int hum = 0;
LiquidCrystal lcd(12, 11, 5, 4, 3, 2);
int inPin = 6;
int val = inPin;

void setup()
{
  int inPin = 6;
  lcd.begin(16, 2);
  lcd.print("  Rouge River ");
  lcd.setCursor(0, 1);
  lcd.print("   Workshop   ");
  delay(2000);
  lcd.clear();
  Serial.begin(9600);
}
void loop()
{
  DHT.read(dht11_data);
  temp = DHT.temperature;
  Serial.print("Temperature=");
  Serial.print(temp);
  Serial.println(" degrees Celsius");
  hum = DHT.humidity;
  Serial.print("Humidity=");
  Serial.print(hum);
  Serial.println(" percent");
  Serial.print(temp*9/5+32);
  Serial.println(" degrees Fahrenheit");
  lcd.clear();
  lcd.print("H=");
  lcd.print(hum);
  lcd.print("%");
  lcd.setCursor(8, 0) ;
  lcd.print("RRW");
  lcd.setCursor(0, 1);
  lcd.print("T=");
  lcd.print(temp);
  lcd.write(0xDF);
  lcd.print("C");
  lcd.setCursor(8, 1);
  lcd.print(temp*1.8 +32);
  lcd.write(0xDF);
  lcd.print("F");
  delay(500);    
}

# # #


# # #

Tuesday, April 17, 2018

Kuman Mega 328 Graphic Tester


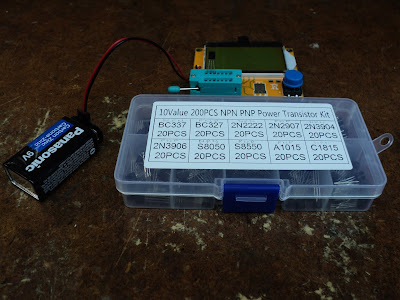
I bought a Kuman multifunction component tester from Amazon recently. Here's what comes in the mail.


There's no documentation with it at all. Here are the features and specs directly from Kuman's website:

Features:
● Multifunction tester: resistor + capacitor + diode + SCR + inductance + Transistor + mos tube.
● Automatically detect NPN and PNP transistors, N-channel and P-channel MOSFET, diode (including dual diodes), transistors, resistors, capacitors, thyristors and other components.
● Automatic power off function, save unnecessary time and battery capacity , Automatic test the pin element and the display on the 12864 LCD Display.
● Accurately report capacitance, inductance and resistance. It's also able to show the layout and type of transistors/MOSFETs, forward voltage of diodes.

Specifications:
● Material: Plastic, metal
● Automatic power off
● Power Consumption Off Mode: Less than 20nA
● Capacitor Measure Range: 25pf -100000uf
● Inductance Measure Range: 0.01mh-20H
● Resistance Measure Range: 0.1ohm resolution, maximum 50M ohm
● Power: 9V battery (If longer power, you can use pack consisting of two 8.4V lithium battery)
● LCD resolution128*64
● LCD Display Color: Green,yellow
● PCB Size: 2.86x2.37x0.047inch ( L*W*T)
● Weight: 45g

Packing List:
● 1 x Transistor Tester
● 1 x Acrylic shell
● 1 x screwdriver


The PCA (printed circuit assembly) is fully assembled and ready to go; it just needs a 9V rectangular battery. Operation is simple enough -- press the blue button and a test cycle commences. You first see this.


With the test socket empty, you then get this.


Note the pin numbering alongside the 14-pin DIP ZIF socket. There are actually only three active locations, but 'pin 1' is repeated (paralleled) four times. The entire seven pin sequence is repeated (paralleled) along the lower course of pin sockets.

What attracted me to the device was the inductance measurement feature. Inductance is surely the most mysterious of all electrical phenomena, and instruments for measuring it are uncommon. I have a selection of ±10% miniature inductors, so I thought I'd put the instrument through its paces with them. Following is the list of my results in the form 'nominal/measured' for fifteen items. All values are millihenrys.

.010/.01
.015/.01
.022/.02
.033/.03
.047/.04
.100/.08
.150/.12
.220/.17
.330/.28
.470/.47
.680/.58
1.00/.94
2.20/1.7
3.30/2.7
4.70/3.6

Hmmm. The measured values are mostly 'ballpark' at best. 'Can't say that I'm impressed.

I've half a mind to return the thing, but maybe I'll hang onto to it, if only as a novelty piece of test equipment.

If and when I fully assemble the unit in its clear acrylic casing, I'll post photographs. And I'll let you know if I find the thing to be actually useful.

- - -

Update -- THURSDAY, APRIL 19, 2018

'Pleasantly surprised by the unit's performance as a bipolar transistor tester.

I'd recently acquired a box of ten transistor types from Amazon, so I thought I'd try out the tester with them.


Something went amiss with my first attempt -- the tester identified a transistor as a diode. Whatever that was all about, the problem went away and never resurfaced. From there on the tester performed flawlessly for identifying polarity and pin-out of all ten types. The tester also gives an 'hFE' gain figure, and a 'Vf' figure. (It's not entirely clear to me what 'Vf' is. Collector-Emitter forward voltage drop, I imagine.) A typical read-out looks like this.


So, I guess the thing is a keeper. I'll peel the paper off the acrylic casing segments, and assemble them.

- - -

Here's the device mounted to the casing's rear panel.


Note that I've routed the battery wiring to the inboard side of the lower left spacer. If the battery wiring is allowed to go to the outboard side of that spacer, the wiring will interfere with the fit of the left side panel.

And here's the completed instrument.


Following are a few points regarding final assembly of the casing.
  • Note the notch in the left side panel that accommodates the ZIF socket's lever when the lever is in the closed position.
  • Fit of the upper panel was imperfect; the ribbon cable for the display tends to push the rear panel outward, making it difficult to fit the rear panel's upper tab into its slot in the upper panel. I had to file the slot for the rear panels's tab a little in order for everything to go together nicely.
  • The screwdriver supplied is a Phillips No. 0. The screw heads' recesses are actually sized to take a No. 2 driver. You'll want a 5.5mm open-end wrench or nutdriver for the hex nuts. (7/32" substitutes ok for 5.5mm.)
Battery replacement entails opening up the casing completely. It remains to be seen what battery life will be like. I suspect that the display's backlight is a fairly heavy load. I may end up incorporating a power jack for an external power supply.

# # #


# # #

Saturday, April 14, 2018

A Rocking Horse


I've become a grandfather. So, I guess that a rocking horse is in order. At the rate that I work, I should have it done by about the time that my granddaughter is ready for it.

I purchased a U-BILD rocking horse plan from Lee Valley.


As is par for the course with all such DIY material, the rocking horse is allegedly 'easy' to construct; ("...appropriate for any skill level...", as Lee Valley's blurb puts it.) On the plan's jacket, seen in the above photo, it says, "Easy Plan! Just Trace, Saw and Assemble." Yeah, right. I've studied the plan, and I'm calling hogwash on all that. The plan looks frightfully challenging to me -- fraught with perils and difficulties.[1] Had I not committed to making the thing, I'd take a pass on it and file the plan away under 'maybe, but unlikely'.

Anyway, I've embarked on the venture, and here's where I'm at so far.


I joined the head and torso with four No. 20 biscuits. The plan calls for the use of two 3/8" dowels. I find dowel joinery to be problematic at the best of times, so I opted for biscuits. That worked out fairly well.

Next up is to cut the body to shape on the bandsaw, and sand the cut edges.

- - -

And here it is done.


And this is as good a place as any for a little digression on tooling for this project. There's a lot of curve sawing and edge sanding involved. The plan would have you do the sawing with a portable sabre saw (jig saw), and I call hogwash on that -- a band saw is called for.

Band Sawing & Belt Sanding

I don't have a full-size band saw, nor do I have a great deal of band sawing experience. What I do have is one of these little 9" band saws from Canadian Tire.


As toy machinery goes, it's not a bad unit, and I've been reasonably well pleased with its performance.

The saw takes a 62" blade, and the only such blade that's locally available, either from Canadian Tire or Home Depot, is 1/4" wide, 6 tpi. 6 tpi is a pretty coarse blade that leaves a rough cut edge. You have to cut well to the waste side of a line to be sure of being able to sand away all the saw scarring without going beyond your line.

In the interest of obtaining a smoother cut, I ordered a 1/4" wide, 14 tpi blade from Amazon and tried it out. The 14 tpi blade does cut quite smoothly, but there's a downside -- the blade's teeth have very little set, so the blade is disinclined to cut curves. For straight cuts or very large radius curves it's ok, but on curves of any tightness it's inclined to bind. Amazon has a 1/8" wide, 14 tpi blade that would no doubt cut curves nicely, but a 1/8" wide band saw blade would surely be a fragile item, prone to breakage. So, I'm back to sawing with a 6 tpi blade, which at least has sufficient set that it negotiates curves easily. I just have to resign myself to doing a lot of belt sanding to remove the saw scarring from the cut edges. And that brings me to my Ridgid oscillating edge belt/spindle sander.


It's quite a piece of gear, and it works as advertised. I consider it to be a 'must have' for this project. I bought 50 grit belts for it for dealing with my rough, band sawn edges. The 80 grit belt that comes with the machine produces an acceptable finished edge. 120 grit belts can be had, if one wanted even more finely sanded edges.

Anyway, there's what I consider to be essential tooling for one to tackle this rocking horse.

A Bit More Progress

Here's one front leg cut to shape and edge-sanded with a 50 grit belt.


An 80 grit edge-sanding is still to be done.

And my band saw blade dulled and broke, so a trip to Home Depot is in order to get a replacement.

- - -

Legs Sawn Out -- SATURDAY, APRIL 21, 2018


A heap of belt sanding lies ahead. It's a good thing I got those 50 grit belts for the Ridgid machine. I also got 120 grit belts, as I decided I wasn't quite happy with the finish I was getting with an 80 grit belt.


- - -

Leg Wedges -- WEDNESDAY, APRIL 25, 2018

I've done a final sanding of all four legs' edges with a 120 grit belt. The edges aren't quite perfect, but they'll do.

And now comes a trial -- fabricating a set of wedges that will splay the legs out at a 7° angle from the body. I have a taper cutting jig for my tablesaw, but it doesn't really lend itself to cutting pointed wedges, as must be done here. So, I'm going to do a quick-and-dirty here; I'll simply lay out the wedge components on 2" nominal stock, and cut them freehand on the bandsaw. Here's a view of the layout for eighteen wedge pieces.


I haven't made allowance for saw kerf width in my layout, so my wedges are going to turn out a little bit undersize. I think there's enough wiggle room to the final assembly that that shouldn't really matter.

And here are eighteen wedge pieces cut out.


They're pretty rough, but they're going to have to do one way or another. The next step is to glue up individual wedge pieces into four broad wedges that will go where the legs join the body. This may be the absolute worst part of the entire construction. I wish there were a better way.

- - -

Front Leg Wedges Done -- TUESDAY, MAY 1, 2018

For each front leg, five of the wedge elements are glued together edge-to-edge to make a wide enough wedge. Then those broad wedges are glued to the inboard upper ends of the legs, like so.


The glued-up/glued-on wedges then get band sawn and belt sanded to the contours of the legs.


It's Recognizable, At Least -- TUESDAY, MAY 22, 2018


The rocker has a nice action to it. Getting the legs positioned and fitted to the body was an ordeal. The plan would have you do it with the aid of the pattern, but I couldn't see making that work. I resorted to 'by-guess-and-by-gosh' methods.

Here's a view of the horse with some further progress made. The stirrups and the handlebar are in place.


There's still much to be done.

- - -

Done -- SUNDAY, JUNE 24, 2018


There it is, quite the shaggy beast.

I'll eventually follow up on all this with some notes and observations on the plan and its execution. 'Easy' it was not.

- - -

Notes And Observations -- WEDNESDAY, JUNE 27, 2018


Feet To Feet-Platforms Interface


The plan would have you saw or belt sand the 'feet' so they sit flat on their platforms. As you can see from the above photo, I didn't even try to do that; I consider it virtually impossible to perform such a procedure and get it right. Each foot is securely fastened to its platform by two #8 x 2" round head wood screws, with flat washers under the heads. I don't believe that the strength of those joins is much impaired by their not being flattened.

Screw Counterbore Plugs

Incredibly, the plan calls for using dowel for screw counterbore plugs. That simply is not the done thing. Dowel plugs present end grain to the surface. They won't sand down properly, and they will stand out prominently and look awful when stained. Screw counterbore plugs are cut across the grain from waste material with a plug cutter, like these from Lee Valley. The plugs are aligned on installation so that their face grain lines up with the grain of the surrounding wood. They're readily trimmed down to near flush with a chisel, then sanded to be perfectly flush.

Leg Wedges Shaping

The plan calls for the lower ends of the leg wedges to be contoured so they align with the contours of the body. I couldn't see a way to do that successfully, so I didn't even try. I left the lower ends of the leg wedges squared off and protruding, like so.


The effect on overall appearance of the horse is not objectionable.

Saddle And Stirrups

By sheer dumb luck, I had on hand some cedar material suitable for making the saddle and stirrups. Using that made for a nice, realistic contrast to the lighter colour of the SPF (Spruce Pine Fir) horse.


Eyes

I found the plan's instructions for making the eyes to be a bit difficult to fathom, but I finally managed to understand them. Lee Valley carries wooden spheres of the correct size for making the eyes from.


Sawing up spheres into sections is not easy, but I managed to do it to good effect. The eyeballs I primed with Tremclad grey primer, and painted with one coat of Tremclad gloss black.

Rounding The Edges

The plan's instructions for rounding the edges of the horse's body, head and legs to a 1/2" radius struck me as utter nonsense; I wouldn't attempt such a method. I did the edge rounding with a 3/16" radius round-over bit in a palm router. The 3/16" radius is adequate to my eye, and much easier to execute than a 1/2" radius, which I think is excessive.

Ears


The plan calls for leather ears. The best I could come up with was some suitably coloured pleather cut from a discarded handbag. I laminated two thicknesses of it together with clear silicone sealant as an adhesive, to create ear material with two good sides. The finished thickness of my ear material was just over 3/32".

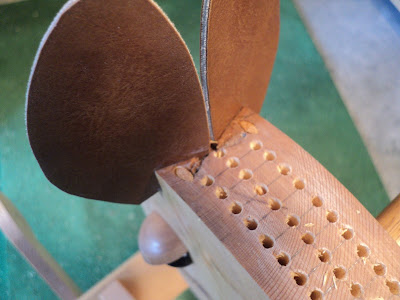
The ears are set in saw kerfs. The trick there is to find a saw that yields a kerf width that matches one's ear material thickness. It turned out that my wife's pruning saw from the garden shed fit the bill. I glued the ears in place in their saw kerfs with CA adhesive, and added 1/8" dowel pins at a shallow angle as a further security measure. Here's a view of that, such as it is.


The upshot of all that is that the ears are problematical -- they're not an easy detail to execute well.

- - -

Yarn For The Mane And Tail

I went to Michael's in Pickering to look over their yarns, and found this.


The colour is taupe (a brownish grey). A single 86 yard skein was sufficient for the mane and tail.

- - -

The Tail


I didn't get quite as full a tail as the plan's author appears to have. I found it very difficult to adhere to the plan's instructions for making the tail. Anyway, the tail I came up with is acceptable.

The Mane

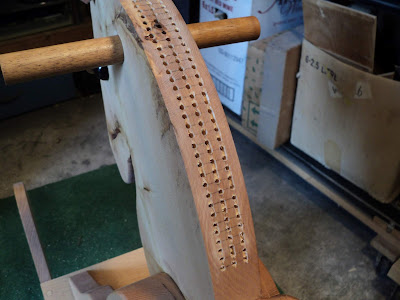
I found the plan's instructions for laying out the mane to be questionable. The plan would have you lay out a closely spaced diagonal grid for a fantastic number of holes in which to insert yarn lengths. I settled on a rectangular grid of three holes across, which eliminated a baldness down the centre, and gave me an acceptable mane.


That's about 150 holes that have to have yarn plugged into them -- a very tedious undertaking. The result is well worth the effort.

In Conclusion

The plan, however one is able to follow it, produces a wonderful rocking horse. The design is brilliant -- way ahead of anything I've seen that can be had store-bought.

That said, many aspects of the plan are iffy and questionable. The rocking horse is not an easy thing to make. You're in for the woodworking challenge of your life should you decide to tackle it.

* * *

Note:

[1] I'd love to hear from anyone who's built one of these rocking horses, who'd care to share with me how their experience of it went.

# # #


# # #