Sunday, December 2, 2018

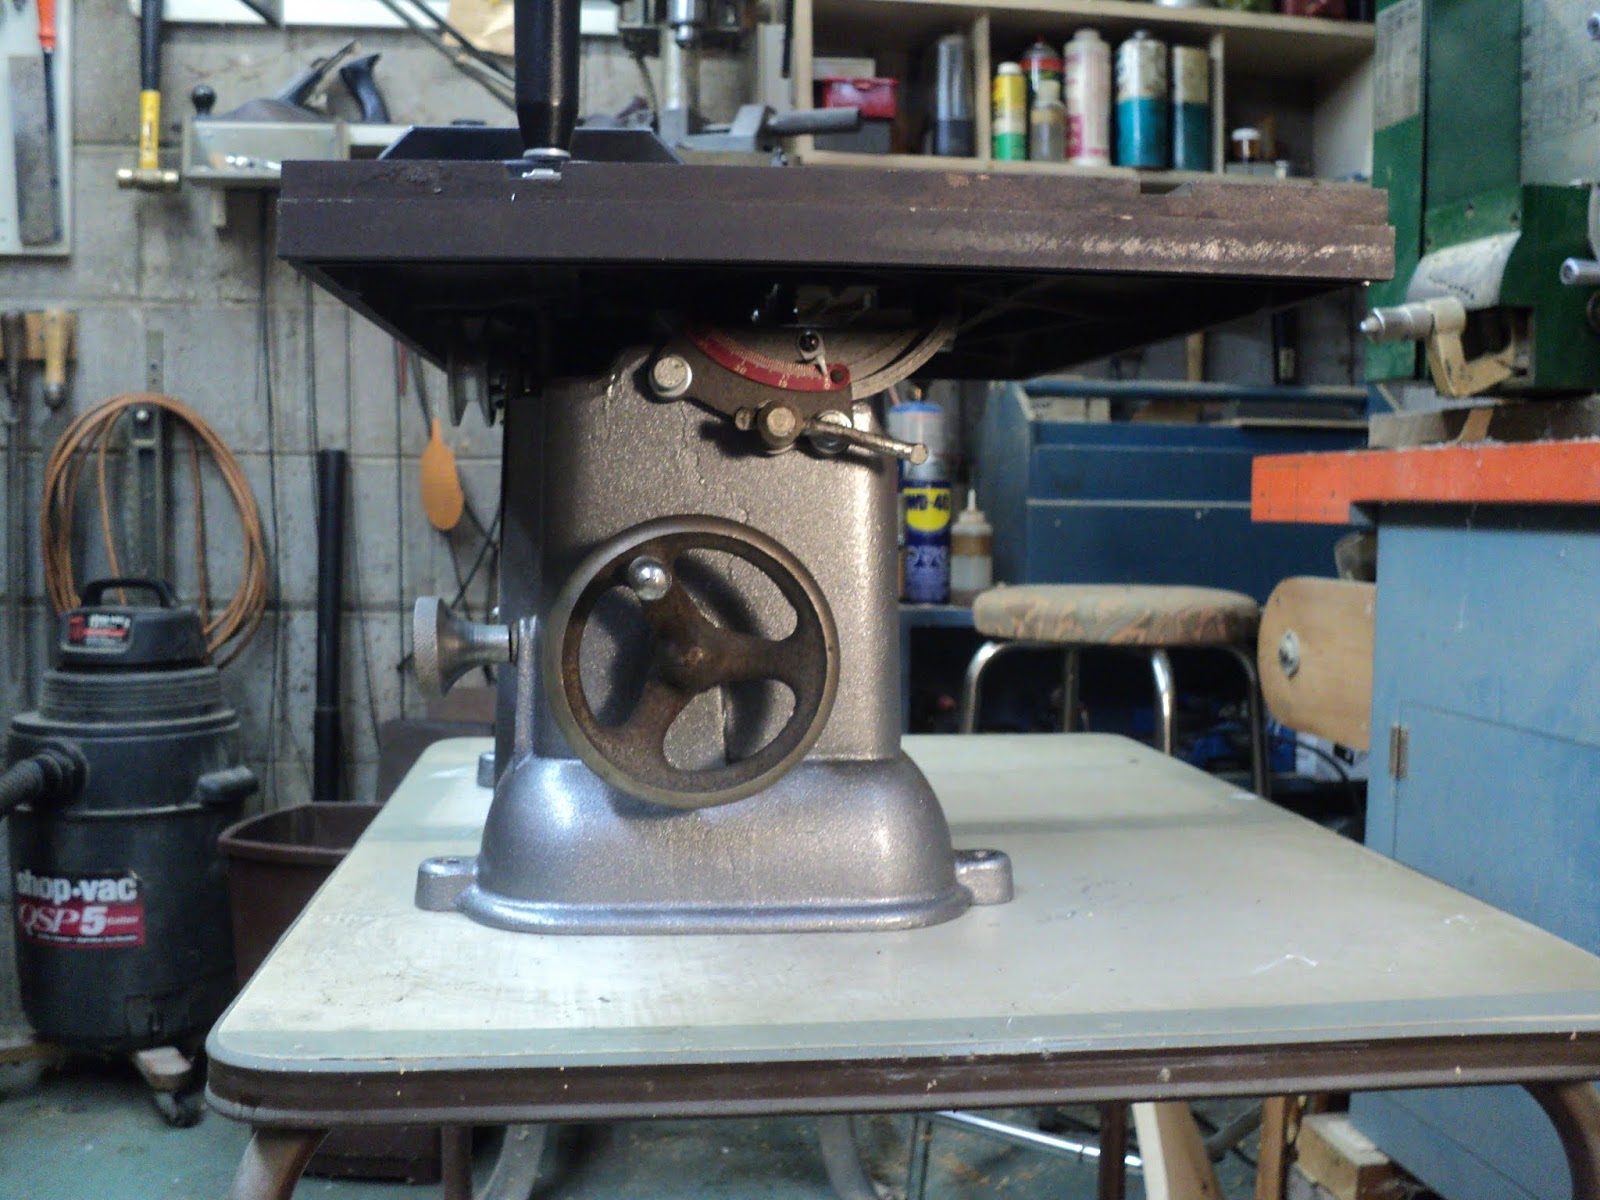
A Craftmaster 8" Table Saw


Here we are at the end of my 8" table saw pursuits.


That's an ancient Craftmaster tilting table machine in pieces. I have the makings of a mitre gauge for it, but there's no rip fence. It has new bearings in it, and will run nicely. I'll give its base a paint job to pretty it up some, and put it up for sale on Kijiji for $20.00.

The days of the 8" table saw are over. I can't get a decent price for one no matter what I put into it, so it's time to pack it in as far as 8" saws are concerned. You can scarcely get blades for them anymore.

- - -

Base Painted -- MONDAY, DECEMBER 3, 2018


That's two coats of Krylon Fusion No. 42521, 'Graphite'. I'm not all that thrilled with it -- too bright. I'd have done better to go with Tremclad's grey. Oh well, it is what it is; it'll do.

- - -

Mechanism Reassembled -- WEDNESDAY, DECEMBER 5, 2018

  • Pivot and bearing points are lubricated with white lithium grease.
  • The elevation screw is lubricated with WD-40.
  • The pulley is 2" diameter x 5/8" bore. There's no keyway on the saw's spindle. The pulley is secured only by a 5/16"-18 x 3/8" long cup-point setscrew w/5/32" hex socket.
There's a blade height scale pointer still to be installed and adjusted. The elevation screw's maximum height stop nuts are still to be adjusted and locked together.

- - -

Table Reinstalled And Mitre Gauge Added -- THURSDAY, DECEMBER 6, 2018


The mitre gauge bar is a 16" length of 3/16"x5/8" mild steel stock that I got from the Metal Supermarket. The mitre gauge head, clamp-handle and pointer were salvaged from a scrapped direct-drive table saw. Now it's time for the parallelism adjustment ordeal.

Parallelism Adjustment

Here's my dial indicator rig for finding parallel between the saw blade and the left side mitre gauge slot.


Parallelism in a table saw is a critical, finicky adjustment that's no fun to do. It has to be more-or-less right, else a saw will be a miserable thing to use. I've gotten this machine as good as I can get it, and tightened everything up. It'll do.

The blade that's presently on the saw is a high-end Freud rip blade that I'll put up for sale separately. I'll get one of Busy Bee's combination blades to go with the saw. Once I get that blade, I'll have a few little details to attend to, then I can put the saw up for sale on Kijiji.

- - -

All Done And Up For Sale -- SATURDAY, DECEMBER 8, 2018


And my 8" table saw days are over.

The absence of a rip fence is a big strike against the saw; we'll see if there's any market for a table saw without a rip fence. The saw did have a rip fence once, but it got stolen. So it goes.

- - -

No Sale -- TUESDAY, DECEMBER 18, 2018

I had several queries in response to the Kijiji ad. Since I know that people tend not to read ads carefully, I replied to each query with, "Please be aware that the saw has no rip fence." That effectively killed off every possible sale but one -- the last one. I could tell that that guy knew nothing about woodworking machinery from his question to me, "...is it hard to source the motor?" I answered his question, and advised him to go for a low-end, direct-drive saw from Home Depot or Canadian Tire. That was the last I heard from him.

Anyway, it became obvious to me that potential buyers were all looking for a cheap, ready-to-go saw, and that certainly wasn't what I had on offer. So, I've withdrawn the ad, and I'll see about completing the saw with a rip fence, motor and stand. Maybe I'll give the saw to my son when I'm done. I'll never get a decent price for it.

A Possible Rip Fence

I have on hand a rip fence that was salvaged long ago from a Ryobi saw that had been run into the ground and scrapped. Here's a view of that.


Adapting that to work on the Craftmaster will be a challenge. For openers, the rip fence is about two inches too short. We'll see.

- - -

Rip Fence Successfully Adapted -- WEDNESDAY, DECEMBER 19, 2018

It took a bit of doing, but I've managed to adapt the salvaged Ryobi rip fence to the Craftmaster saw.

I first added a sub-rider to the fence's front rider.


The sub-rider is a 4 5/8" length of 3/16" square keystock that I got from Princess Auto.

Then I added keepers to the rider so that the fence can't possibly be flipped up out of place.


And finally I extended the clamping works at the rear end of the fence.


And here we are with a useable rip fence on the saw.


- - -

Going The Whole Nine Yards -- SUNDAY, DECEMBER 23, 2018

What the hey, I may as well do up the saw with a decent stand and dolly that I have left over from a previous 8" table saw project.

Here are some views of the assemblage so far.


That's a 1,725 rpm, 1/2 hp motor with a 5" diameter pulley on it. The saw's pulley is 2" diameter. Measured no load motor speed with a general purpose blade mounted is 1,760 rpm; blade speed is 4,528 rpm.

A Drivetrain Improvement

A 'web' in the underside of the table was rubbing on the outer surface of the V-belt with the blade fully elevated, so I ground that away with a hand grinder.


Now there's clearance for the belt.


- - -

I have some painting to do now to pretty up the stand's deck and the dolly. Then I may put the machine up for sale again. Or, I may give it to my son. He can keep it in his backyard under a tarp, maybe.

- - -

All Done -- TUESDAY, JANUARY 8, 2019


The deck and the dolly are freshly painted Tremclad light grey. The machine is as good as it's ever going to get. It's up on Kijiji so maybe I can be rid of the thing.

- - -

Update -- THURSDAY, JULY 9, 2020

Well, the saw didn't sell the last time, so I dismantled and stashed it. Recently, I reassembled it for one last try, and again there were no takers, so that's truly the end of it. I'll dismantle and stash it again. The saw can go for scrap metal.

- - -

Update -- SUNDAY, JULY 11, 2021

I know what I said in my previous update from a year ago, but I changed my mind and decided to give it another go. Something that influenced me was the appearance of 8 1/4" table saws on the market. Both Ryobi and DeWalt have 8 1/4" machines on offer. I was all but certain that the Craftmaster could take an 8 1/4" blade, making the saw not-so-obsolete after all. To confirm, I went to the Home Depot and bought an 8 1/4", 24 tooth Diablo blade. That blade fits (barely), so I can offer the Craftmaster as an 8 1/4" saw.

A Modification To Better Accommodate The New Rip Fence

Something else I did to improve the rip fence's clamping action was to shim up the rear edge of the saw's table across the centre and the left side extension. Here's a view of that.


The original (stolen) rip fence clamped in place only at the front of the table -- the length of the table and its two extensions was immaterial to that rip fence's clamping action. The modified Ryobi rip fence clamps at the rear, so table and extension lengths are critical. I added lengths of aluminum angle to the rear of the main table and the left side extension, using silicone gasket maker as an adhesive, to make the entire width of the table more-or-less the same length. It's not perfect -- there's a point where the main table and the left side extension meet where there's a slight 'hump', because the left side extension is a bit longer than the main table. But it's pretty good and will have to do.

Sale Effort So Far

It's not looking good. I've had the saw up on Kijiji for about a week. There have been 35 views of the ad and zero responses. That's got to be telling me something.

I really don't know at this point what I'll do with the machine if I can't sell it. I used it a fair bit in the construction of a toy truck recently, and I quite liked working with it. It would be a shame to scrap it.

- - -

A Motor Upgrade -- WEDNESDAY, JULY 14, 2021

I was ripping a length of 2" nominal dense softwood the other day, and the performance of the 1/2 hp motor was pathetic. I decided that a credible 8" table saw needs a 3/4 hp motor -- there's no getting around it.

I had a 3/4 hp motor on hand. It's a face-mount unit that I had created a cradle-style mount for. Here's a view of it installed.


The motor is 3,450 rpm, so its pulley is 2 1/2" diameter, rather than the 5" diameter of the 1,725 rpm motor's pulley. That necessitated a shorter v-belt -- 35" rather than 40". The saw now has adequate power.

# # #


# # #

Friday, November 30, 2018

A Razor Scooter Roadside Find


Someone abandoned this Razor scooter today by the roadside in front of my home.


People do the oddest things. The scooter appears to be complete and in reasonably good condition. A label on the underside of the deck says, "DATE OF MANUFACTURE: 01/10/2012".

I'll check out all of its bearings and clean it up. 'Should be able to get something for it on Kijiji.

- - -

Inoperative 'Fold' Feature

The fold feature was frozen from disuse. Removing two black plastic side covers from the scooter's neck with a 2.5mm hex key and some judicious prying gives access to the fold detent pawls. Some WD-40 got the pawls freed up so I could fold the scooter.


However, the fold detent release action is still balky. I'll add some grease to the detent ways at final reassembly.

- - -

Loose Headset

There's slop in the headset bearings


To correct that, I'll need a 36mm spanner. So, it's off to the bike shops in Pickering tomorrow to see if they have one.

- - -

Front Wheel

With two 5mm hex keys, the axle can be unscrewed to release the wheel.


The axle was assembled with blue threadlocker, so it took some effort to unscrew it.

The bearings feel ok. I'll scrape the grime off them and see if I can ID them.

- - -

The bearings are ABEC-5, No. 608ZZ. 'ABEC-5' is a tolerance rating. P/N 608ZZ is a bearing with an 8mm bore, 22mm O.D. and 7mm width, shielded both sides. They're widely used in skateboards, inline skates and scooters.

- - -

Rear Wheel

The rear wheel is identical to the front, but its bearings are noisy; they'll have to be replaced. I've ordered replacements from Amazon.

- - -

36mm Spanner Update -- SATURDAY, DECEMBER 1, 2018

My trip to Pickering was fruitless. 36mm spanners appear to be as common as hens' teeth; neither of the two bike shops there had one. I could get one from Amazon for about $35.00 CDN, but I neither want to spend that much nor wait for it to arrive, so I'll see if I can weld up a crude facsimile of a spanner that will at least do the job for me. I have some steel flat material on hand that should serve.

Here's a close-up view of what I'm up against with the headset nuts.


An adjustable wrench can be used on the upper jam nut, but the thin cone nut underneath calls for a suitable spanner. Anyway, here goes with fabricating a spanner.

- - -

Possibly The Worst, Ugliest, Nastiest Welding Job Ever Done By Anyone, Ever

Here's my welded up 36mm spanner. The spanner is about 12" long overall.


As you can see, I'm no welder. I have next to no experience with my little Princess Auto, flux-core wire-feed unit, and it shows.

Now we'll see if my creation will at least do the job of a spanner for me.

- - -

Headset's Apart


My spanner has worked so far. Now I can clean all the headset components, pack the bearings with fresh grease and reassemble and adjust the headset.

- - -

It worked. The headset is back together, tightened and adjusted for zero preload. Here's a view of my spanner on the job.


So the scooter is done for now. It can go in the shed until the new wheel bearings arrive from Amazon.

- - -

Wheel Bearings Arrived -- TUESDAY, DECEMBER 11, 2018


They were a day late, but they did get here -- a package of sixteen ABEC-9, 608RS bearings for $14.99 CDN + shipping.

- - -

New Wheel Bearings Installed -- WEDNESDAY, DECEMBER 12, 2018

The bearings are a light press fit in their hubs, so it's easy to knock out the old ones with a suitable punch. Thumb force is adequate to press the new bearings into place. There's a 10.5mm long spacer inside the hub that resides between the two bearings.


Reassemble the axles with blue threadlocker and you're good to go. Wheel rotation with new bearings is positively silky and noiseless.

# # #


# # #


Tuesday, November 13, 2018

An MTD LAWN FLITE Reel-Type Mower


Here's something a little different -- a self-propelled reel-type mower, probably from the days when cars didn't have seat belts.


Model No. is 150-518-004. Serial No. is 74377. Looking up that model number on MTD's website got me nothing, unsurprisingly.

Note that there's no spark plug wire -- not an encouraging sign. So that's the first order of business here -- to get the cowl off the engine and see what's what with the missing spark plug wire.

- - -

And here we are with the cowl off the engine.


Hmmm. The ignition coil is missing entirely, and what I take to be an air-vane governor is in utter disarray.

- - -

Replacement Ignition Coil -- WEDNESDAY, NOVEMBER 14, 2018

A replacement coil is supposedly Briggs & Stratton part number 591420. That part represents a conversion to solid state ignition; it would render the points and condenser irrelevant.

An OEM coil from the small engines shop is $72.92 CDN -- that's a heap of money. Amazon lists it for $48.03 CDN. My son is going to see what's available on Ebay.

- - -

Ignition Coil Obtained -- WEDNESDAY, DECEMBER 26, 2018

See this post for the story of the coil's installation. That linked post also has a good photograph of the correctly assembled governor linkage.

The Ignition coil installation was successful, and the mower now has a working engine.

- - -

Engine

Engine model/type/code number is 60102 0294 01 690801. According to "Chilton's Guide To Small Engine Repair Up To 6 HP", the first five digits of that number signify the following:

6 = 6 cubic inches displacement.

0 = basic design series [whatever that means].

1 = horizontal Vacu-Jet carburetor.

0 = plain bearing.

2 = rewind starter.

The engine no doubt predates solid-state ignition, so there will be breaker points and a condenser under the flywheel.

The next step is to pull the flywheel and examine the points and condenser.

- - -

And here's a view of the points-and-condenser arrangement.


That appears to be in good order. Breaker points gap for this engine is 0.020".

Spark Plug

The engine's Operating Instructions call for a Champion J-8 plug. That's a 14mm, gasketed plug with a 13/16" hex. Gap is supposed to be 0.025".

The spark plug that's in the engine is an AC LM46, in reasonably good condition. It's a non-resistive type.

Air Cleaner

The air cleaner appears to be on the wrong way around.


It's covering the fuel tank's cap. Here it is correctly oriented.


Inside the air cleaner's enclosure is a foam element that's maybe still serviceable.


- - -

Fuel Tank Cap Gasket

The original gasket is badly embrittled. I made a replacement from some 1/16" thick cork gasket material.


The venting arrangement on old Briggs & Stratton fuel tank caps will admit rain. Don't leave an engine with such a cap out in the rain uncovered; you'll end up with water in the fuel tank. I believe that Briggs & Stratton has finally solved this with a fuel tank cap design that vents from underneath its perimeter.

- - -

V-Belt

The V-belt measures 19 3/4" outside length. There is no OEM part number visible on it. A 20" belt might work.

The belt looks serviceable, although it has one break in its traction side. From what I've seen of worn V-belts, their strength is all in their outer spines; their inner 'V' portion is just tractive 'filler'. They can have breaks in that area and still function, so I won't pursue getting a new belt for now.

- - -

V-Belt Pulley Alignment -- SUNDAY, NOVEMBER 18, 2018

It's not good.


The engine's pulley is too far inboard. There's shaft-length enough for the pulley to be moved over into alignment with the driven pulley on the countershaft. I'll see if I can persuade that rusty arrangement to loosen up and let me adjust the engine pulley's position.

- - -

Much Better


I loosened off the pulley's setscrew with a 5/32" hex key, put a three-jaw puller on the pulley and was able to shift the engine's pulley into alignment with the driven pulley. The engine's pulley didn't want to come all the way off, though -- the shaft is not badly rusted, but it's rusted enough that the pulley won't come off readily.

- - -

V-Belt Tension Idler

The tension idler is just a shielded-both-sides ball bearing that bears against the inner surface of the belt to tension it and engage the drive. The bearing feels a bit grease-starved and rough.

Removing a 5/16"-18 x 5/8" hex head screw allows the bearing to come off its bracket. Here's a view of it along with its retaining screw.


The bearing is a NICE 3023-DS; 5/8" bore x 1 3/8" O.D. x 7/16" width. There's no way to repack it with grease. I'll clean it up and get some oil seeped into it as best I can.

- - -

A V-Belt Tension Idler Anomaly -- TUESDAY, NOVEMBER 20, 2018

I was wondering why the operator's DRIVE ON/OFF lever only had about half of its possible travel, and why drive disengagement wasn't terribly effective. It turns out that the tension idler's positioning crank had gotten flipped around 180 degrees from its normal position. It doesn't photograph well, but here's a view of the correctly positioned idler arrangement in its OFF position.


Note that the idler bearing is well away from the belt. Belt tension is truly relieved, and the drive is disengaged.

And in its ON position.


The tension idler bearing is permitted its full, spring-loaded travel down onto the inner surface of the belt. The belt is tensioned and drive is engaged. The operator's DRIVE ON/OFF lever now has its full travel.

Note also the washers underneath that upright piece that's supporting the tension idler's positioning crank. Those are not from the factory, and have no reason to be there. I'll be deleting them.

- - -

Combustion Chamber Cleaning

The engine's Operating Instructions recommend a combustion chamber clean-out every 100 to 300 hours of operation. It's likely never been done on this engine, and I've never done one on a small engine, so I may as well go ahead and do it; it will be interesting to see the state of the combustion chamber. And while I'm at it, I may repaint the scruffy looking upper air baffle that sits on top of the cylinder head.

And here we are with the head off the cylinder.


That doesn't look too bad at all. There may not be all that many hours on this engine. The cylinder wall looks good.

- - -

Combustion Chamber Cleaned -- WEDNESDAY, NOVEMBER 21, 2018

Here's a view of the cleaned up cylinder head alongside its new gasket. It's not immaculate, but it will do.


The gasket is Briggs & Stratton P/N 272167. The original gasket tore a bit when I lifted off the cylinder head; it wasn't fit for reuse. Some observations on the matter of combustion chamber cleaning:
  • Work with the piston at top dead centre, with both valves closed. Have compressed air available for blowing away debris.
  • Have a new gasket on hand. The original is unlikely to be reusable.
  • My original gasket was stuck to the top of the cylinder in places, and 'welded' to the cylinder head. It took some serious scraping to get all the remnants of it removed.
  • The carbon build-up is stubborn stuff; it has to be scraped off. I know of no solvent that will dissolve it. Oven cleaner might work, but that would involve a mess that I'm not prepared to make.
  • There are YouTube videos out there about this subject. From what I've seen of them, they're utter nonsense. I have no idea why people take the trouble to make them.
- - -

Muffler -- FRIDAY, NOVEMBER 30, 2018

The original muffler looks pretty rough, so I got a new replacement.


That new muffler down in front is what's known as a 'sausage' muffler. Briggs & Stratton P/N is 89966. The thread on it is 1/2" NPT (National Pipe Thread).

I can see now that the severe offset of the original muffler's body had a reason behind it -- it's to clear the very nearby carburetor. The new sausage muffler just barely affords clearance for the carburetor.


The muffler also just barely clears the underside of the air cleaner that perches on top of the carburetor. Anyway, 'just barely' will do.
- - -

On Second Thought -- WEDNESDAY, DECEMBER 26, 2018

I decided to put the original muffler back on. The original muffler has a deflector on it to blow exhaust sideways -- away from the mower's operator.


The sausage muffler would blow exhaust gases straight back toward an operator. There are reasons things are the way they are on machinery. One makes alterations at one's peril.

- - -

Final Drive Roller Chain -- SATURDAY, NOVEMBER 24, 2018

Removing a small cover from up on the mower's deck gives service access to the roller chain final drive.


It's a half-inch pitch chain, but it's narrow; it's not the common No. 40 or No. 41 half-inch pitch chain that I can get from Princess Auto.

Roller diameter and overall chain width are each just shy of 5/16". Roller length is about 1/8". There are 48 links, for an overall pitch length of 24". There's a maker's logo, "D.I.D", stamped on the chain's links, and that firm appears to still be with us. But these days they don't seem to be making that small size of chain -- they're strictly a supplier of motorcycle and ATV chain.

The chain is a little worn and saggy, and it's rubbing on the edge of the hole in the deck that it feeds through. I may end up just giving the chain a good lubrication and leaving it be.

- - -

Roller Chain Update -- FRIDAY, NOVEMBER 30, 2018

I found out what manner of chain it is -- it's 1/8" bicycle chain, like this.


It's narrow, 1/2" pitch chain. The 1/8" figure is the chain's roller length. Bicycles with single rear sprockets, such as coaster brake bikes and bikes with Sturmey-Archer rear hubs take 1/8" chain. There's a narrower, 3/32" chain that's used on bikes with derailleurs.

So, it turns out that I have replacement chain on hand, should I decide to give the mower a new chain.

- - -

Drive Train -- TUESDAY, NOVEMBER 27, 2018

Following is a list of all the drive train's engagement components, for any who'd care to do the math:
  • Engine Pulley: 2 3/8" O.D.
  • Countershaft Pulley: 4" O.D.
  • Countershaft Sprocket: 9 tooth.
  • Reel Sprocket: 27 tooth.
  • Wheel Drive Pinion (rotates at reel speed): 11 tooth.
  • Wheel Ring Gear: 77 tooth.
Doing the math for an assumed governed engine speed of 3,000 rpm gave me a walk-behind speed on the ground of approximately 2.64 mph. That's a reasonable walking speed for an adult.

- - -

Wheels About To Go Back On -- FRIDAY, NOVEMBER 30, 2018

Here's a view of the inside of the left side wheel, with its back-plate and drive pinion in place.


I'll grease the gearing and the wheel's axle bearing with white lithium grease prior to assembly.

The mower's original left side axle bolt and nut were lost and replaced at one time with common hardware components -- a 1/2" carriage bolt and a square nut, 7/8 A/F. That arrangement works remarkably well, but it's not quite right. The replacement parts are right-hand threaded, so wheel rotation is in the direction of loosening them. I'm certain that the original parts were left-hand threaded, so that wheel rotation would be in the direction of tightening them. In reality, the loosening forces generated by wheel rotation are negligible, and I don't expect there to be any problem with the left side wheel. But it is another example of the harm that inept tinkers do to perfectly good machinery.

- - -

Recoil Starter Cog-And-Ball Clutch -- SATURDAY, DECEMBER 1, 2018

The starter clutch is also the flywheel nut.


Much the same style of clutch is used on Briggs & Stratton's vertical shaft engines. See this post for more on that. On horizontal shaft engines, DO NOT remove the clutch's cover with the clutch in place -- you'll have six steel balls spilling out.

To remove the clutch, restrain the flywheel and apply a pair of 12" Channellocks. Take care not to distort the two screen-mounting ears. There'll be a slightly convex washer under the clutch; note its orientation.

Here's a view of the clutch dismantled.


Note the felt disk at the centre of the photo. That's a lubricant wick from up inside the clutch's spindle. After cleaning and drying it, give the wick a soaking with WD-40 before poking it back into place with the shank end of a 1/2" twist drill.

All parts of the clutch should be immaculately clean. Use no grease or oil whatsoever on the balls and ball cavities. Here's a view of the clutch partially reassembled, awaiting its cover.


At reinstallation, lubricate the cover's seal and the bore of the spindle with WD-40.

- - -

Engine Oil Change

Sump capacity is 1 1/4 US pints, which is 20 US fluid ounces or about 590 ml.

The square-headed 1/4" NPT drain plug is 3/8" A/F. Fill level is full to overflowing from the fill/inspection hole.

- - -

Recoil Starter -- SUNDAY, DECEMBER 30, 2018

I wanted to paint the engine's cowl, which would best be done with the recoil starter removed from it. Also, the starter was in need of attention anyway -- grime and crud buildup inside were making its rewind sluggish.

Recoil starters are not a pleasant item to deal with. Keeping the spring under control while it's rewound and the cord is installed can be challenging. Following are some photos and notes on my go-around with the starter.

A Crank Rod

You need a safe way to restrain the pulley as you unwind the spring after detaching the cord. On this starter a 23/32" square length of wood served as a crank rod, like so.


You want to count the number of turns it takes for the spring to completely unwind, so you can reproduce the necessary spring tension at reassembly.

Note the two tabs that are folded over the perimeter of the pulley. Those tabs must be bent up straight in order for the pulley and spring to be removed. There are two spare tabs available for use in the event that the tabs break off on you from fatigue.

Here's a view of the unwound spring with the pulley removed.


That's a view of the spring after cleaning. I didn't use grease on the spring for fear of it turning to sludge in time. After final assembly, I sprayed in a fair bit of WD-40 for a lubricant.

Retensioning The Spring

Here's the starter back together after almost six turns of the pulley to retension the spring.


The Vise-Grips served as a crank handle. The c-clamp is there to keep the thing from unwinding while the cord is reinstalled.

Threading in a cord is a bit of a chore, but it does go into place. A simple knot at the pulley end of the cord is all that's needed to secure the cord there, though I added some CA adhesive just to be certain.

Finishing Up

At the handle end of the cord, you can use a spring clamp for a restraint while you work out the cord's length.


Cowl Back On

Here's a view of the engine with its cowl, fuel tank and air cleaner repainted.


- - -

Update -- TUESDAY, MAY 28, 2019

The mower has overwintered in the garden shed with its fuel tank emptied. I fueled it, and it started up easily and runs fine. I tried it out on some grass and it cuts reasonably well. A problem arose, though; the left side wheel came loose. I wasn't surprised at that. Old equipment that's been tinkered with is almost guaranteed to have problems built into it by tinkers, and this mower is no exception.

The left side wheel's axle is supposed to have a left hand thread on it, unlike the right side wheel's axle which is right hand threaded. The different threads are designed to resist loosening from the turning of the wheels. Right side wheel forward rotation will tend to tighten a right hand thread; left side wheel forward rotation will tend to tighten a left hand thread -- loosen a right hand thread.

The original axle screw for the left side wheel on this machine was lost at some point, and replaced by a right hand threaded axle screw. The forward turning wheel exerted a small but relentless turning force on the axle that succeeded in loosening it from its nut.

I've added a jam nut to the assembly, like so.


That should take care of the problem.

# # #


# # #