Sunday, January 20, 2013

A Broken Weld Repair


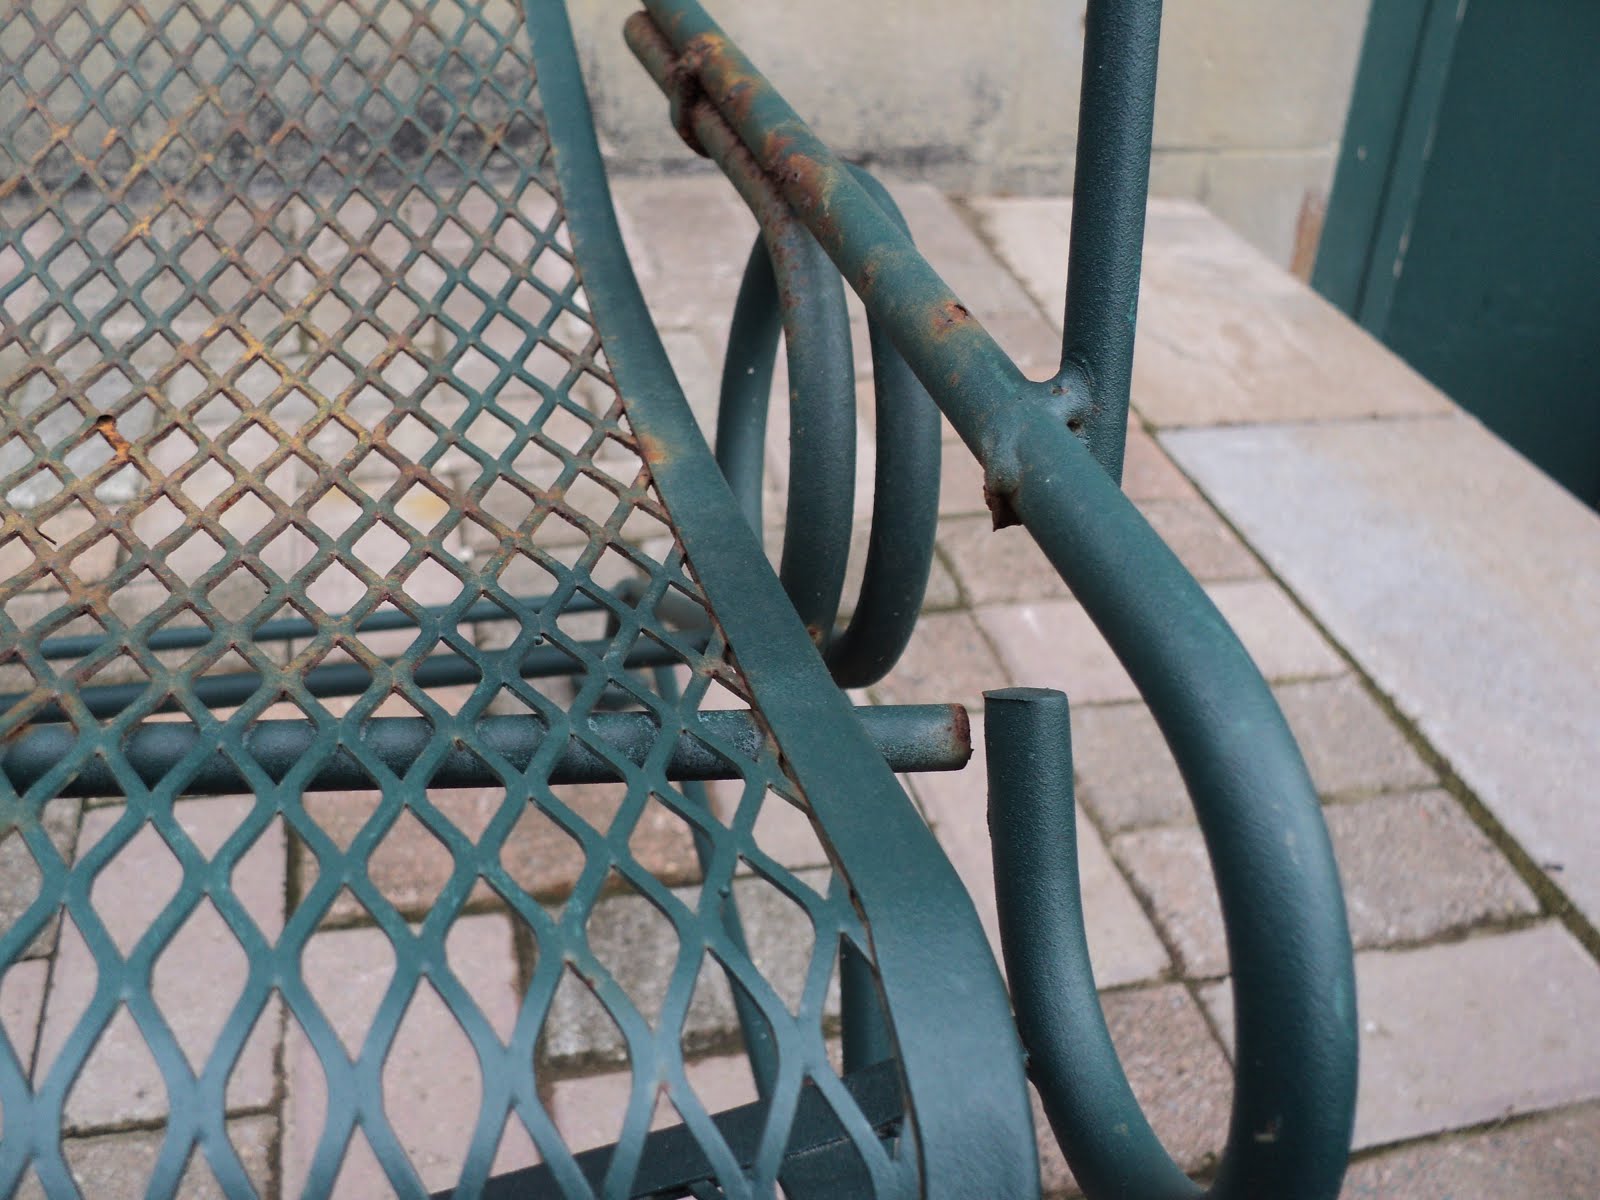
My wife found this iron patio chair some time ago.


It's quite an attractive piece, but it has a flaw -- a broken weld at the front left.


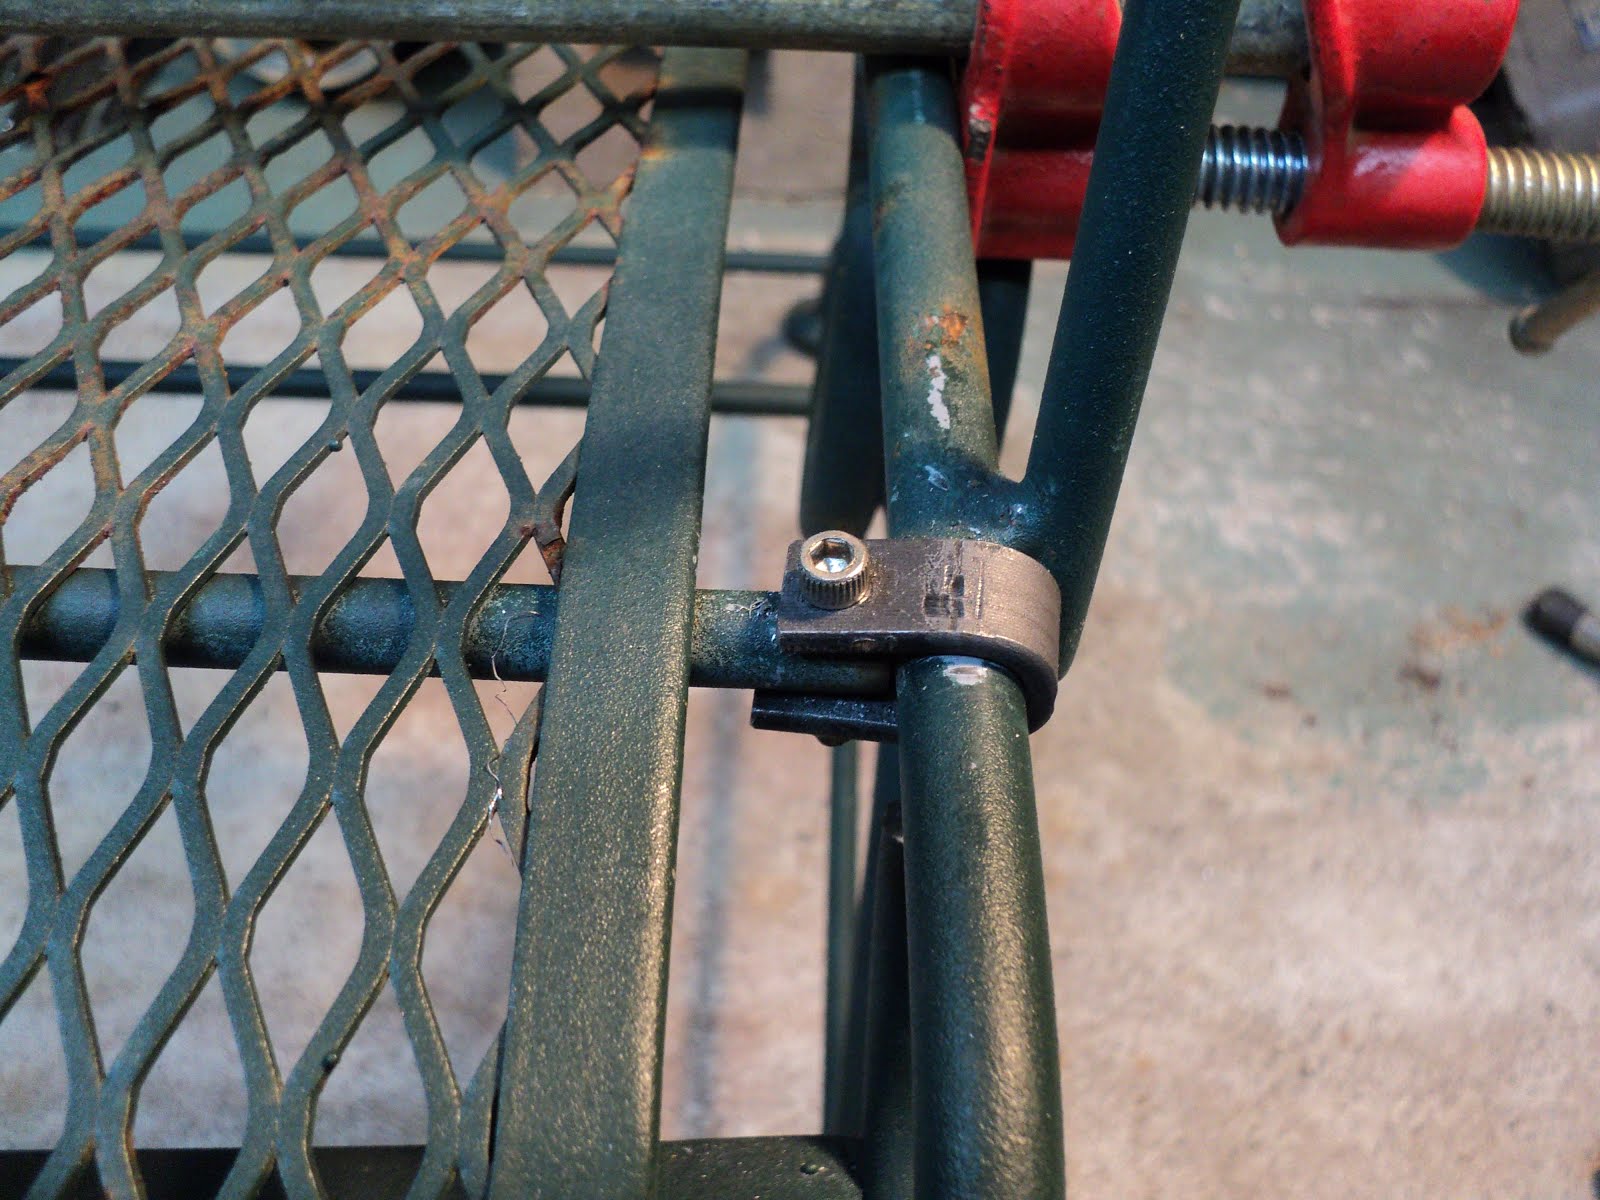
I don't have welding gear. I might be able to braze it, but I'm not all that practised at brazing; I'm not certain I could obtain a good outcome. That leaves me with the option of a mechanical repair method similar to one that's already been applied to this chair by someone in the past. Here's a view of that repair at the upper left of the back.


This will be a bit of a challenge. The repair pictured above would have been relatively easy to accomplish, since that  added strap was attaching to a flat piece. I need to do a similar repair, but I'll be attaching to a round piece -- that complicates things a little. Anyway, we'll see how it goes.

- - -

First off, what's left of the broken weld on the underside of the large diameter round has to be ground away -- it will interfere with installation of a strap.


That went reasonably well.


Then it turned out that the upper part of the old weld had to go as well; it would interfere with positioning the end of the  lateral round.


Now I can begin to fabricate the attachment strap, and figure out how to go about installing it.

- - -

Here's what I've rigged for a metal forming jig.


That 's a couple of pieces of 12mm diameter steel rod[1] clamped very tightly in the vise, and very tightly clamped across/to the work by Vice-Grips. The masking tape on the work gave a me a way to mark distinct positioning lines. The material is 1/2" wide mild steel flat stock, 1/8" thick. Here's the short end after forming with the aid of Channellocks.


And here it is almost fully formed.


This method doesn't yield a perfect result, but with a little more persuasion from another pair of Vise-Grips while the work is still in place there, I'll get an adequate approximation of the shape I need for my repair strap. Then I can cut off the excess material and carry on with fitting the strap to the chair.

- - -

I've prepared the strap. I've drilled a 5/32" pilot hole through its upper side. Here it is clamped in place ready for the drilling to be completed.


And here it is done.


After drilling completely through 5/32" diameter, I bored the hole out to 11/64" diameter, and installed a stainless steel 8-32 screw. That will make for a more-than-adequately strong repair.

I'm not entirely done with this. I still want to refine that repair job a bit, and I need to plan out a repaint job for the entire chair. But I'm pleased that my methodology here panned out as I thought it would -- that's a sound repair that will never need attention again.

- - -

The Finished Repair -- SATURDAY, JANUARY 26, 2013

Here it is fully completed.


I've rounded off the strap's corners, and cinched the strap as snugly as I could around the large diameter rod. I shortened the screw by 1/8" so it would fit correctly with two stainless steel flat washers added, and an acorn nut installed with blue thread-locker. The repair is now well and truly done.

- - -

Note:

[1] My loathsome day job is as a laser and impact printer repair technician. That gives me access to an excellent supply of discarded steel rod material from parts replacements and from scrapped printers. For an amateur machinist, it's a treasure-trove of useful material.

If your workshop interests are similar to mine, you might want to make the acquaintance of a local printer repair shop -- you'll be amazed at the stuff they throw out.

# # #

Sunday, January 6, 2013

CA Adhesive As A Machinist's Aid


Cured CA adhesive ('Krazy' glue or 'Super' glue) is not terribly heat resistant -- boiling water temperature will soften it. While that's a weakness of the material for some applications, it's a characteristic that can be put to good use in the machine shop at times.

I have a small gland nut from the valve stem of a propane torch with ruined threading on it. [Long story.] If I can turn down the mashed threads so that the nut's shank can at least re-enter the valve's stem-hole, I can get the valve back in working order. The difficulty is in mounting the tiny nut for turning on the lathe. That's where CA adhesive comes in. Here's a view of what I've done up so that I can chuck the gland nut.


A length of 1/4" steel rod and 9/32" brass tubing provide a foundation on which I can squarely place the damaged nut. I've applied CA adhesive and let it cure. Now I've got a 'mandrel' that I can chuck in the lathe.


When I'm done turning that, I'll dismount it, heat it up a bit with a propane torch and the nut will come free of the mandrel easily.

- - -

That worked nicely.


Now I'll free the nut from the mandrel and I can reassemble the valve.

- - -

Here's the valve back together less the knob.


After inserting the now threadless gland nut, I applied CA adhesive all around the perimeter of the nut's hex,[1] and set the thing aside for awhile for the adhesive to cure. That adhesive-secured gland nut should work fine. That nut really doesn't do much -- all it's there for is to provide a sleeve bearing for the valve stem. The gland nut has no sealing function, and it really has no load to bear of any consequence, so held-in-place-by-glue is just as good as held-in-place-by-threads.[2]

- - -

Here's the torch fully assembled and operational.


CA adhesive is versatile stuff. I'm never without it on hand.

- - -

Notes:

[1] CA adhesive can be treacherous to work with in this sort of situation. The stuff is extremely runny, and it will wick in anyplace and everyplace it can. Never take the attitude 'if a little is good, more should be better'. You'll end up regretting it.

[2] This is a good example of the value of setting aside orthodoxy at times, and pondering what it is that a given component really does. As long as I remained fixated on having a proper screw-in gland nut, this torch just sat idle in a box under my workbench. Once I finally studied the problem more thoughtfully, it dawned on me that the repair method outlined above could work, and was worth pursuing.

# # #

Friday, October 26, 2012

Backyard Archaeology II


The first 'Backyard Archaeology' post I did was about an old 6" diameter wheel that turned up when some retaining wall work was being done at the back of the house.

Here's another item that got dug up along with the wheel:


The scantest remains of a garden fork. Turning that back into a useful tool will be a righteous challenge. I have the makings of a handle-shaft on hand. Some wire-brushing is in order for starters. We'll see how this goes.

# # #


# # #

Saturday, October 20, 2012

An Unorthodox Coupling Nut Application


I've written before about coupling nuts -- about what a useful, versatile standard hardware item they are. Here's another example of an unorthodox application that got me what I needed with a minimum of machining.

- - -

The Problem

I have an old 230V space heater in my workshop that works fine, and looks likely to last forever. It has one little annoying feature, though -- its thermostat is mounted at the lower rear of the unit, like so.


(That's actually a sensible place for the thermostat to be, where it can determine when to switch off based on the temperature of the incoming air.)

The way I have the heater situated, it's awkward to have to reach around to the lower rear of it to switch it on. I could see a way to install a control knob in front while leaving the thermostat in place at the rear, but I needed to fabricate a 3/16" diameter rod-coupling with a little bit of axial 'give' to it to compensate for imperfect alignment of components. A 1/4"-20 coupling nut came to the rescue. Here's a view of the rod-coupling I came up with.


I love that sort of work. I won't bore you with all the details of it as I'm usually prone to. The key to success is extremely careful layout, centre-punching and setup in a good drill press vise.  The key to the coupling's axial 'give' is the cotter-pinned end. That part of the coupling is 'sloppy' enough to compensate for an imperfect rod axis from front-to-back of the heater. The setscrew fastening at the coupling's other (left) side end gives angular adjustability, so the knob can be positioned correctly angularly.

The brass bushing at the left was glued onto its shaft-end with CA adhesive. The brass bushing at the right was left a free slip fit. Here's a view of the coupling installed in the heater.


And here's the front of the heater with its new control knob.


The knob's 'directionality' is the reverse of what it should be, but that's not difficult to get accustomed to. The whole arrangement works perfectly. (Concealed by the knob is a Heyco SB 312-3 snap bushing that's serving as a 'bearing' for the control shaft.)

Anyway, that's a good example of the versatility of coupling nuts. I could have fabricated much the same thing from scratch from a similar length of plain steel rod, but the hexagonal coupling nut was easier to work with for my purpose here.

# # #


# # #

Sunday, October 14, 2012

Work Habits -- Picking Up and Putting Away


[That's not a picture of my place. I just threw that picture in for effect.]

- - -

It never ceases to amaze me -- the number and variety of tools, parts bins, adhesives, solvents, lubricants, what-have-you that get brought to bear on the seemingly simplest, tiniest of projects. Every time I tackle anything, by the time I'm done with it, I seem to have put to use eighty percent of my workshop's resources in one way or another.

There's no escaping that, and it can result in mind-boggling workbench clutter if you let it. Now, I know there are those who can cope with frightful clutter, and keep on working in the midst of it efficiently and effectively,  but I'm not one of them; workbench clutter eventually causes my brain to seize up. I reach a point where all I'm aware of is the clutter, and I can no longer function. I have to take a time-out to pick up and put away everything before I can carry on with the project at hand.

I long ago decided that the best way for me deal with clutter was to nip it in the bud, minute-by-minute if need be. What I do is I constantly review what it is that I actually need to have right at hand on the workbench. If I tap a 6-32 thread, as soon as it's done I ask myself, "Any more of those to be done on this?" If the answer is 'no', the tap and the tap wrench go directly back to where they belong; I don't leave them to loiter on the bench. I apply that little test to everything as I go along.

I find that there's really no down side to that practice. Once I'm done with a session of whatever, the 'picking up and putting away' left to be done is near zero; things don't get misplaced -- they're always back where they ought to be, and the bench is cleared and ready for the next session, whatever that may consist of.

Anyway, as I said earlier, I know there are those for whom what I've just been on about is not a concern at all -- they can happily work away amidst clutter that would have me running for the exit. But if you're one for whom clutter is an irritant, there's an easy way to keep it at bay -- just make it a habit to nip it in the bud as you proceed with whatever you're doing.

# # #


# # #

Monday, October 8, 2012

Belt Sander/Grinders


My dad found this old Delta sanding machine some years ago.


It was in pretty rough shape. The disc sander's table was missing, the 8" diameter disc had a lot of axial run-out and the belt sander's plastic pulleys were badly out-of-round. I gave up on the disc, I have an adequate disc sander anyway, but I trued up the belt pulleys on the lathe and replaced their bearings. That got the belt sander portion working reasonably well, and gave me an introduction to what a 1" x 42" belt sander/grinder can do. I was impressed. A lot of tool sharpening chores are made much easier. Grinding with the belt is a cooler-running operation than with a grinding wheel, and the table opens up possibilities for creating fixtures to 'de-skill' certain jobs.

However, the three-pulley architecture of the Delta machine leaves a bit to be desired. I've never been entirely happy with the way the belt tracks, and I don't expect the plastic rims of the pulleys to remain true indefinitely. (I'm already getting a bit of 'shimmy' from the belt.) So, when I saw a two-pulley sander/grinder[1] on offer at Lee Valley for a reasonable price I thought, "Hmmm. That may be the way to go." A bonus was that the Lee Valley machine takes the same size sanding belt as the Delta, so all my spare belts would remain useable

A couple of weeks ago I went to a Lee Valley store, parted with the requisite number of dollars and brought home a box full of assemble-it-yourself sander/grinder. We'll see how this goes.

- - -

The Lee Valley machine is a supply-your-own-motor deal. The motor's shaft diameter must be 1/2", rotation must be CCW as seen shaft-end-on. I have a spare 1/3 hp motor[2] that will do nicely. I'll rob the Delta machine of its switch and wiring, and I'll have the motor taken care of.

The machine's base comes with rubber 'feet' attached. The feet are adequate, but they look kind of dinky to me. I have some taller, more substantial feet that I'll install in their place.


- - -

With that done, assembly of the machine is straightforward. (An adequate if unimpressive 'manual' comes with it.) I gave it a trial run, and the belt's tracking is good but not perfect. Here's a view of the drive pulley.


The belt wants to track slightly off to the left. To correct that, I'll need to shim up the front end of the motor very slightly -- easier said than done. I have an idea for a way to build a tracking adjustment into this machine, and I think I'll pursue that and see how it works out. I'll be back with that when I get it done. Meanwhile, it looks like I've got a good replacement here for the old Delta boat anchor.[3]

- - -


Update -- SATURDAY, OCTOBER 27, 2012

I've prepared the chassis for the tracking adjustability modification I have in mind. Here's a view of that.


That beige steel rectangle will shim up the front end of the motor. The furniture glides will elevate the chassis so there'll be about an inch of clearance underneath it. (I glued inner-tube rubber discs onto the glides with CA adhesive, so the machine won't 'walk'.)

Two modified 5/16"-18 tee-nuts will be force fitted into those two chamfered 25/64" diameter holes I drilled. (Unmodified tee-nuts are shown down in front.) I could have drilled tap-size holes and threaded the base plate directly, but installing tee-nuts gives me far superior threads.

The idea is to shim up the front of the motor more than is needed, giving the machine an inherent, initial tendency to track the belt too far rightward, Then, by means of short 'jack' screws installed from below, I should be able to slightly elevate the rear of the motor as needed to adjust belt tracking. I would like to have only needed one central tee-nut, but the base of the motor-mount is mostly hollow along its centre, so I had to go with two tee-nuts. Here's a view of the chassis with the tee-nuts and feet installed.


And fully reassembled, It works as I thought it would.


The machine now has on-the-fly adjustable belt tracking. (It's easy to tip the machine rearward for access to the adjustment screws.)

Key to the adjustability is the installation of the rear motor-mount bolts. The front bolts and nuts are fully tightened, of course, but the rear bolts aren't. The rear bolts are partially tightened against split lock washers, like so.


That provides a sprung downward bias for the rear of the motor mount that the two adjustment screws underneath can operate against to effect the tracking adjustment.

Anyway, I'm quite pleased with that outcome -- it's a worthwhile modification. There's still more to show and tell about this machine, but I'll leave it at that for now.

- - -


The On/Off Switch Fitted -- SUNDAY, NOVEMBER 11, 2012

Here's a view of the simple way I adapted the old Delta switchbox to the chassis.


I just fabricated an 'L' bracket from some 1 1/2" wide steel flat stock, and attached it to the chassis at the left rear foot's stud. That's certainly an improvement from having the switchbox just out flopping about on the line cord. Now the machine is a proper, self-contained unit.

- - -

Platen Tracking -- SATURDAY, NOVEMBER 17, 2012

The 'platen' is a flat steel bar that backs up the working portion of the abrasive belt between the two pulleys. The belt tracks a little off to the right with respect to the platen; it ought to track centred on the platen. Here's a view of the flaw.


I could shift the drive pulley leftward on the motor's shaft a bit to correct that, but I'd also have to fiddle with upper pulley's positioning. I'd rather take the easy way and just shim the platen rightward a little by installing two washers where the platen attaches to the chassis.

1/4" flat washers are thicker than what's needed. I have some 3/16" fender washers that are about the right thickness. I'll bore two of those out to 1/4" I.D. and they should do fine.

- - -

And here's a view of the platen re-installed with the two shim washers in place.


That takes care of that.

Tomorrow, I'll have something to show about the upper pulley, and then I can get on with putting this machine to use.

- - -

The Wheel Mount -- SUNDAY, NOVEMBER 18, 2012

Viel's name for the item that supports the upper pulley is 'wheel mount'. Here's a view of it with a slight modification that I made to it.


I wedged a piece of 3/4" thick softwood in between the uprights to make the thing more rigid. Prior to doing that, tightening up the screws on either side at all tended to distort the wheel mount's uprights.

The loose fit of the wheel mount in its tube, along with the screws at either side, provide a bit of pulley alignment adjustment. My machine appears to be happiest with the wheel mount biased fully rightward. Note that pulley alignment is not the same thing as belt tracking. Belt tracking is adjusted by shimming the motor, and must be resolved first, as was done here.

- - -

The Table

The machine's table is well-thought-out and nicely made; it has a huge 'tilt' range, like so.


That's far superior to the table geometry I had on the old Delta machine. I think I'll spend some time sharpening cold chisels.

- - -

That was the easiest sharpening work I've ever done.


(That blade at the right is the plane iron from from a small block plane.)

That was a breeze. It's amazing how coolly the belt grinds; you'd have to be trying to 'burn' a cutting edge with the thing.

Anyway, no regrets about retiring the Delta beast and acquiring this machine. It was money well spent.

- - -

Update -- SUNDAY, MARCH 10, 2013

I've had the use of this machine for a few months now, and I'm delighted with it. It's proving to be one of the most useful pieces of gear in my workshop.

- - -

Addendum -- A Table Tilt-Lock Improvement -- MONDAY, JUNE 10, 2013

I found it a nuisance to have to use two wrenches while making adjustments to the table's angle, so I pinned[4] the head end of the 1/4"-20 screw, like so.


I also substituted a light split lockwasher for the standard one, and added a flat washer under the nut, over the split lockwasher.

I find the easiest way to make the tilt adjustment is to have the nut loosened just enough that the table is free to pivot, but will stay at whatever angle it's set to. Then, slide the table off for good access to the nut, and tighten the nut. The angle you've set won't be altered at all as you tighten the nut.[5] Re-install the table, set its distance from the belt, and you're away.

- - -
Notes:

[1] The machine is made in Rivière-du-Loup, Quebec by Viel Tools. Viel's on-line price is a little less than Lee Valley's, but Lee Valley has a store that's handy to me, so I wouldn't save anything by having one shipped to me from from Quebec.

[2] Lee Valley calls for a minimum 1/8 hp motor. 1/4 hp would be ideal. 1/3 hp is more than what's needed, but it's what I have on hand and idle, so I'll put it to work here. The Delta motor's shaft diameter is 5/8", so it's unsuitable for the new sander/grinder.

[3] I'm always inclined to think, with respect to workshop machinery, that 'the more massive, the better'. That line of thought is not fallacious, but it's not infallible; the belt sander/grinders seen here are illustrative.

The old Delta machine is a massive, heavy piece of gear. The Viel machine is a fraction of the Delta machine's mass/weight, yet the Viel machine does the job at least as well if not better. There's a lot to be said for 'minimalism' sometimes.

[4] A 3/32" x 5/8" roll pin would work. I used a 5/8" long steel dowel pin that I happen to have a supply of. The pin is 0.092" diameter -- just shy of 3/32". I drilled through 5/64", followed by No. 43 (0.0890"), followed by No. 42 (0.0935"). That gave me a light interference fit for the pin.

The reason that worked out as it did is because of a peculiarity of twist drills. Twist drills are not reamers. When an existing hole is enlarged by the next size up of drill, the resulting hole is likely to be a bit undersize. That characteristic can occasionally be exploited to good effect, as I was able to do here.

Since I drilled all the way through, I'll be able to punch out the pin should I ever have reason to dismantle the thing again.

[5] Warning -- WEDNESDAY, OCTOBER 16, 2013

What I just said there is not necessarily true, I've since discovered. It's helpful to oil the washer arrangement, but that's no guarantee that table angle won't shift on you as you tighten the nut. A better way to deal with table angle adjustment may be to tighten the nut to where the table remains hand-adjustable with some difficulty. At that tightness, the table's angle is unlikely to be altered by normal use forces.

# # #


# # #

Sunday, September 30, 2012

A Discarded HP (Hewlett-Packard) mPDU

My boss at work found this and thought I might have use for it.


It's an HP Modular Power Distribution Unit (mPDU). Not shown in the photo are three more power bars, and a heap of steel brackets and fasteners. It's all brand new; it was in its original box.

It seems a school was throwing it out,[1] so my boss snagged it. I don't have use for the breaker/distribution box, but the power bars I can certainly make use of -- I just have to replace the peculiar plugs they have with standard ones.

The power bars' line cords exhibit something I've not seen before -- the wire gauge expressed in both American Wire Gauge (AWG) and metric. The AWG number is '14'; the metric 'gauge' is 1.5mm2. Looking up a combined AWG/metric wire gauge table reveals that 1.5mm2 is actually a bit shy of 14 AWG, so the cords are either 'light' 14 AWG, or 'heavy' 1.5mm2. It strikes me that the metric 'equivalence' figure here is at best unhelpful, at worst misleading.

Anyway, enough of that.

I picked up four Leviton No. 515PV plugs to make the power bars useable. They're the type with clamp-style terminals that I find to be easy to work with and very reliable. Here's a view of one opened up.


Installing these is a no-brainer, really, but it's nice to have predetermined dimensions for jacket and insulation strip length. I'll go with 1" for the jacket, 3/8" for the hot and neutral wires and 1/2" for the ground wire. Here's how that looks.


The colour coding is international, not North American. Here's the equivalence in the form 'Function/N.A. colour/Int'l colour'.

Line/Black/Brown

Neutral/White/Blue

Ground/Green/Green with Yellow Tracer

It's easy to remember the international colours if you think of 'line' as 'hot', brown as a 'warm' colour and blue as a 'cool' colour.

I like to tin stranded conductors with 60/40 electronic solder and flux. Here's how that looks after the flux residue has been cleaned off.


Those strip length dimensions I used make for a nice, compact installation that for certain will fit the shell and the strain-relief clamp correctly, like so.


Now I've got the use of one of the four power bars; I just have to come up with a way to mount it. The mounting provision is an M5 threaded hole at each end of the bar, like so.


The brackets that came with the mPDU are all odd looking things meant for mounting the bars in an electronic equipment rack -- they're not suitable for mounting to a flat surface as I have in mind. A common one-inch corner brace may be a simple solution.


That will work, but I'll need some 1/8" thick material for shim 'washers' to take up the space under the corner braces.

A while ago, I came up with a neat method for ripping odd thicknesses of shim/spacer material on the table saw. I'll apply it here and I'll have just what I need shortly.

- - -

And here we are.


Now I can replace this clunky old arrangement.


And here we are.


Much better. That corner brace and 1/8" shim mounting arrangement turned out well; that power bar is solidly attached to the bench leg.

By the way, having plenty of well-situated, permanently installed power bars in a workshop is a great convenience -- well worth the expense to acquire them and the work to install them. I dislike extension cords; they're a nuisance and a trip hazard. I have something like six power bars installed here and there in my shop, and they save me a lot of aggravation.

- - -

Note:

[1] I could go off on a rant here about government waste, but that would be futile. Waste is everywhere in our economy; the economy practically runs on the production of waste. At least in this case, I was able to intercept a bit of it to my advantage. Good. And if some school wants to throw out a new milling machine and some welding gear where I can find them, that would suit me just fine.

# # #


# # #