Here's a 'won't start' snow thrower that my son picked up for very little money.

I just brought it in from outside, so there's snow on it. I'll leave it to make a puddle on the floor, and return to it when all is dry.
- - -
It's a Model No. 55380, Serial No. 000242. That serial number doesn't show up on Lawn-Boy's website as being legitimate. Perhaps it's a Canadian serial number that Lawn-Boy couldn't be bothered to track.
Anyway, I got some useful information from the website on the model series:
- Swath: 20 inches.
- Engine: Tecumseh Model No. AH600-1657N; 3 hp; 2-stroke cycle; electric start.
- Engine Speed: 4,000 rpm ± 100 rpm..
- Ignition Coil Air Gap: 0.013".
- Mix Ratio: 50:1; originally 32:1. [The subject machine is 32:1.]
- Spark Plug: Champion CJ8Y.
- Spark Plug Gap: 0.030".
- - -
Top Cover Removal
Seven No. 10 x 1/2" hex washerhead screws (5/16" A/F) fasten the top cover. (Two of the screws are missing on this machine.) The fuel tank's cap must come off, then the cover can be forced up over the fuel tank's neck and slid up the handlebars a ways. A small bungee cord serves to hold the cover up out of the way.

Spark Plug Access
Here's where things get a bit messy. I don't have a compact 3/4" spark plug socket that will reach in neatly under the machine's rear cover, so I'll have to loosen off the rear cover a bit to get the spark plug out. A few more No. 10 x 1/2" hex washerhead screws have to come out.
And here's the spark plug out.

It's a resistance-type spark plug -- Champion RCJ8Y. Centre electrode resistance is about 13k ohms. The plug is in reasonably good condition. Gap is a 'loose' 0.030".
And a test shows that I have spark, and the kill switch works. I'll clean and gap the spark plug and reinstall it.
- - -
A Needless Retaining Clip To Watch Out For
Tecumseh likes to install a barb-fastened retaining clip on a cooling fin of the cylinder head to keep the spark plug wire in place. On this engine, the clip has come part way off. (The clip is right at the centre of the following photograph.)

Delete the clip entirely; it's not needed, and it can come loose and get into the engine's flywheel/starter-gear area. I've had that happen on an MTD snow thrower with much the same engine. The little gone-astray clip had the engine jammed solid until I found and removed it. Here's a view of the clip from this engine, alongside the one that I had once retrieved from a similar Tecumseh engine.

Again, the clip is not needed, and can cause nasty trouble if it comes loose.
- - -
It Starts!
At room temperature here in the workshop, it started on the first pull with only choking -- no priming. I know from experience with this engine that it is very easily flooded by needless priming. I wonder if that might have been a factor in the original owner's decision to let the machine go -- perhaps he'd been inadvertently flooding the engine. There's a chart decal[1] on the dashboard, though, that gives good guidance for use of the primer bulb. What all went on with the machine before my son got it, I'll never know.
- - -
Rear/Underside Accessibility
Rear/underside service accessibility on this machine is dreadful. There's a single rear/underside cover that incorporates the dashboard. Gaining access to the carburetor to remove and service it looks like a daunting task. Here are two views.


Note that someone has cut away the grillwork under the carburetor to lend accessibility to the carburetor's float bowl. I'll remove the float bowl and take a look-see for contamination.
- - -
There's some particulate matter in the float bowl, but no evidence of water. The float level appears to be set very high.
Be that as it may, for the time being I'll go with the adage, "If it ain't broke, don't fix it.", clean the float bowl and put it back on. There are some improvements I want to make to a couple of cover attachment points.
- - -
Two Cover Attachment Brackets Riveted So They Can't Swivel
The Tinnerman nut brackets for attaching the top cover at its upper rear corners tended to swivel a bit, so the nuts would fail to align with the screw holes in the cover. I gave each bracket a 1/8" hollow rivet, and that's the end of that little problem.


Electric Starter Switch
Dismounting the electric starter switch is the key to removing the rear/underside cover. (Along with removing the wheels.) With the switch off its mounting block, and the mounting block off the cover, the switch can be passed up through a big opening, out of the way of cover removal. Here's a view of that.

Wheel and axle removal is straightforward -- there are external snap rings holding the wheels on.

And here we are with the rear/underside cover out of the way of carburetor removal.

In addition to getting the starter switch and its mounting block and the wheels out of the way, the following items must be dealt with:
- The discharge chute's positioning crank must be unpinned and removed from its shaft.
- The kill switch's wiring must be disconnected from the kill switch.
- The choke handle must be forced through its grille opening.
- The primer tube must be removed from its nipple at the carburetor.
- - -
Carburetor Removal
Here's the carburetor accessible for removal.

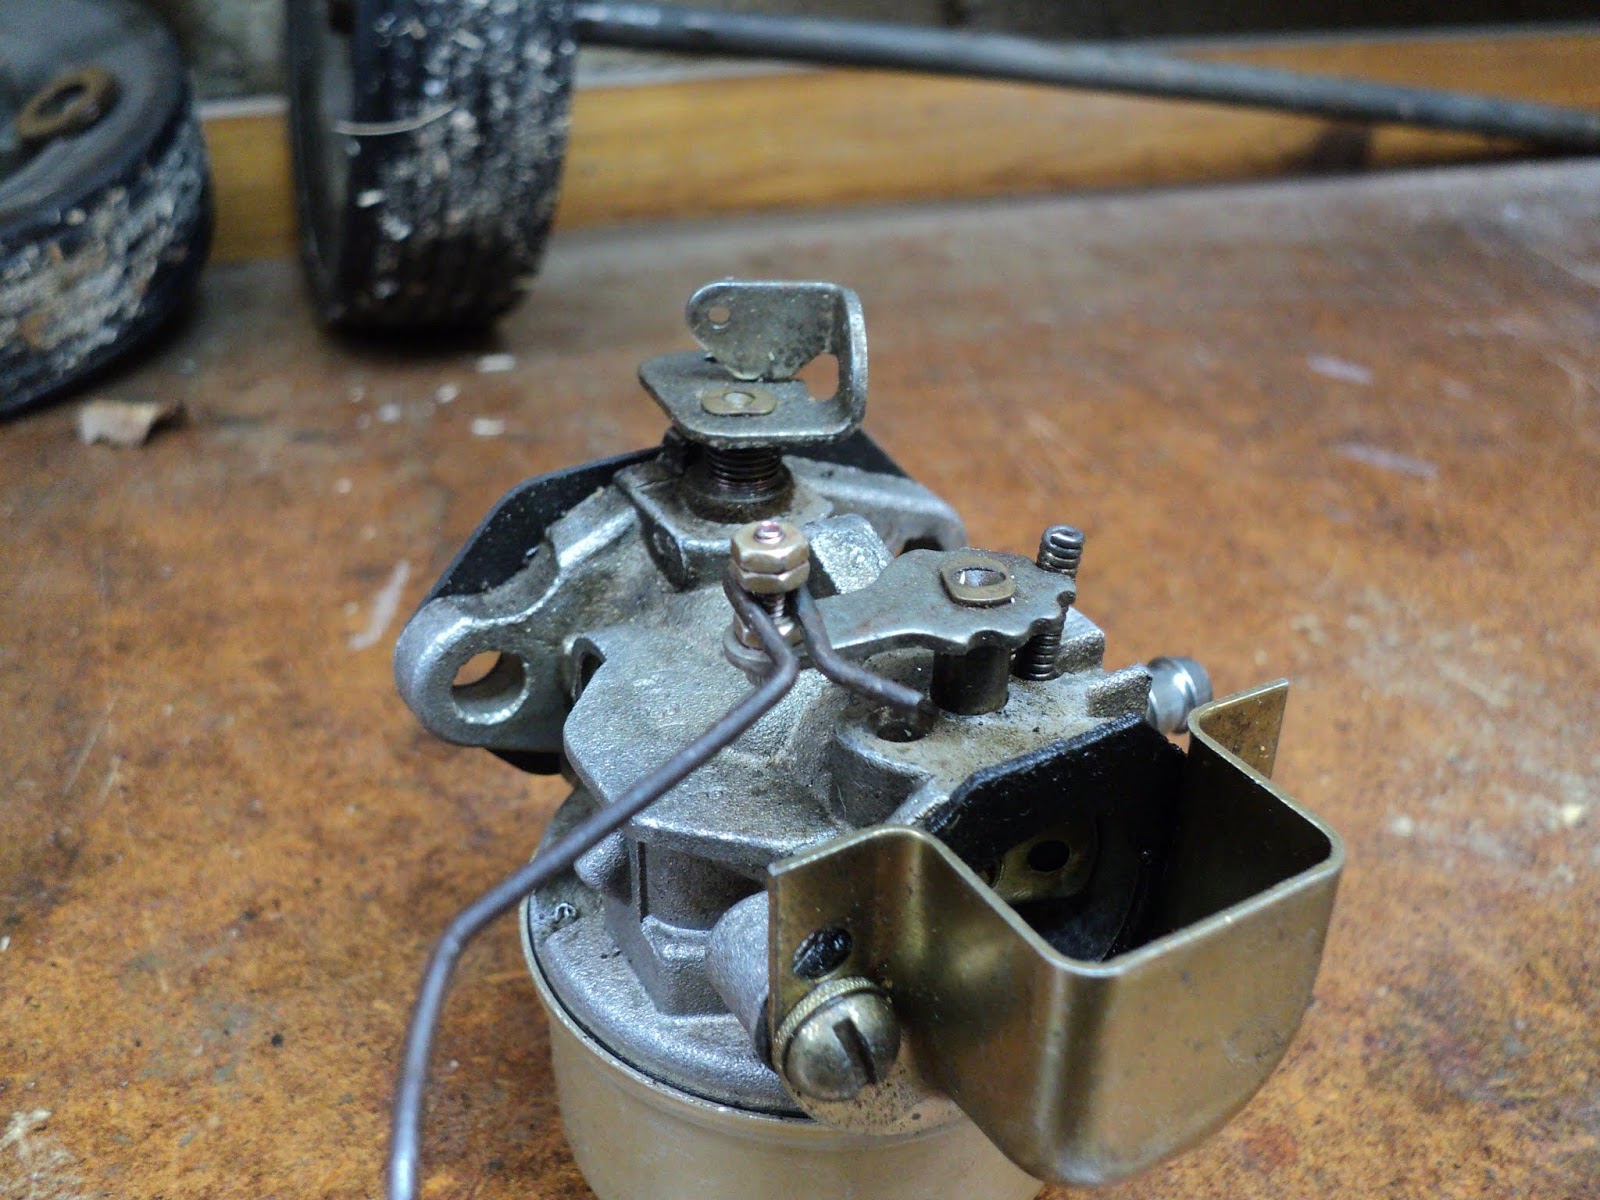
And here's the carburetor off the engine.

Note the following:
- A spring-type hose clamp secures the 1/4" I.D. fuel line to its nipple. Have a suitable container handy to drain the fuel tank, or a stopper for the end of the fuel line.
- Two 3/8" A/F hex nuts fasten the carburetor to the engine.
- There's a gasket, and then a spacer/insulator block between the carburetor and the engine. The gasket is likely to be welded to the carburetor. Just leave it be. Leave the spacer/insulator block on the engine.
- There are no extraneous mystery holes for the governor spring and link. Governor spring and link installation is straightforward.
- The carburetor is as simple as carburetors ever get. There is no idle circuit -- the carburetor is designed to operate only at the engine's 4,000 rpm governed speed via the main jet. There is no mixture adjustment.
- The choke detenting on my carburetor is imperfect; the choke butterfly's lever doesn't want to engage the fully wide open detent. The choke butterfly's wide open position is a little askew from fully wide open. I can see no way to correct the flaw.
- - -
Fuel Tank Removal
I chose to remove the fuel tank so I could thoroughly drain it and dry it out. The tank is attached at two points, with one 1/4"-20 fastener and one 10-24 fastener. The nuts used are prevailing-torque types, so they're a bit stiff to get off and on.
- - -
A Brief Trial -- MONDAY, FEBRUARY 4, 2019
I buttoned up the machine sufficiently to try it out, mixed up a half litre of 32:1 fuel and took it outside. It started on the first pull. It's been mild lately, and the snow has compacted and gained density, so it wasn't much of a trial. But the machine does work. 'Time to finish up 'perfecting' it.
- - -
Remounting The Electric Start Switch Mounting Block And Switch
The original fasteners were discrete screws and nuts. I prefer not having to deal with discrete nuts, so I'll install threaded inserts. We'll see how that works out.
- - -
And here we are with two 6-32 inserts in the mounting block.

And three 10-24 inserts in the underside cover.

I add a bead of runny CA adhesive around the flanges of threaded inserts, just for good measure.
I'll reinstall the mounting block and switch with anti-seize compound on the screw threads, and I can get on with an examination of the snow thrower's drive train.
- - -
Drive Train Cover Trouble
The two lowermost screws for attaching the cover are not original -- they're 10-24 screw-and-nut arrangements that have rusted to near seizure. I managed to get them apart and out. Here's a view of the cover fastener complemement.

The best I'll be able to do will be to come up with hex head replacements for the 10-24 screws. New nuts and anti-seize compound should make for an assembly that can be opened up again readily if and when the time comes.
- - -
The V-Belt Drive Train
It appears to be in remarkably good condition.

The belt looks ok. The tension idler runs on a big sleeve bearing that's in fine condition. I can button that up, and put the machine outside to see how well it starts at low temperatures.
- - -
Whoops! -- THURSDAY, FEBRUARY 7, 2019
There's nothing like old machinery to keep one occupied. I was trying out the machine this afternoon, and it started to run poorly after a bit. It turned out that the choke handle's stud had popped loose from the choke lever. The engine must have remained choked after I thought I'd opened the choke.

Not one of Tecumseh's finer moments.There are three possible ways to go to repair this:
a) Swage the stud back in place in its lever with a centre punch. That might work, but if the stud worked loose once, it may work loose again. The design is evidently not trustworthy.
b) Cut away the grillwork in the cover immediately behind the carburetor, so one can reach in and operate the choke lever directly, without the aid of a handle. That would do away with the possibility of another choke handle failure, but it's an inelegant solution -- the sort of thing a bush mechanic would do in a pinch. I'll leave that for a last-ditch solution.
c) Fabricate a new stud from a 2-56 screw and hex nuts and red threadlocker. I have some stainless steel 2-56 screws on hand that I got from Amazon a while ago. The screws are very nice, and one of them ought to be strong enough to serve as a stud. I think I'll go with that.
- - -
Fixed
Here's my replacement choke handle stud.

That's a 2-56 x 3/8" stainless steel hex socket head screw and three hex nuts assembled with red threadlocker. That should work and last. And here it is with the choke lever's handle clipped on.
Now I can button up the works again and try it out in the morning.
- - -
Choke Position Detenting
Earlier on, I mentioned that there was a defect in the choke's detenting -- the choke couldn't be quite fully opened. While I had the carburetor off the engine again, I tried modifying the detent profile with a diamond burr in a rotary tool. That worked out ok, and the choke now detents correctly. Here's a view of the modified detents.

- - -
A Proper Trial -- WEDNESDAY, FEBRUARY 13, 2019
We had some real snow here, so I got a chance to try out the snowthrower. It started easily, and it chewed its way through snow as deep as the height of the snowthrower's intake maw. I cleared a walkway all across the back of the house with it.
I'm actually quite impressed by these small machines. They save the user a lot of heavy lifting, and they're far more maneuverable than the big, two-stage snowthrowers. For dealing with relatively light snowfalls, they can't be beat.
I'll put this machine up for sale on Kijiji, but I'll hang onto my MTD SnowFlite.
* * *
Note:
[1] Here's the primer usage data from the decal. (Temperatures were Fahrenheit. My approximate Celsius equivalents are given in square brackets.)
FUEL PRIMER
BELOW 15° - FIVE PRIMES [Below approx. -9.5° Celsius]
15° TO 30° - TWO PRIMES [Approx. -9.5° to -1° Celsius]
ABOVE 30° - NO PRIMES [Above approx. -1° Celsius]
# # #
# # #
Looks good. My Lawn-Boy ST320E is 40 years old and still eats it up.
ReplyDeleteThe power of the two stroke engine is hard to beat!
ReplyDelete