I should know better by now than to take on 8" table saw restoration projects, but this piece of junk was free, and I couldn't resist.
The 8" saw blade diameter is utterly obsolete -- it's difficult to find replacement blades. But the 8" saws take me back to my long lost youth, so I like to see them brought back to useful life, even though they're next-to-impossible to sell. With this machine, I'm going to see if I can coax an 8 1/4" blade into it. 8 1/4" appears to be a current blade diameter that can maybe extend the life of these old-timers.
As it currently stands, the saw is the usual mess of tinkered-up components, with much (just about everything) wrong with it.
The Saw Itself
There's no maker's name on the saw, just an embossed "MODEL S 25" in front.
Googling "MODEL S 25 table saw" got me nothing.
The rip fence and mitre gauge are actually pretty decent. The throat insert is a wretched, shop-made piece of scrap metal that will have to be replaced. The arbor bearings aren't gone, but they feel grease-starved. The arbor's pulley is in frightful condition.
The pulley was run with a loose setscrew, so the pulley's bore and keyway have been battered beyond salvation. The spindle's keyway is also a battered, widened mess. I've yet to examine the spindle's outside diameter closely. I hope it's ok.
To add insult to injury, the v-belt is a 3V cross-section belt running in 4L pulleys, and the drive ratio is way too slow. At its best, this must have been a feeble excuse for a saw.
The Stand
The stand is a cobbled-up collection of wooden table legs and plywood. It's likely to end up as firewood.
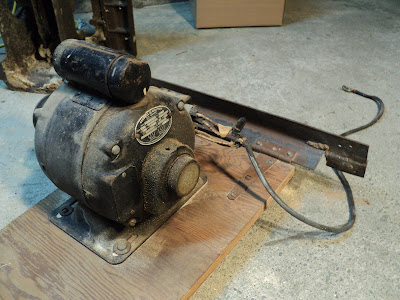
The Motor
The motor is an ancient beast of a thing with a 1/2 hp rating. I suspect that it was originally a 25 cycle motor that got rewound for 60 cycles -- its size and weight are about twice that of a modern 1/2 hp motor. I don't think I'll be using the motor for this saw; it's just too big and heavy for the rear-mounted motor configuration that I have in mind. The motor-underneath configuration strikes me as an awkward, needlessly complicated way to power the saw that puts the motor right in the way of all the sawdust coming down from above. Here's a view of the motor on its platform out of the stand.
I'm itching to see the thing run, so I'll get it off that platform and onto the workbench for a test. Then I'll stash the thing against the day that I can give it a proper teardown, cleaning and paint job. It could be a good unit for powering a wood lathe.
Here's a view of the motor's I.D. plate.
Googling the model number, 11F801D, got me nothing. Let's see if the thing runs.
- - -
It starts and runs nicely; these things last forever.
The motor weighs 44 lbs., and it has an output shaft diameter of 3/4". That's big for 1/2 hp. I'll find a place to stash it, and return to it if and when I ever find a suitable application for it. (Or perhaps sooner, should I feel moved to restore it to pristine condition just for a project.)
Where To From Here
I'll rig a stand and deck for the saw, and a light weight 1/2 hp motor to prove out a drive arrangement. There may be a belt tensioning complication attendant to the saw's elevation feature; we'll see.
Belt Tensioning
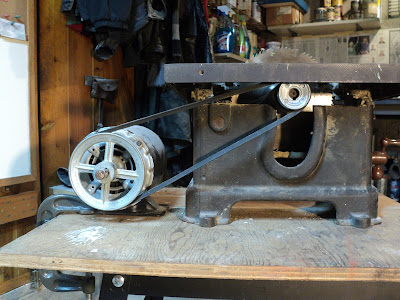
Sure enough, belt tension varies with saw blade elevation, as I expected it would. Here's a view of the belt correctly tensioned with the saw blade fully elevated.
Now, lower the blade and see what happens.
The belt tension slackens off severely. There are three ways I can think of to deal with that.
a) A hinged motor mount that's arranged so that gravity acting on the motor's weight automatically maintains belt tension throughout the range of saw blade elevation.
b) A sliding motor mount with a single clamp to it that makes static belt tension adjustment as quick and easy as possible.
c) Use the adjustment range already available from the elongated mounting holes in the motor's base. That adjustment range is sufficient, it's just not terribly convenient to use.
I'll probably go with method 'c)' to keep things simple. Methods 'a)' and 'b)' introduce complications that I really don't want to have to deal with.
The Stand
I have an adequate stand left over from a Ryobi saw that got scrapped.
If the saw had been as well made as the stand, the saw might still be with us. (See this post for complete information on the stand.)
The Deck
I salvaged the 3/4" firply deck from the saw's original stand, cut the sawdust chute portion away and reassembled the pieces with biscuits. Now I've got a contiguous panel that will do nicely for a new deck.
I'll trim that down to a neat rectangle and finish the edges. Come final assembly time, I'll give it a light grey enamel finish, and I'll have a proper deck for the machine.
- - -
And here we are with a decent deck for the saw stand.
I installed four 1/4"-20 tee-nuts for fastening the deck to the stand. While I was at that, I worked out the saw's position and installed another four 1/4'-20 tee-nuts for fastening the saw to the deck.
Next up is to overhaul the saw and get it into running order. Then I can work out the motor mounting arrangement and try the machine out. Before I do that, though, there's a little detail about the motor that I should attend to so it's out of the way. Oh, and before that, I should build a wheeled dolly for the stand to perch on, so I can easily move the machine around in the shop.
- - -
Here's the completed dolly.
It's basically just half-lapped 2x4s. Half-lap joints are not that easy to make in material that large. If I ever make another dolly like this one, I may go with biscuited butt joints -- they'd be a lot easier to execute, and quite strong enough.
I still have to provide the dolly with a 'floor'. Then the dolly will be able to accept a sawdust bin. (See this post for the dolly floor I came up with.)
- - -
And here we are with the deck and saw in place; the machine is beginning to take shape.
That arrangement puts the saw's table height at 38 3/4". That may seem a bit on the high side of ideal, but it suits me fine.
A Replacement For The Antique Motor
Here's the unit that I have in mind for powering the saw.
It's a Marathon Electric model No. 5KH36JNA769. It's rated at 1/2 hp, which is just adequate for an 8" saw. 3/4 hp would be ideal, but I don't want to sacrifice my one 3/4 hp motor to this project.
Note the extended thru-bolts holding the motor's frame together. I can't seem to find a straight explanation for that feature; I can only assume that it's for mounting the motor by its output end face. Anyway, for my application here the extended thru-bolts will just be a snaggy nuisance, so I'll make up regular length thru-bolts from 8-32 threaded rod. (I don't want to cut down the long thru-bolts, just in case I ever want this motor to have its extended thru-bolt feature back.)
And here are my new thru-bolts.
They're 7 1/2" lengths of 8-32 threaded rod, with acorn nuts installed with red threadlocker.
And here we are with regular length, acorn-headed thru-bolts.
Much neater.
The Arbor, Blade and Outer Flange
The arbor is the usual 5/8"-18 with a 15/16" A/F hex nut. The blade is scrap metal. The outer flange is a ruin. It's been tightened down on too hard in the past and distorted. I'll have to find a replacement.
The Table And Throat Insert
The table is rusted, but not badly -- nothing that a machine sanding won't clear up. As I mentioned earlier, the throat insert is a wretched, shop-made thing that I'll have to fabricate a decent replacement for. The throat opening itself appears to have been abused somehow; its edges aren't true. There's really nothing I can do about that, and it won't affect the saw's performance so I won't worry about it.
Now is as good a time as any to deal with the surface rust on the table, so here goes.
- - -
And here we are after a brief sanding.
Much better. There's still cleaning and cosmetic work to done on the table, but it's now perfectly serviceable.
Next up is to take the table off, and start attending to the machine's innards.
Removing The Table
Remove:
- Tilt Pointer (Only to save it from harm. The pointer is attached to the table's front trunnion, and isn't really in the way of removing the table.) One 8-32 x 1/2" round head screw.
- Tilt Clamp Screw. Unscrew it completely.
- Front and Rear Trunnion Caps. Four 1/4"-20 x 1/2" hex head screws.
The table with its trunnions still attached is off and set aside. There's access now to the arbor casting and the elevation mechanism. The tilt clamp is a bar that's tied in to the elevation screw.
Note the 90° stop at the upper left rear of the frame.
It's just a 1/4"-20 flat head screw with an adjustment locknut on it. It's a bit bent and will have to be replaced.
The Elevation Mechanism
It feels as though the elevation screw may be bent; the screw binds towards the low elevation end of its travel. That has to investigated and corrected. It's a flaw that's not tolerable.
Here's the elevation screw and nut out of the machine.
It may only be old grease and sawdust fouling that's causing the elevation screw to bind. We'll see.
The Arbor Casting's Elevation Pivot
The pivot is a 3/4" diameter steel rod. The arbor casting is anchored to the rod by a setscrew, so the rod pivots in holes through the side walls of the frame. The rod's axial position is fixed by the point of a setscrew riding in a groove at the left end of the rod, within the left side wall of the frame. Two flaws attend that arrangement:
- There is some radial play between the rod and the holes through the frame's side walls.
- There is some axial play in the axial retention groove.
The rod no longer pivots in the frame with the arbor casting anchored to it; instead, the arbor casting pivots on the rod. The rod is now firmly held in place both axially and radially. A pair of collars and washers fix the arbor casting's axial position on the rod. The arbor casting is free to pivot on the rod between the collars and washers.
The Arbor Bearings
The bearings felt grease-starved, so I extracted them for replacement. I take them to be an obsolete make and model -- N.D. No. 7503/3203. They're 17mm bore x 40mm O.D. x 12mm thick, which makes them exactly equivalent to No. 6203 bearings. Here's a view of the original bearings.
I got 6203-2RS (sealed both sides) bearings from Princess Auto and put them in. 'Trued the face of the arbor's flange on the lathe and I've got a serviceable arbor assembly.
Trial Assembly In Progress -- Motor Installed And Wired -- SUNDAY, APRIL 9, 2017
See this post for some notes on that paddle switch. The wiring material is 16 AWG/3 SJOOW from the Home Depot.
The Mitre Gauge
The mitre gauge's beam is remarkably close-fitting in its slot; it has about the nicest fit I've ever seen in a mitre gauge. All I've done to it has been to clean it up and add a facing, like so.
I just had to drill two 9/64" holes through the face of the gauge's head to accept No. 6 screws, for fastening the wooden facing in place.
The Throat Insert
As I've mentioned before, the throat insert is a wretched, shop-made thing that needs to be replaced. However, I can make it serve for the time being by giving it proper leveling screws.
The insert is two thicknesses of aluminum sheet riveted together, for a total thickness of just over 1/4". The heads of four 8-32 hex head screws serve, not very successfully, as levelling screws.
I drilled and tapped the four 8-32 screw holes to 10-24, and installed set screws, like so.
Once I had the screws adjusted satisfactorily, I applied CA adhesive to the screws at the underside of the insert so the screws would stay put. We'll see how that works out.
- - -
End Of The Road -- SATURDAY, JUNE 3, 2017
'Sold it. The buyer only wanted the saw itself, so I still have the motor and stand to apply to some other project. Here's a view of the saw all freshly painted and ready to go.
# # #
# # #


