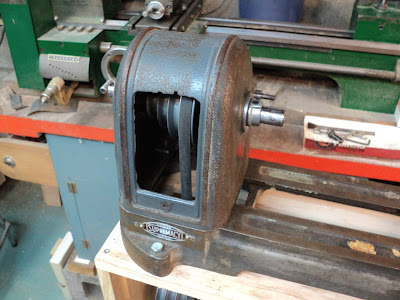
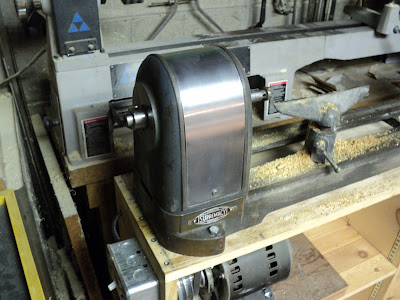
This post is the continuation of an overview of the subject wood lathe. Here I'll record what gets done to the machine, and the parts and materials that go into it.
The Headstock
Following are the items to be dealt with:
- New replacements for the bronze sleeve bearings.
- Functional replacement for the original, missing ball-thrust bearing.
- Replacement for the original, missing 4-step pulley.
- Re-creation of the inoperative indexing function. (The indexing stops were incorporated into the original, missing pulley. I'll fabricate a separate index wheel to restore the indexing function.)
- Replacement for the missing front cover.
The bearings are 3/4" bore x 1" O.D. x 1" long.
I obtained replacements from BDI Canada. BDI is my go-to place for any kind of bearing or power transmission component. The bearings that I got are Isostatic Industries P/N EP-121616.
The bearings are a tight press fit in the headstock casting. A hydraulic shop press is needed to remove and install them. Replacement went smoothly with no surprises. Within the casting surrounding the bearings, there's plenty of space for an oil supply.
Thrust Bearing
The original, missing ball-thrust bearing resided inside the headstock casting at the outboard end. I've replaced the thrust bearing function with a steel washer right against the inboard end of the headstock casting, a bronze thrust washer and a steel collar. Following is a list of the parts used:
- Steel washer -- 5/8" flat washer bored out to 3/4" I.D. x 1 3/4" O.D. x 1/8" thick, Canadian Tire P/N 61-3203-4 (pkg of 4).
- Porous bronze thrust washer -- 3/4" bore x 1 1/4" O.D. x 1/16 thick, Isostatic Industries P/N EW-122001 from BDI Canada.
- Steel collar -- 3/4" bore x 1 1/4" O.D. x 9/16" long, RBL P/N SC 3/4, Princess Auto P/N 3871340.
At the outboard end of the spindle, I installed another bronze washer and steel collar, so the spindle can be set up axially with something approximating a no-bind/no-lash condition.
4-Step Pulley
As I pointed out in the introductory post on this lathe, the headstock's spindle is a mite undersize at 0.741" diameter. That led me to shim the bore of my replacement, 3/4" (0.750") bore pulley for a better fit. Here's a view of my beer can shim tucked part-way into the pulley's bore.
It's not too difficult to assemble that arrangement onto the spindle; the whole affair goes together nicely and works as it should. I was pleasantly surprised by that, actually -- I'd expected it to be much more difficult to shim a pulley's bore.
The pulley's four step diameters are 4 1/4", 3 1/2", 2 3/4" and 2". The motor's pulley has identical step diameters. So, for a 1,725 rpm full-load-speed motor, the spindle speeds obtained are approximately 800, 1,360, 2,200 and 3,660 rpm.
Indexing Function
Here are two views of the indexing wheel I fabricated, to re-create the indexing function.
That wheel is a whole story in itself that I won't go into here. It was a challenging little machine shop project, and it does work. The lathe now has its 36-position indexing feature back. Here's a view of the wheel installed in the headstock, with the indexing pin engaged.
The Headstock's Front Cover
In the first photo above of the headstock, that gaping opening in front is supposed to be concealed by a sheet metal cover; the cover is missing. If only as a safety feature, never mind aesthetic considerations, there ought to be a cover.
I have some 0.024" thick aluminum sheet on hand that will make an acceptable cover, so here goes a little sheet metal fabrication work.
Much better. I think the original cover had an engine turned finish, but I didn't feel quite up to reproducing such an effect. My plain cover will have to do.
The Tool Rest
The lathe's 8" tool rest is a fine, sturdy piece of gear.
The only thing I had to improve on was the flat washer for the position clamp bolt -- the washer it had was ill-fitting and too thin. I turned down a close-fitting, thick washer on the metal lathe for a perfect fit. The tool rest's sliding action across and along the bed ways is now flawless.
Cleaning, primer and paint are all that are now needed.
The Tailstock
The tailstock is massive, and so is the affair that clamps it in position on its ways. Here's a view of the tailstock taken to pieces.
Tailstock Handwheel Fastening
The handwheel's hub has provision for two 1/4"-20 x 1/4" set screws, but the ram's screw shank only had one flat. I filed a second flat on the shank, and installed a second set screw.
Tailstock Position Clamp Screw
I assembled the acorn nut and the 1/2"-13 x 1 1/2" stud together with blue threadlocker, and added a thin flat washer for under the acorn nut.
Tailstock Ram Position Clamp Screw
Here's a view of the knob-headed clamp screw that I fabricated to replace the original hex headed screw.
That's a length of 5/16"-18 threaded rod with a dog-point turned on it at one end. The knob has an internal 1/4"-20 threaded insert, so the other end of the 5/16" rod had to be turned down and threaded to fit that, then assembled with red threadlocker.
Tailstock Accessories
And here's the fully accessorized tailstock.
The complement consists of:
- 2-13mm drill chuck, Princess Auto P/N 8144727.
- MT1 drill chuck arbor, KBC P/N 1-507-350.
- MT1 dead centre, KBC P/N 7-560-005.
- MT1 live centre, Busy Bee P/N B1677.
I find that a drill chuck for the headstock is often useful for turning small items like toy stub axles, but a drawbar is essential for keeping a drill chuck arbor seated in its taper. I couldn't find an MT1 arbor that would take a drawbar, so I modified a tang-ended arbor to accept a drawbar. Here's a view of what I ended up with.
There was already a shallow, centred hole in the tang end of the arbor, so I drilled that deeper and tapped it 8-32. The drawbar is a length of 8mm diameter steel shaft salvaged from a laser printer, that I also drilled and tapped 8-32. An 8-32 x 1" long stud completes the drawbar/arbor connection. I turned a 5/16"-18 thread on the outboard end of the drawbar for retention nuts.
I'll assemble the drawbar to the arbor with blue threadlocker, and I'll have my drawbar-fitted drill chuck arbor.
A Handwheel For The Headstock Spindle
It appears that the lathe never had a handwheel, and I find a handwheel to be very helpful for inspecting one's work with the lathe not running. For a quick-and-dirty handwheel, I got a 2 1/2" diameter v-belt pulley from Canadian Tire (P/N 056-5718-2). That looks like it'll work fine.
I.D. Plate Removal
The two I.D. plates are fastened by tiny drive screws.
The screws are No. 4 x 3/16" long. Fortunately, the screws were installed in through-holes, so I was able to punch them out from behind. Had they been installed in blind holes, I'd have had a devil of a time to extract them.
Paint
The lathe is getting my usual treatment of primer plus two coats of enamel.
- Primer: Princess Auto Power Fist No. 8057275 Sandable Grey Primer.
- Enamel: Tremclad Gloss Grey.
- - -
All Done
Here it is all painted and ready to go to work.
# # #
# # #


Great job. I am hoping to have similar results. My issue is reassembling the pulley, etc. in the headstock. I believe I can handle the rest.
ReplyDeleteGetting the headstock back together should be fairly straightforward. My restoration was complicated a bit by the missing thrust bearing and indexing plate, whose functions I had to re-create from scratch. I sold the lathe long ago, so I no longer have it here with me to refer to.
DeleteI have one of these in mint original condition. The double-row ways are unusual.
ReplyDeleteNow that you mention them, yes they are. I hadn't really noticed them before.
DeleteThis comment has been removed by the author.
ReplyDelete