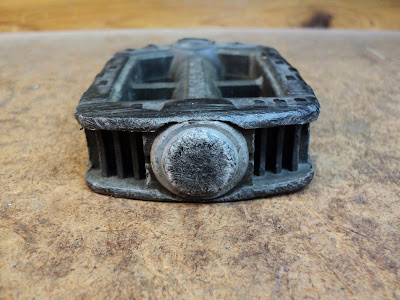
Bicycle pedals should rotate smoothly, with just a hint of bearing preload. Grittiness or 'lumpy' rotation should be attended to. A pedal that rotates very freely is grease-starved.
This post deals with what I believe is the commonest style of bicycle pedals; i.e. those with a 9/16"-20 threaded stud for attachment to the crank arm, and a ball bearing at either end.
- - -
Removal
Pictured below is a fairly typical right side pedal.
It has 15mm A/F wrench flats on its spindle, and a right hand (conventional) threaded stud. Its left side mate will have a left hand threaded stud. The spindles are usually marked 'L' and 'R', but it's not difficult to tell the difference by eye.
When loosening a pedal to fully unscrew it, you may need to get some leverage on the crank arm. Here's a quick-and-dirty way to do that.
Take care to get the big adjustable wrench centred and snug, so it doesn't slip on you. I've yet to have a pedal defy that arrangement. Pedals aren't usually all that tight, and I haven't encountered a seized one so far.
Disassembly
The outboard end will have a cap that can be pried off, like so.
Revealed are a locknut, a keyed washer and the outboard bearing cone.
The locknut pictured here is 12mm A/F. (I've encountered some oddly dimensioned locknuts that needed an adjustable wrench.) Mount the pedal in a mechanic's vise by its wrench flats to loosen the locknut.
You'll use the same vise setup later to adjust and lock the outboard cone.
With the locknut removed, dismantle the pedal over a bin so that you can't lose anything. You'll end up with this.
This pedal employs eleven 5/32" diameter balls at each end, although its inboard balls seem to be a bit undersize -- I'll have to keep them segregated. You may encounter other ball sizes and counts.
A tea caddy is good for handling tiny parts in the parts washer.
Get everything immaculately clean, and you'll be ready to reassemble the pedal.
I use white lithium grease for the bearings, and I'm inclined to be fairly generous with it.
Lay grease in the cups then, with tweezers, lay the balls in the grease. The grease will retain the balls. Here's a view of the outboard bearing ready for the spindle and cone.
Excess grease can escape as it pleases. With plenty of grease in the bearing, the bearing will be reasonably well protected against water incursion.
With both bearing cups greased and loaded with balls, reassemble the pedal and get it back in the vise for adjustment.
As I said earlier, a pedal should rotate smoothly, with just a hint of bearing preload. In theory, the keyed washer is supposed to prevent the locknut from altering your cone adjustment as you tighten the locknut. In practice, that doesn't work out so much. Bearing adjustment is a trial-and-error process. You just have to keep at it until you get it right. This pedal didn't give me a hard time -- it settled into proper adjustment without much retrying. Here's a view of the pedal's outboard end all greased and adjusted and locked up.
Replace the cap and you're done.
- - -
Notes:
Following are some notes on pedal maintenance.
- Ideally, bearing cups, balls and cones should show no trace of corrosion. In the real world, those items may be less than perfect. Unless the bike is meant for hard, frequent riding, you can probably get away with just cleaning and regreasing.
- Pitted balls should be replaced. Any bike shop worthy of the name ought to carry bearing balls. Alternatively, you can find them on-line. In my experience, ball sizes are fractional inch measure. A fractional-inch/metric vernier caliper is a handy thing to have for bicycle work. Bicycles tend to have quite a mix of inch and metric components in them.
# # #
# # #


