I have an old rear wheel drive lawnmower that's been languishing under a big fir tree at the bottom of the backyard for a few years. 'Time to get after it and see if I can get it working. Here's a photo of it after I hauled it up to near the patio.
The mower was a roadside find. It must be pretty old, because it lacks an engine brake. The single control bail is for the rear wheel drive engagement.
It's a Mastercraft (Canadian Tire) mower, with an MTD model number on it -- 126 283 515. That model number doesn't show up on MTD's website, so what we have here is an ancient, abandoned machine that MTD no longer recognizes the existence of. Anyway, it's too cold to work on it outside. I'll get it into the workshop and start cleaning it up; it has quite an accumulation of fir tree debris on it.
- - -
The Fuel Tank
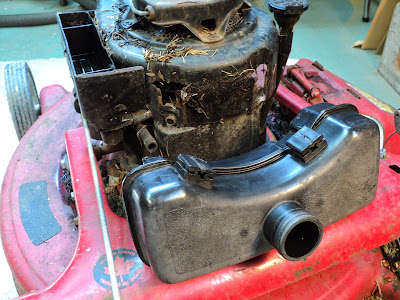
There's the 5/16" fuel supply tube to disconnect; then, with a little coaxing, the tank just lifts off two channels at the rear of the engine's cowl. Here's a view of the cleaned up tank off the engine.
A fuel tank can never be too clean inside. I've flushed the tank with Varsol in the parts washer, then I flushed it with Fantastik and hot water in the sink, then I flushed it with methyl hydrate to help absorb and evaporate the water. I'll leave it out in the sunlight to dry out completely.
- - -
The Air Cleaner Box
The lid and air filter element are easily removed. The box is attached to the carburetor by two 1/4" hex head, 10-32 shoulder screws. There's a ring gasket that resides in a depression around the box's air outlet.
Those screws didn't come out easily. There's evidence of galling/seizing on their threads. I'll have to chase all the threads to correct that.
- - -
The Cowl And Recoil Starter
The recoil starter doesn't want to rewind itself very well.
I'll have to take the cowl/starter off and attend to that. The fasteners are 5/16" and 3/8" hex head.
I drilled off four hollow rivet heads to separate the starter from the cowl. I didn't really have to do that, but I wanted them apart so I could do a better job of cleaning the two items. I can put them back together with screws and nuts. Here's a view of the underside of the balky starter.
These starters can be disassembled by way of that shoulder screw in the centre, but beware. The screw is likely to be very tight, possibly having been installed at the factory with threadlocker. I once broke one of those screws, and had to fabricate a replacement. I'm just going to use WD-40 on this starter, and hope that that's all it will take to get it working properly -- I'd just as soon not have to dismantle the thing.
- - -
[Now that I have the cowl cleaned up, I can make out the model and serial number on the front of it. It's "TVS90 43325D SER 5350A".]
- - -
A Little Surprise
With the cowl off the engine, there appears to be nothing holding the oil filler tube in place; it just tumbles over. I whittled a cork to plug the oil filler hole for now, like so.
What I could see of the oil looked awful. It was something of a vaguely grey colour.
- - -
The Flywheel
To get the flywheel off, first brace it against turning by wedging a big screwdriver in against the flywheel's counterweight. The nut is 3/4" hex. A 1/2" square drive breaker bar works nicely.
When applying a puller, set it up so that its jaws are under the flywheel's fins. Don't apply pulling force to just the thin rim of the flywheel.
Oil the puller's screw and screw centre-point liberally, and start tightening the puller. Tighten until you meet serious resistance, then give the head of the puller's screw a whack with a steel hammer. If the flywheel doesn't break free, tighten some more and whack again. Eventually, the flywheel will let go. Be prepared for the pop and clang and clatter that you're in for. When a tensioned flywheel finally lets go, it does so quite violently. Here we are with the flywheel broken loose from the engine's crankshaft.
- - -
The Crankcase Vent
I could just leave this part be, but since I'm cleaning things up here I may as well take the vent off and clean it. Two 5/16" hex head screws hold it in place.
Inside, there's a crumbly filter element that I'd best leave alone. I'll just clean the output tube and put it back together.
And that's about far enough to go with this post. See Part II for the continuation.
# # #
# # #


