[Last updated: Thursday, May 16, 2019.]
My son got this shredder cheaply; it was new in its box.

As my son told it:
"Started it up and ran, but then there was a pop, some smoke and now it spins up and then stops, then repeats that cycle.
I opened it up and it seems this large capacitor strapped to the side of the engine exploded."
- - -
Hmmm. Now the thing won't even spin up briefly. It's completely dead.
There's no model number ID on the unit, only this bilingual label with what looks like a serial number.

So, let's open it up for a look-see.
Four No. 2 Phillips recess screws fasten the bottom cover on. At the centre rear, there's an M4 x 12mm threading screw, then way up under the deck there are three M5 x 14mm screws with split lockwashers and flat washers. Removing those four gets us to here.
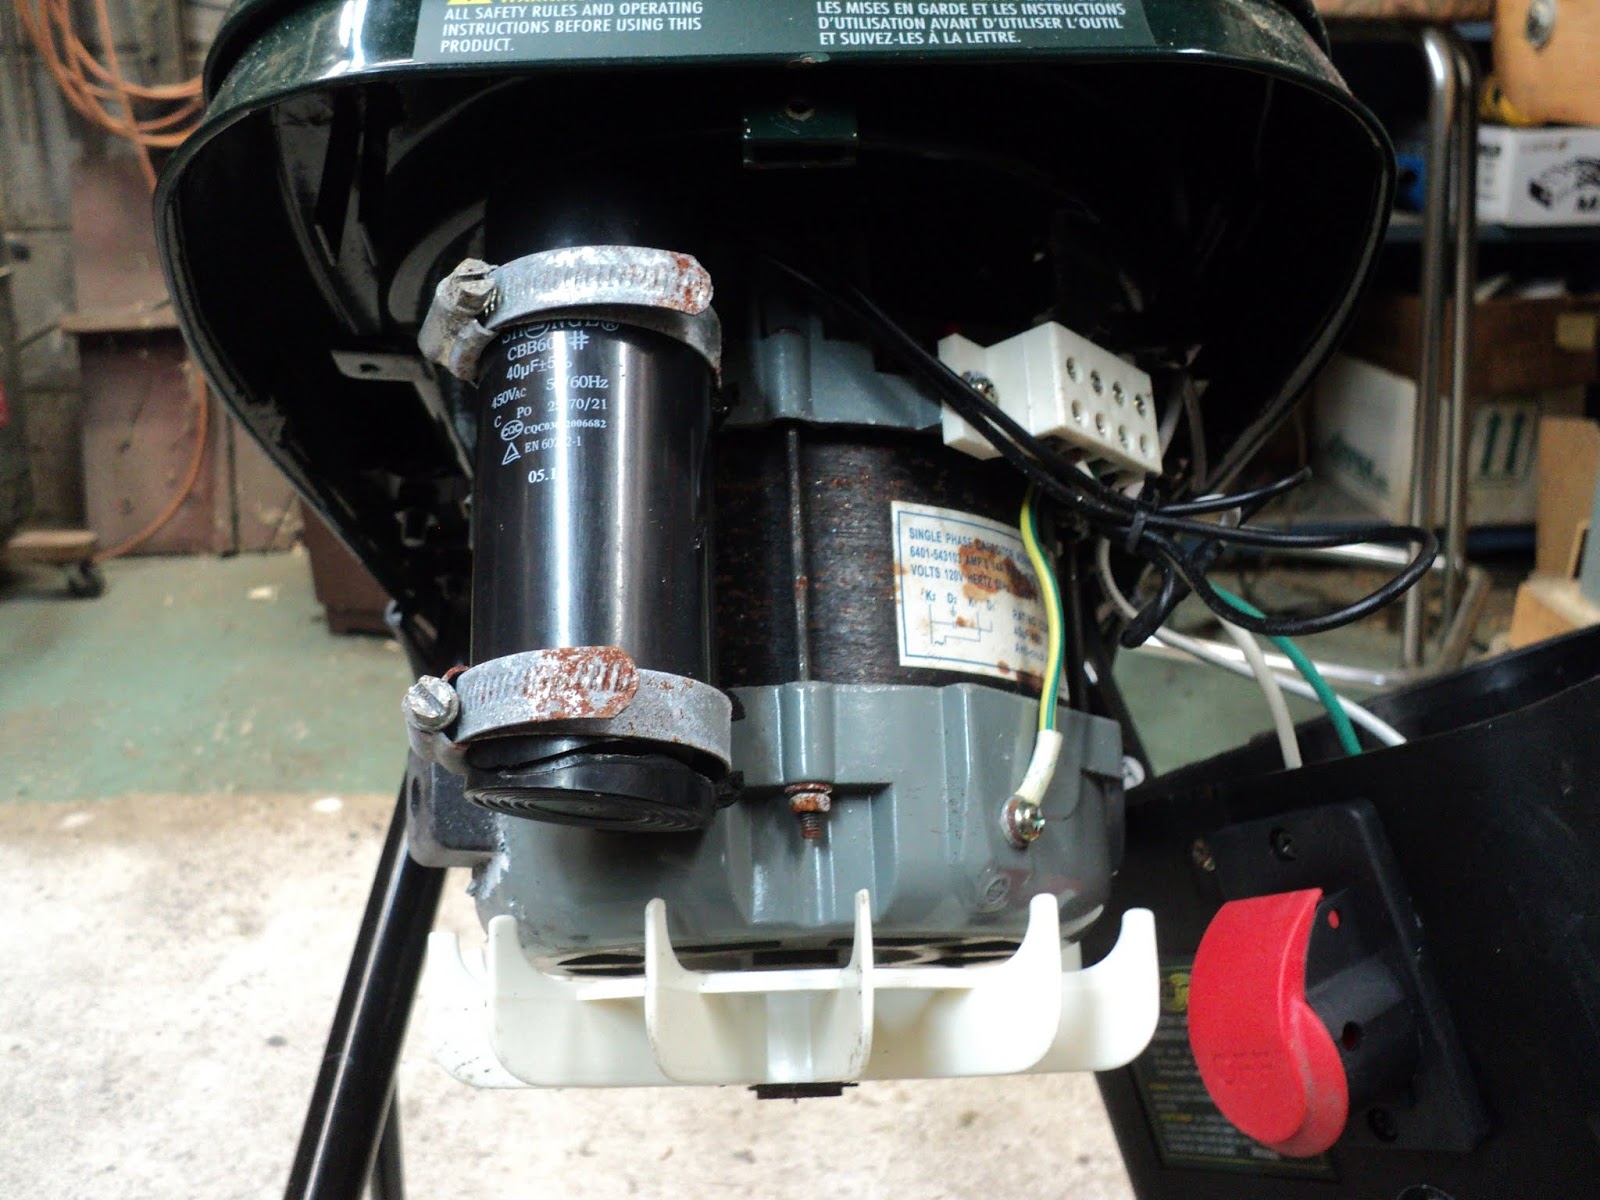


And I discovered why the machine is completely inoperative -- there's a wire that likes to come off its terminal at the circuit breaker when the cover is manipulated. With that wire reconnected, the machine does spin up, only to shut down in a few seconds.
Anyway, the capacitor is obviously a ruin. That may prove to be difficult to source. The motor feels odd when turned by hand. There's a seemingly random turning resistance that doesn't feel right to me. Also, there are indications of there having been water incursion at one time.
Teardown
Cutter Head Removal
With the hopper opened up, one has access to the cutter head. It's fastened by a single M10 x 25mm hex head screw, 16mm A/F (across flats), with an internal tooth lockwasher and a big cup washer.

The screw was installed with threadlocker; it takes an impact wrench to remove it. (Chase the female thread with a tap to clear out the old threadlocker after removing the screw. Blow out the debris with compressed air.) Here's the cutter head removed.

The hub affair looks like a fine, rugged design. (Note the rusty screw heads of the motor fasteners.)
- - -
Motor Removal
Make a sketch of the electrical connections. Disconnect the lower row of four terminations from the terminal block. Release the capacitor from its clamps.
Up top, there are four M8 x 16mm flat head screws with external tooth lockwashers, 5mm hex recess. The motor is heavy. Remove the screws with great care. Here's the motor out and up on the bench.

And now I can see what looks to me like a centrifugal brake at the upper end of the motor.

There's a hub in there that can move downward, away from two brake shoes that are integrated with the motor's frame. And that explains why the big screw holding the cutter head on was installed with threadlocker -- so that the cutter head's inertia can't unscrew the cutter head when the brake applies.
The odds appear to be reasonably good that this motor is ok -- that it just needs a new capacitor. 'Time to reassemble the machine, and see about obtaining a new capacitor.
- - -
An Inoperative Hopper-Open Interlock Switch -- THURSDAY, MAY 9, 2019
While trying out the machine, I inadvertently discovered that the hopper-open interlock switch doesn't function -- the machine will run with the hopper open.
The switch is mounted on a rectangular steel plate, and the whole affair is fastened to the shredder's frame by two M4 x 12mm pan head screws, No. 2 Phillips recess, with split lockwashers and flat washers. The wires are attached by two M3.5 x 6mm pan head screws, No. 2 Phillips recess with captive internal tooth lockwashers.
Here's a view of the switch assembly out of the shredder.

And here's the switch disassembled.

'Disassembled' may not be quite the right word here. 'Destroyed' is more like it. The body-clamping ears snapped off when I pried on them a bit. I can think of a way to go about a repair attempt, but I'm not optimistic of a good outcome.
Anyway, it appears that the switch was misassembled at the factory, and could never have worked since day one. The shorting plate and its spring were assembled in such a way that the switch was always closed.
- - -
And after a bit of an ordeal, the switch is back together and working.

I rearranged the switch's innards so that the switch could function, and wired the casing closed with 0.031" diameter steel wire. I ran a bead of CA adhesive all around the seam between the body and the mounting bracket.
I reinstalled the switch in the shredder and it's working as it's supposed to. We'll see how it holds up. Should it fail, it'll likely just have to be deleted and shorted out. The odds in favour of finding a replacement are slim to nil.
- - -
Replacement Capacitor On Order -- FRIDAY, MAY 10, 2019
Maybe this will be the cure.
- - -
The Capacitor Arrived -- THURSDAY, MAY 16, 2019

Now I see what I didn't quite understand from the vendor's description -- it's a dual run capacitor. It's two capacitors in one casing; one 40 microfarad and one 5 microfarad. These are used in air conditioners. One capacitor is for the fan motor; the other capacitor is for the compressor.
The terminals are labelled 'C', 'FAN' and 'HERM'. 'C' is for 'common', 'FAN' is for 'fan', obviously, and 'HERM' is for 'hermetically sealed compressor'. 'FAN' to 'C' is 5 microfarads; 'HERM' to 'C' is 40 microfarads. So there's my 40 micofarad replacement capacitor. The 5 microfarad capacitor will just go unused.
- - -
Capacitor Installed
It fits.

I clipped out the old capacitor and fitted out the wires with 1/4" female spade terminals. 'Clamped the new capacitor in place and reinstalled the cover.
The motor starts and runs up and keeps on running.
It remains to be seen how it behaves under load.
- - -
To be continued.
# # #
# # #
No comments:
Post a Comment