Thursday, November 2, 2017

Tealights As Jack-O'-Lantern Lights


It turns out that tealights are not a great choice for lighting a jack-o'-lantern. They don't last nearly as long as they ought to. Here's a view of one that I pulled out of a jack-o'-lantern after only about two hours. (The lights are rated for four hours.[1])


The wick got consumed completely long before the fuel ran out. Being out in the cool autumn air, and sitting on cold pumpkin flesh inside the pumpkin, the tealight's body couldn't warm up enough that the fuel could melt fast enough to keep feeding the wick with liquified fuel.

I still like the idea of using a tealight to light a jack-o'-lantern, though. Tealights are cheap; I got this package of 32 for $2.00 at the 'dollar' store.


So, I'll do a little experiment. I'll make a wooden holder for a tealight, so the light's metal cup will be insulated from the cool air and the cold pumpkin's flesh. I have a 2 1/2" diameter softwood off-cut from a lathe turning that should make a good holder. I bored a 1 1/2" diameter pocket in that to receive a tealight, like so.


I'll install that in my jack-o'-lantern and set it out by the back door to the workshop, where no one will see it and think that I'm trying to make a multi-night festivity out of Halloween, like the twelve days of Christmas or something. Here's a view of my experiment underway.


- - -

Well, so much for that experiment.

The tealight with the wooden insulator lasted over two hours, but met the same fate as an uninsulated tealight -- it consumed its wick long before it could exhaust its supply of fuel.


So there we are. The tiny flame of a tealight can't overcome the chilling effect of a low ambient temperature on its fuel supply, and liquifiy sufficient fuel to keep itself going.

Next year, I'll try using a dollar store votive candle as a jack-o'-lantern light, and see how that does.

* * *

Note:

[1] I checked out the 'four hours' rating under ideal conditions indoors, and four hours turned out to be a conservative figure. With a tealight perched on a scrap of softwood inside the workshop, the light burned for well over four hours. By about half way through that amount of time, the fuel inside the light's metal cup had liquified completely -- there was no possibility of the wick running out of fuel and consuming itself before the fuel supply was actually exhausted.

# # #


# # #


Tuesday, September 26, 2017

An Installation Tool For Staked Garden Fixtures -- Or -- An Earth Poker


I recently built a tomato trellis for my son's garden. Here's a view of it.


I got the plan for the trellis from a book, Classic Garden Structures by Jan & Michael Gertly.
 
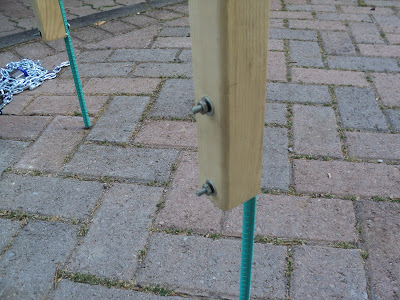
Note the 12" long rebar stakes attached to the bottoms of the legs. Those weren't in the book's plan. I added them to improve the trellis' anchoring. Here are closer views of one of the stakes.


It dawned on me that installation of the trellis might be a bit problematic -- shoving the trellis' four stakes into the ground simultaneously didn't strike me as an approach that was likely to work. So, I made a poker tool to help prepare holes to accept the stakes. Here's a view of that right next to a stake.


The handle is a 4 1/2" length of 1 3/8" diameter hardwood dowel. The shank is a 15" length of 1/2" diameter steel rod, salvaged from an ancient Qume daisy wheel printer. Here are some closer views of the tool.


The rivet through the handle is a 3" common nail. I seated the shank into the handle with five-minute epoxy, since the shank turned out to be a little bit loose in the hole that I'd bored for it. I turned a 60° pointy end on the shank in the metal lathe.

So there we are. I expect that the trellis will still be an awkward thing to install, even with the aid of this tool. We'll see how it goes.

# # #


# # #


Friday, September 15, 2017

A Soil Sifter


In two earlier posts, I've dealt with a couple of gardeners' tools -- a seed row compactor and a seeding tool. I so enjoyed those two projects that I was moved to go casting about for another gardening tool to build, and make a threesome of it. I found a plan for a soil sifter that looks like it might be useful. Here are scans of the article from the book "Build It Better Yourself", by the editors of "Organic Farming and Gardening", published by Rodale Press of Emmaus, Pennsylvania.


Following are a few notes on the version of the thing that I constructed.

a) I made the length and width bigger by 1/4", so that the snaggy edges of the hardware cloth screen would be set back a bit from the frame's perimeter.


b) Frame corners are joined with plugged pocket screws and Gorilla glue.


c) No finish is needed, but I gave the frame an application of tung oil.

Here's a dimensioned sketch of the end pieces' shaping and handle cut-outs.


d) The book calls for 3/4" staples for fastening the hardware cloth screen to the frame. 3/4" staples strike me as an oversize, awkward fastener for the task. I used No. 6 screws with flat washers. Here's a view of that.


And here's the completed sifter out among some comrades.


Bill of Materials
  • Qty 2: 3/4" x 3 1/2" x 18 1/4" SPF for frame sides.
  • Qty 2: 3/4" x 5 1/2" x 10 3/4" SPF for frame ends.
  • Qty 1: 12" x 18" rectangle of 1/4" mesh hardware cloth.
  • Qty 8: Kreg No. SML-C125, No. 8 x 1 1/4" screw.
  • Qty 8: Kreg No. P-PNT, paint grade pocket-hole plug.
  • Qty A/R: Gorilla glue.
  • Qty A/R: Tung oil.
  • Qty 20: No. 6 x 1/2" pan head screw.
  • Qty 20: No. 6 SAE flat washer.

# # #


# # #

Monday, September 11, 2017

An Electric Lawn Mower Motor Failure


I actually know better than to pick up discards like this from the roadside, but I've got nothing else pressing to do, and I thought I might learn something about electric mowers.


It's an elderly Sears Canada model C935-35516-1. The odds of it being repairable are slim to nil. But I have no experience with or knowledge of electric lawn mowers, so I may as well open this one up and at least discover what its problem is. At worst, I'll have one more hunk of scrap metal for the next run to the scrapyard.


The blade is not in too bad a condition, but when I try to turn it it won't turn but a bit, and there are crunching noises -- not a good sign.


A 3/4" A/F hex nut holds the blade on. Removing that with an impact wrench reveals the blade's 1/2"-20 spindle stub.


There's a plastic centrifugal fan blade that's seized in place. That fan blade has to come off in order for the motor to be removed.

- - -

To make a long story short, after much puzzling out and dismantling, I got the motor out of the deck and opened it up. Here's what happened to the motor.


One of the permanent magnets came loose from the frame, met the spinning rotor and shattered, jamming the rotor. Here's another view after I'd removed some bits of the shattered magnet.


That's what's known as catastrophic failure. That motor is unrecoverable.

So, that's a roadside find that didn't pan out. All I'm left with is scrap value, which is precious little since the mower's deck is all plastic.

Anyway, I did learn a bit about electric lawnmowers -- they use permanent magnet DC motors. That's how they're able to have adequate power with a motor of minimal size and weight. A solid state bridge rectifier is what makes it possible for the motor to operate from AC household current. Here's a view of the rectifier mounted on top of the motor.


There's quite a good article on electric lawn mower wiring and servicing here.

# # #


# # #

Saturday, September 9, 2017

Tool Review -- Groz Hobbyist Vise No. 35523/Busy Bee No. 9862


I'm glad I got this vise on special for $11.50, instead of the regular price of $15.99, because I found it to be a bit of a disappointment.


I have several Groz products in my workshop, and I've been very favourably impressed with them. The quality is superb, and the prices were reasonable. I wish I could say the same about the quality of this little vise. It comes with what I consider to be a defect -- the crank is extremely stiff to turn. The reason for the stiffness is the heavy-gauge reverse spring. Here's a close-up view of that.


That spring is way too forceful. It lends a heavy axial pre-load to the screw that makes the screw difficult to turn. The vise would be quite unpleasant to use with that reverse spring in it.

Fortunately, I had a suitable spring on hand for a replacement. Here's a view of my replacement spring alongside the original spring.


I installed that lighter gauge spring along with an additional thrust washer, greased the screw and all the thrust bearing points liberally, and the vise now operates more-or-less as it ought to.


Aside from that flaw, the vise is ok for what I paid for it. The moveable jaw's ways are sloppy, with nothing like the precision that one would expect from, say, a proper, full-size mechanic's vise. I guess you can't expect precision ground ways for sixteen dollars.

All-in-all, the vise is ok if and only if you're prepared to replace the reverse spring with something more suitable, as I had to here. I must say that I was unpleasantly surprised to encounter such a lame product with the Groz brand on it.

Specs
  • Jaw width: 2".
  • Screw: 3/8"-16.
  • Max. jaw opening with full screw engagement: about 1".
  • Max. practical jaw opening: about 1 3/8".
  • Benchtop clamp thickness capacity: 1 3/8".
# # #


# # #

Friday, September 8, 2017

A Seeding Tool -- or -- A Five-Point Dibble


My previous post got me somewhat interested in gardening gear. I showed my son the finished tool that I'd made, and the book that the plan for it came from, and he suggested that this seeding tool from the book might be useful to him.


As with the seed row compactor from my previous post, the book's instructions look pretty nonsensical to me -- the attachment of the handle is flimsy, and the directions for making the tool's 'tines' are rubbish. I thought it might be interesting to work out a better handle attachment, and a scheme for making five 'tines', so I embarked on construction of the seeding tool in the book. Before getting to that, though, permit me a brief lexiconical digression that will explain the alternative title of this post.

- - -

A crossword puzzle recently introduced me to the word 'dibble'. A dibble is a tool for poking holes in earth to receive bulbs or seedlings or, I suppose, even just seeds. Here's a view of a large dibble that my wife has for bulb planting.


Beyond solving the crossword puzzle, I didn't expect to ever have use for the word 'dibble'. But when I saw the seeding tool plan in the book, I immediately thought of the word 'dibble'. It may be a bit of a stretch, but it seems to me that what we have here could properly be called a 'five-point dibble'. And with that out of the way, we can get back to making the tool.

- - -

Two aspects of the tool as presented in the book's article were particularly problematic:

a) The handle attachment to the body. The single No. 6 screw for attaching the handle is not on; there's no way that such an attachment would stand up to actual use of the tool.

b) Fabrication and attachment of the tines. What the book's article offers on this is hogwash. A doable, sturdy tine design is called for.

The Handle

I added a receiver block to the tool that accepts the handle solidly in a socket. And that brings up the difficulty of working with dowel stock that's undersize and/or out-of-round. Much dowel stock is flawed that way, and that was certainly the case with my 7/8" dowel.

The 7/8" dowel stock that I had on hand was badly undersize and out-of-round. I got around that by turning one end of my handle blank down to 3/4" diameter on the wood lathe, and sizing the receiver block's socket to suit. Here's a view of the handle blank mounted on the wood lathe, having just been turned at one end.


I made that handle blank over-long, so I could saw away the spur centre grooves and centre hole after I was done with the turning. That worked out fine, and gave me a handle attachment that could stand up to hard use of the tool.

The Tines

I wanted round, one inch long tines that would seat in half inch deep holes in the tool's body. Turning short little items like that is a bit awkward. Here's how I did it.


I started with 2 1/2" long blanks of 3/4" dowel. Those were long enough to be chucked and turned to a taper at one end. They were also long enough (barely) to be cut to finished length (1") on the table saw. It was reasonably easy to make five tines with that method.

And with all the components assembled, here's the end result.


A sturdy five-point dibble that can take hard use, and ought to last forever.

Following are dimensioned sketches, and a bill of materials in case you'd like to make one of these. I should make note here of a couple of points.
  • Use a weather-resistant glue like Gorilla glue throughout..
  • If your 3/4" dowel stock for the tines is undersize, that's ok. The tines needn't be a snug fit in their holes. Just use plenty of glue when installing them.
Sketches


Bill of Materials
  • Qty 1: 3/4" x 1 1/2" x 10" SPF for body.
  • Qty 1: 3/4" x 1 1/2" x 3" SPF for handle receiver.
  • Qty 1: 7/8" diameter dowel handle blank, sufficient length for 5 3/4" long handle.
  • Qty 1: 3/4" diameter dowel, sufficient length for five 2 1/2" long tine blanks.
  • Qty 1: 1/4" diameter dowel pin blank, sufficient to pin handle in its receiver.
  • Qty 2: No. 10 x 1 1/2" pan head screw.
  • Qty 2: 3/16" flat washer.
  • Qty A/R: Gorilla glue.
Finish

No finish is needed, really, but I gave the tool an application of tung oil, to afford it some minimal protection from being left out in the rain.

# # #


# # #

Tuesday, September 5, 2017

Flaunting My Wealth II


I've written about this before -- way back in February of 2011. As I said at that time --

"Now and then, I like to tackle some little job that really needn't be done -- the less it needs doing, the better. I figure that if I have the time and resources to do something really needless, I must be relatively wealthy. If I were truly dirt poor, I'd have to spend all my available time and resources on things that must be done."

That urge is upon me again, only this time it's motivated by a ghastly sense of futility; retirement is not agreeing with me all that well. I figure that a good way to combat feelings of futility may be to succumb to them, and do something that really is futile. So, here goes.

I came across something in a book that should fill the bill. It's a gardener's tool, a 'seed row compactor'. I'm not a gardener, so it's of no use to me whatsoever. My wife is a gardener, but she doesn't do the sort of gardening that would call for a seed row compactor, so it's of no use whatsoever to her, either. That pretty much covers the needlessness/uselessness bases around here, so I may as well get on with it and make myself a seed row compactor.

The book that the project is in is titled "Build It Better Yourself", by the editors of "Organic Farming and Gardening". The publisher is Rodale Press of Emmaus, PA, USA. Here are the best scans of the article that I was able to do.


(Right click on the images and 'Open Link in New Tab'. You'll be able to magnify the text so it's readable.)
 
The instructions are mostly hogwash, as is much of how-to 'literature'. The dimensions for the handle don't seem quite right, and the 1/2" diameter axle strikes me as oversize. Also, having a wheel's bore bear on a threaded axle is a bad practice; it makes for a scant bearing surface that will wear the wheel's bore quickly.

The width and diameter of the wheel seem agreeable enough, though, so I'll go with them.

- - -

I'll have to thickness plane some 2" x 6" nominal stock to get that 1 1/8" wheel thickness. I could make the wheel by way of a faceplate turning on the lathe, but I think I can do it more easily with a circle cutter on the drill press. Here goes.

- - -

And here we are with the thicknessed wheel blank material mounted on the drill press table, with the circle cutter part way through its job.


Note the c-clamps. Such work must be absolutely, positively clamped securely in place.

And here's the wheel blank free of its material.


That circle was cut in two stages -- halfway through from one side, and then the rest of the way through from the other side.

Note the ridge on the blank's perimeter. My alignment wasn't quite perfect when I flipped the blank for the finishing cut. Also, my drill press' table isn't quite perfectly perpendicular to the quill's axis. The result is that flaw in the wheel blank's perimeter.

What I'll do now is bore out the wheel blank's centre hole to 3/8" diameter, then mount it on a threaded rod mandrel on the wood lathe. I can dress away that ridge on the perimeter, and chamfer the wheel's edges slightly. Here's a view of that setup.


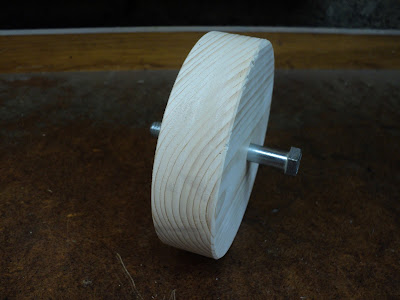
That turned out reasonably well. Here's the finished wheel with the 3/8" x 3" bolt I'll be using for an axle.


That bolt has sufficient unthreaded length that the wheel's bore will have a smooth surface to bear on. I bored out the 3/8" hole through the wheel to 25/64", so there'd be sufficient clearance for the wheel to be free-turning.

On to laying out and cutting the handle from 3/4" stock.

- - -

And here's the completed seed row compactor.


I added a 3/8" fender washer at either side of the wheel to provide an axial bearing surface. I also cut down the length of the 3" long axle bolt by about 3/16", to make it only as long as needed.


Sketch

Following is a sketch with sufficient information on it for reproduction of the compactor's handle from 3/4" stock.


Bill of Materials
  • Qty 1: 3/4" thick x 2 1/4" x 9 3/8" blank for the handle.
  • Qty 1: 1 1/8" thick blank sufficient to produce a 4 1/2" diameter wheel.
  • Qty 1: 3/8"-16 x 3" bolt.
  • Qty 2: 3/8" fender washer.
  • Qty 1: 3/8"-16 nyloc hex nut.
- - -

So there we are. I'm now the owner of a pretty nice seed row compactor that I don't need and have no use for. I'll bet Bill Gates doesn't have one.

# # #


# # #


Thursday, August 31, 2017

A Pipe Smoker's Bowl Scraper


I've taken up pipe smoking recently as a way to break the cigarette habit. I still smoke a fair bit, but at least the convenience of cigarettes is no longer at hand. Anyway, this is not about my smoking habit; It's about a tool for a pipe smoker.

A pipe smoker needs a correctly shaped blade with which to scrape carbon accumulation from the bowl of his pipe. Such things can be had for a price, of course, as can anything, but I thought I'd fix myself up with a freebie by modifying a pocket knife blade. I have a bogus, made in China Swiss army knife that will serve nicely. The knife is a piece of junk, really, but it's adequate for what I have in mind.


The point at the end of that blade makes it unsuitable for scraping a pipe's bowl. The point just gouges the bottom of the bowl, while the shallow curve of the blade never gets at the radius of the bowl's bottom. Some grinding is in order.


There. That's a start. I'll try that out and see if needs to be improved on.

# # #


# # #