The reason the washer can't spin is likely that its lid switch isn't making. The lid switch is a safety interlock feature that precludes the possibility of one sticking one's arm into a spinning tub and being injured by it.
The lid switch on our Whirlpool Ultimate Care II washer gave me exactly that problem recently. The switch resides at the right side of the tub lid opening, where a projection on the underside of the lid actuates it. While investigating it, I noticed that if I pushed its lever further than normal, the switch would make, and the washer would commence spinning/draining. That little experiment ended when the body of the switch broke half apart. I unscrewed it and clipped its wires and removed it. Here it is.
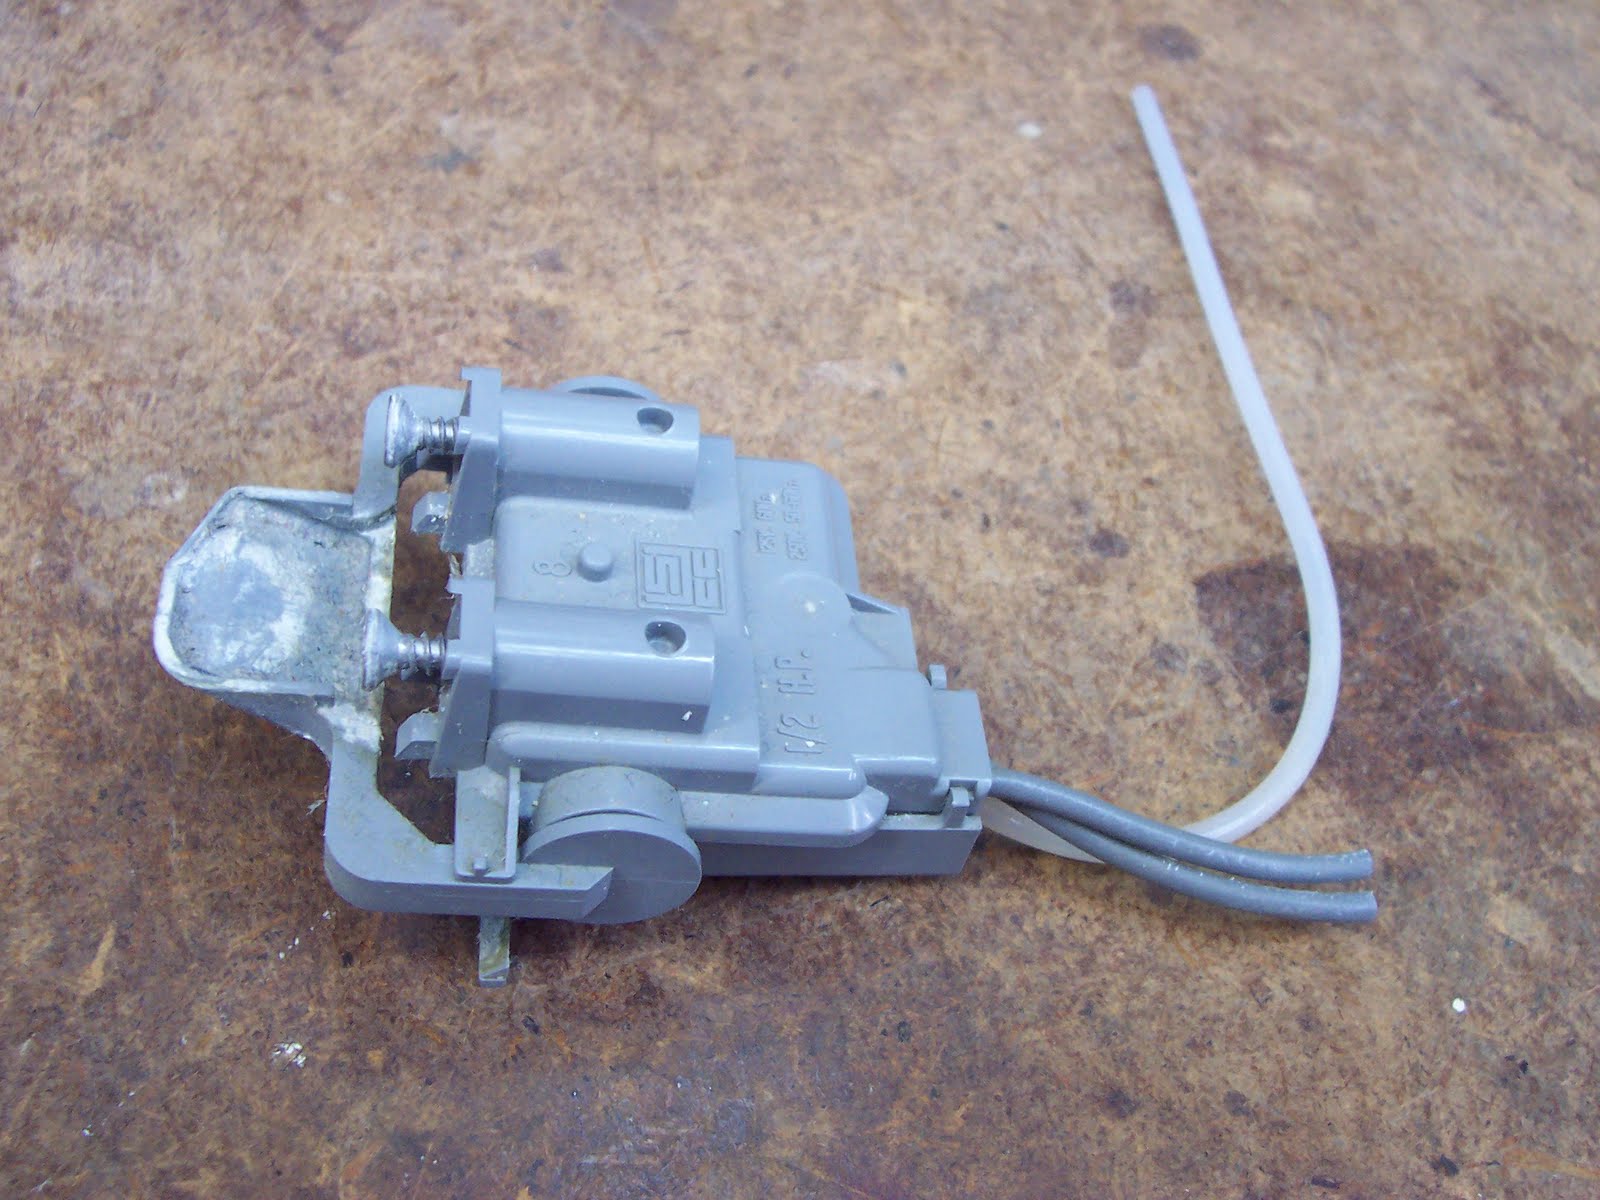 It's quite an elaborate looking piece of gear for an SPST[2] interlock switch. That length of tubing stretching away from it mystifies me. I have no idea why that's there. I can see no conceivable purpose that it serves.
I took it apart completely, and a spring and a mangled contact flew out of it.
 I managed to straighten the contact and get it all back together. In the following photo, you can see how it operates. (It's upside down in the photo.)
 When the external lever is pressed by the projection on the washer's lid, an internal lever rocks against that taut extension spring in the back, and that ultimately causes the moveable switch contact to snap over and close the circuit.
I could conceivably have burnished the contacts and sealed the housing back together to repair it, but I didn't care to take the chance that it might still give me trouble.
I went to an appliance parts dealer near where I work and asked what they want for a new one. I was thinking that a replacement would likely eat a twenty dollar bill, and I was ok with that. The counter guy quoted me $51.08!
For $51.08 I can post a notice in the laundry room that says, "DON'T REACH INTO THE TUB WHEN IT'S SPINNING!", and splice the switch's wires permanently. Here's my method for making an ultra-reliable wiring connection for a hostile environment.
First, strip and twist together the wire ends as you would for a regular wire nut connection. (It looks like 18AWG stranded wire they used here.)
 Solder the splice with 60/40 flux-core electronics solder, and trim the length if need be to fit a wire nut correctly.
 Install a wire nut, and back fill it with an RTV silicone gasket maker like Permatex Ultra Grey.
 Leave it to cure undisturbed.
- - -
Once it's cured, I'll tuck it away securely and there's an end to lid switch trouble on this washer. And if the 'safety' authorities are genuinely concerned for peoples' safety, they might suggest to the likes of Whirlpool that they cease over-engineering a simple function like an interlock switch, and make it affordable to replace. Meanwhile, I'll keep working around the idiotic 'system' and hang onto as many after-tax dollars as possible.
- - -
SATURDAY, JULY 16, 2011
ADDENDUM
I left something out.
To finish off the wire splice pictured above, cinch a miniature ty-wrap around the wires just above the wire nut. Any forces attempting to separate the wires will be taken by the ty-wrap, and not transmitted to where the wires are immersed in sealant.
- - -
Notes:
[1] This is an exquisite example of how machinery failure symptoms can be utterly baffling and misleading, for want of a little information about how a thing works.
As I said, the washer's drain function is linked to its spin function. If you're unaware that the spin function is interlocked, and that interlock switches tend not to age gracefully, you can go off on all manner of tangents trying to figure out what's wrong. The documentation supplied with the appliance is unlikely to be helpful, and much, if not most, of what you find on the internet is gibberish.
[2] 'SPST' = 'Single Pole Single Throw' -- a bit of shot-form switch configuration terminology. There are endless variations of switching configurations. SPST is the simplest; a single set of contacts is either open or closed, on or off.
# # #
# # #
Thank you so much for providing pictures of the assembly. My lid switch broke open and the spring & contact fell out, and I couldn't figure out how to put the puzzle back together. I used a zip tie (which I saw on a YouTube video) to hold the switch shut. Works like new. You saved me time & money.
ReplyDeleteThanks, Tom! I was following Bill Newberry's video (https://www.youtube.com/watch?v=JqeEf2IveSQ) on this and managed to open the housing too much and had to reassemble it. Your pictures saved the day. Much obliged.
ReplyDeleteThank you, saved me home money....
ReplyDeleteThank you for the pictures. They were invaluable.Tried to fix it but realized I was missing the internal spring for the contacts. So i simply electrical taped the contacts together. Tested the spin cycle, it worked and I didn't get electrocuted. Routed out the plastic in the lid so the contacts would fit and voila.Duct taped the case back together and re-installed. Redneck engineering to be sure but it works. Thanks again.
ReplyDeleteI agree with the above- these pictures were extremely helpful (as far as I can tell, these are the only such pictures on the web). I was able to put the spring and contact back together, used the zip-tie per the aforementioned video, and now it's working. I had to improvise because the tab on the left that the spring attaches to broke off, so the spring is hooked to a different part of that particular copper piece. I have a new switch on the way, but this fix is allowing us to wash a few loads in the meantime. Thank you, Tom!
ReplyDeleteThank you so much for posting these photos!!! I found the spring and copper piece on the inside rim of the bowl. I would have have known to even look for these pieces or how to put it all back together without your photos. Thank you for saving me $50CAD! I secured the whole thing with a plastic tie which is a tip I got from several you tube videos. :)
ReplyDelete