Another roadside find.

It's a 25cc machine. Serial number is HA0483185. There's what looks like a date of manufacture of 02-99, so I've got a machine here that's over ten years old.
There are a few obvious defects:
- The fuel lines are in ruins. I can't tell which is uptake and which is return.
- The air filter element and the air cleaner cover are both missing. There are a couple of square recess screws in the air cleaner body. Square recess screws on small engine equipment is always a sign of inept tinkering.
- The primer bulb is an embrittled ruin.

All that aside, let's see if we have spark.
The spark plug is a Champion RDJ7Y -- a resistive type spark plug. Hex is 5/8" A/F (across flats). Gap is a very snug 0.025". The plug looks in not bad a condition.

And we have spark. So it's on with getting the carburetor off and dismantled. I can just imagine the state of the metering diaphragm.
- - -
Carburetor Removal -- SATURDAY, MAY 4, 2019
- Remove two tubes from their nipples on the carburetor. If the tubes are sound and intact, make certain that you know which tube goes to which nipple before removing the tubes. That'll spare you having to puzzle out which nipple/tube is which come reassembly time. If the tubes are utter wreckage as they are on this machine, You'll have to sort out uptake from return at reassembly time. More on that later.
- Two 10mm A/F prevailing torque type hex nuts fasten the entire air cleaner body and carburetor to the engine. Remove those.

- Slip off the air cleaner body. It can dangle by the kill switch wire, or you can remove it altogether by removing an M3.5 x 12mm pan head screw, No. 2 Phillips recess, from the kill switch wire's ring terminal.
- Slip off the carburetor, noting the location of the throttle cable's 'Z' fitting in the throttle lever. Unhook the throttle cable.
- Note the gasket at the engine side of the carburetor. It'll probably be stuck fast to the carburetor. Just leave it there.
- - -
Carburetor Off The Engine

The carb is a Zama. Embossed on the body is "C1U" -- that's the body type. Etched on the body is "H39A 8XA" -- that's the model number. I've seen Zama carburetors similar to this one on string trimmers before, but not ones with the mixture adjustment affair that this one has. The mixture adjustment feature appears to be designed to defy dismantling.
Primer Side Dismantled

Note the following:
- There's a clear plastic diaphragm and a gasket stuck to the fuel pump body. (Some diaphragms are opaque black.) The diaphragm goes inboard directly to the carburetor's body; the gasket goes outboard to the fuel pump. A diaphragm kit will have new ones of those.
- The primer bulb's flange can only go on one way; you can't go wrong when reinstalling it.
- The two screws are M4 x 15mm, No. 2 Phillips recess.
- - -
Metering Side Dismantled

Note the following:
- The metering diaphragm goes outboard directly to the cover. The gasket goes inboard to the carburetor's body.
- Diaphragm stiffening is the common failure. The diaphragm must be supple, else the carburetor will not function.
- Note the small hole in the cover. That hole must be free of debris so that it can admit atmospheric pressure to the outboard side of the diaphragm.
- The two pan head screws are M3 x 6mm, No. 2 Phillips recess.

- Exercise extreme caution when handling the tiny spring. It can take off for the dark side of the moon on you in an eyeblink.
- The flat head screw is M3 x 6mm.
- - -
Diaphragm Kit -- FRIDAY, MAY 10, 2019
The diaphragm kit for this carburetor is Zama P/N GND-18. The kit contains five diaphragms and four gaskets, so one has to pick out only the items needed for the carburetor at hand.
On my carburetor, the metering diaphragm was very stiff -- completely inoperative. That's to be expected on virtually any diaphragm-type carburetor that's years old and been neglected.
- - -

Fuel Tank Removal -- THURSDAY, MAY 9, 2019
The fuel tank here needs to be fitted out with all new tubing, so I'll have to get the tank off the engine. That means loosening off the engine's rear crankcase cover. That cover is fastened in place by four 10-24 x 9/16" pan head screws, T25 Torx recess, with captive split lockwashers and flat washers. The screws were factory-installed with threadlocker, so it's a bit of work to get them loosened off.

I was fortunate in that the cover came away with no damage to the gasket. A damaged gasket would have to be replaced, or repaired with silicone gasket maker. The seal at the crankcase cover is absolutely critical to engine operation.
Fuel Tank Repair -- FRIDAY, MAY 10, 2019
The factory installs the tank's tubes by squeezing them through undersize holes. The same thing can be done in repair work; you just have to obtain the correct size of tubing.
The tubing holes in the tank are 11/64" diameter, so 3/16" O.D. tubing can be squeezed through nicely. The stuff to have is Tygon F-4040-A tubing, 3/16" O.D. x 3/32" I.D. Any small engines place should have the tubing. It's sold by the foot.
For a return tube, feed about an inch of tubing into the tank, then cut off a length outside the tank that's sufficient to reach the carburetor. It's helpful to cut the starting end of the tubing at an angle, to facilitate getting it started through the hole in the tank.
For an uptake tube, feed in tubing until it emerges from the tank's filler neck, where you can install the fuel filter, like so.

Cut the tubing end squarely and install the fuel filter. With the fuel filter in place, pull back on the tubing until the filter is back inside the tank, then cut the tube outside the tank as you did for the return line.
Label the tubes 'R' for 'Return', and 'U' for 'Uptake' with a Sharpie marker.
- - -
Fuel Mixture Ratio
I don't know what the mixture ratio is for this engine. 'Best guess is 40:1; I'll go with that.
- - -
All Together And Running
Here's a view of the carb and fuel tank installed with their new uptake and return tubes, and a new primer bulb. On the Zama carburetor, the nipple nearest the primer bulb is return; the nipple furthest from the primer bulb is uptake. The way that I arranged the fuel tank's tubes has made for a neat tubing installation. The tubes run parallel to one another; they don't cross.

With everything buttoned up, the engine started and ran more-or-less ok, but it wouldn't idle off choke. 'Time to get at the limit-capped mixture screw.
- - -
I got the mixture adjustment affair dismantled.

There's a needle valve for what I take to be idle mixture (the valve was about one turn out), and a force-fit plug in what I take to be the main jet's mixture well. I really don't know what to make of that.
Anyway, I put it all back together and it now idles with the idle mixture screw about 3 turns out. Idle speed seems high, even with the idle speed screw backed all the way off. Wide open throttle operation sounds a bit 'laboured', but it works.
- - -
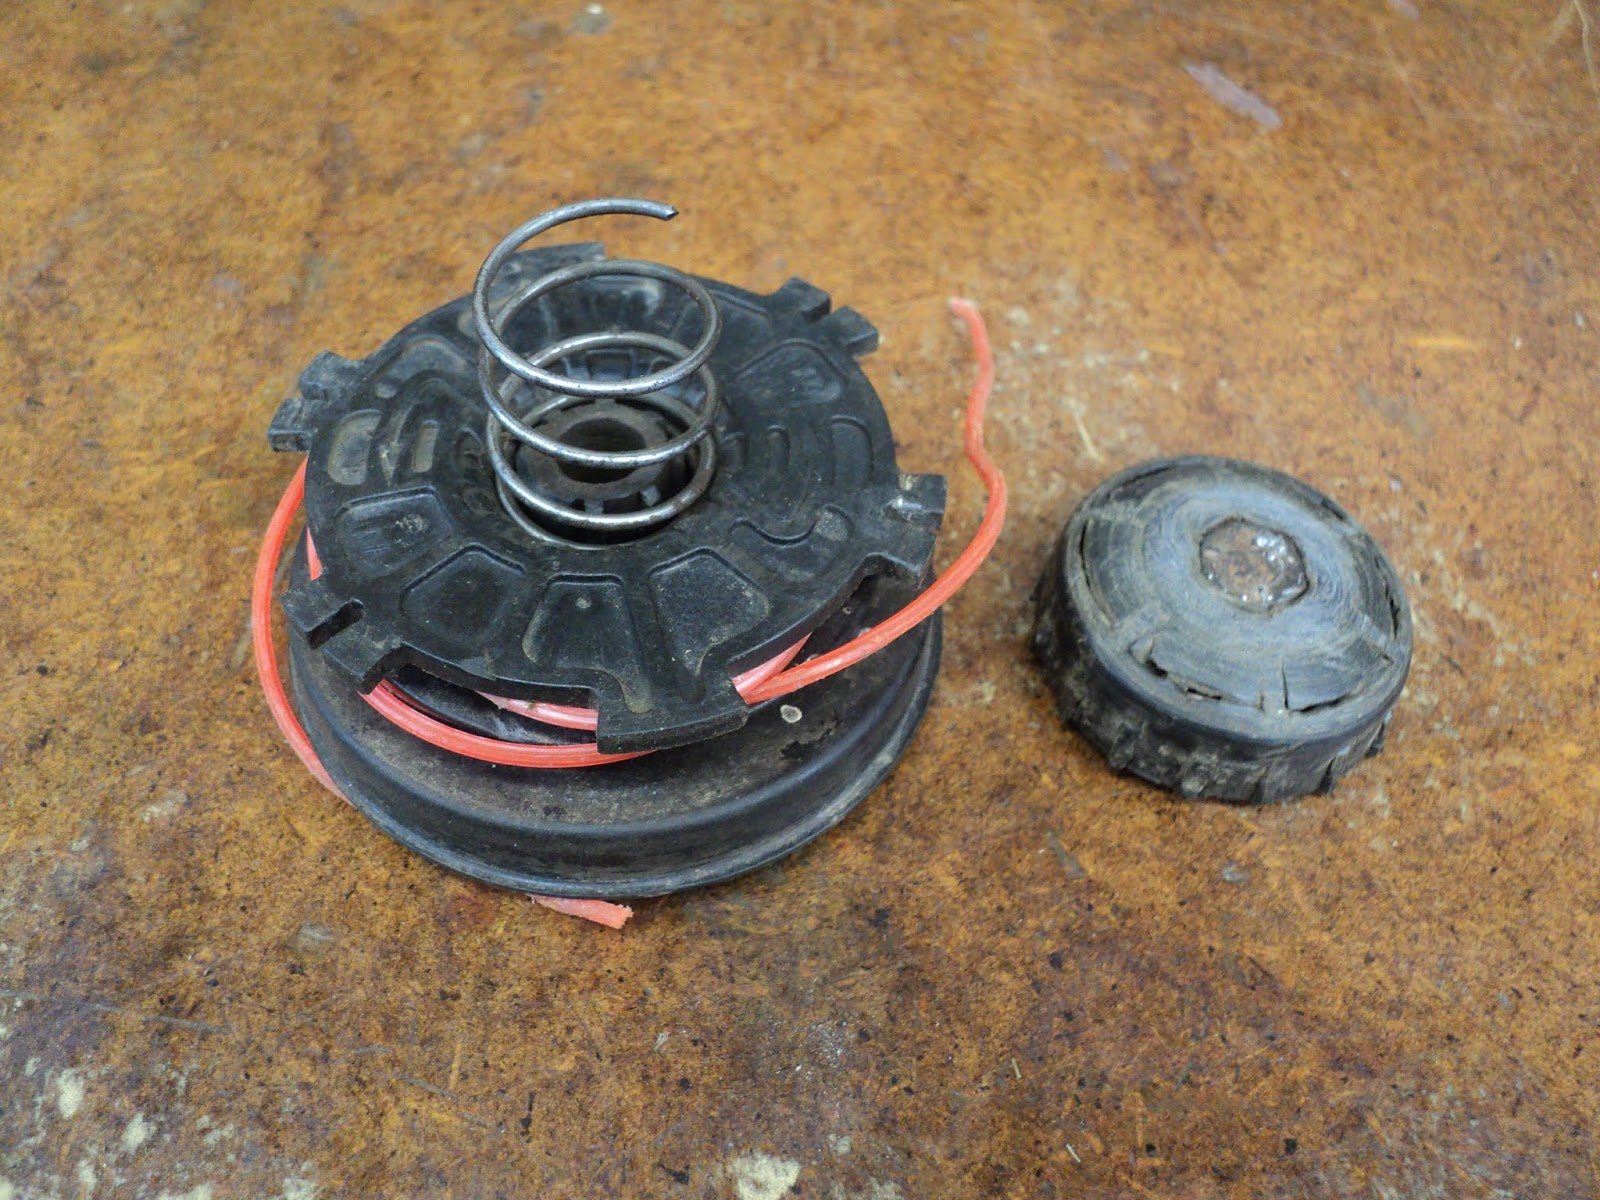
Trimmer Line Hub
The trimmer line that's on the hub is 0.080" diameter. The bump-feed feature doesn't work. There's a kluged spring in the hub that's too long, and that's inhibiting the bump-feeder's operation. Also, the face of the bumper is all but worn through.
- - -
Where all The Preceding Leaves Me
Given that I obtain all the following items, I may have a saleable string trimmer here:
- Air filter element.
- Air cleaner cover.
- Bump feeder spring.
- Bump feeder bumper.
- - -
A Shop-Made Air Filter -- THURSDAY, MAY 16, 2019

I had some 3/8" thick foam on hand that looked suitable, so I cut two rectangles of that for a filter element. I've given the foam some oil, and I hope that it's up to the task, and doesn't get ingested by the engine.
The 'cover' is 1/4" mesh hardware cloth, fastened by a couple of M4 x 16mm truss head threading screws. The No. 2 Phillips recesses give a better appearance than is had from square recess screws, which always look incongruous on equipment like this.
Bump-Feed Spring And Bumper
The small engines place in Pickering gave me a written-off Homelite UT20006 string trimmer for parts, so now I've got a proper spring and a bumper that's in better condition. Here's a view of the 'new' spring alongside the old one.

The proper spring is at the right.
- - -
To be continued.
# # #
# # #
nice share
ReplyDeleteI have a homelite trimmer, 25cc, model UT20024A. Worked fine until yesterday when it stopped dead in the middle of trimming. Plenty of new fuel mix in the tank. After initial troubleshooting I drained the gas out of the tank and along with it came some tubing pieces and the fuel filter. Do'h! I got new tubing today (clear tubing!) and put it all back together, but I'm not sure if the tube lengths are correct or if they even need to be certain lengths. For that matter, I don't know what the non-filter tube does. It had nothing attached to it as far as I can tell. Carb overflow? Air input?
ReplyDeleteThe non-filter tube is primer return to the fuel tank. Tubing lengths are not critical, as long as the filter sits in the bottom of the fuel tank. If the original tubing fell apart, the carburetor may be in need of a new diaphragm kit.
Delete