Saturday, February 23, 2013

A Frying Pan Handle

SUNDAY, OCTOBER 31, 2010

This is a companion piece to an addendum to "Somewhere, a Saucepan Needs a Handle". It picks up where the addendum leaves off.

This did not go as smoothly as I'd thought it would. I got caught out by some wood behaviour that I didn't foresee. I tell about that following the subtitle, "Whoops!", much further down.

Ultimately, this method of constructing a frying pan handle proved to be a failure. However, the matter of mating a piece of hardwood to a metal fitting by way of an interference fit remains of interest to me, and may prove useful some day in some application.

I salvaged the wooden part of the failed handle, and reconstructed it in much the same manner as I made the saucepan handle. We'll see how it holds up.

* * *
SATURDAY, OCTOBER 9, 2010

I don't like to leave loose ends unattended to, so I'll make the frying pan a new handle, and return the saucepan's handle to the saucepan. The hose fitting pictured below has given me an idea for a handle construction method quite different from that used to make the saucepan handle.

As with just about everything, there are endless variations of hose fitting construction. This one's nipple/ferrule is entirely made of light gauge pressed metal, inserted into a cast/machined threaded fitting and swaged in place.

I'll chuck it in the lathe and cut away the lip at the end. Then I should be able to extract the nipple/ferrule. What I have in mind is to make a handle with just that cast metal piece press-fitted onto the handle's end. It'll be a one-piece handle-reinforcement ferrule and threaded fitting.

- - -

That separation exercise worked out remarkably well; I've got my threaded fitting. It's bore is roughly eight thou greater than 3/4".


That bore dimension and how I arrived at it raises an issue of measurement methodology deserving of its own post. Here it is. I also explain there how I obtain the press-fit dimension for this handle.

The Wooden Handle

I have more of the same broomstick material that I used for the saucepan handle. I'll use it for this handle, but I'll make this one just a plain cylinder with no contour to it, so as to lose as little diameter as possible. I want this handle to be a bit more substantial.

Here's the new handle with its fitting:

I've turned that land at the end of the handle to a diameter that will be a press-fit in the hose-fitting's bore. The length of the land is just less than the length of the bore, so that I can be certain of getting the handle pressed in all the way to the shoulder of the land.

Note the three grooves on the handle's land, and in the bore of the fitting. The grooves are positioned so they'll align with one another when the two pieces are joined together. Just prior to assembly, I'll smear the land and the bore with J-B Weld epoxy. Once cured, the epoxy-filled grooves will effectively act as embedded lock-rings, securing the assembly from ever working apart.

Here's the assembly in the press, having just been pressed together.


(Something about that wooden cylinder gives my camera fits. I cannot get it to photograph well.)

While I was setting this up, I attached a disc of glossy cardstock to the end of the press' ram with carpet tape, so the ram wouldn't mar the end of the handle. Now I just have to clean up the squeeze-out, and I can leave it for the J-B Weld to cure overnight.

- - -

Here's the outcome. Not too shabby, if I do say so myself.


All that's left is to bore a shallow hole in the fitting end of the handle, to clear the screw head inside the cap that's attached to the pan. Then I'll give the handle a coat of tung oil and let that harden.

I'll post a photograph of the whole thing installed on the frying pan when it's all done.

- - -

And here's the pan with its new handle back home on the range. (Sorry! Couldn't resist.)

In closing, here are a couple of lessons learned along the way:

a) When I had the saucepan's handle on this large diameter pan, the pan wouldn't sit flat in the sink for scrubbing because of the handle's length. This new handle is short enough for the pan to fit properly in the sink; a consideration that's easily overlooked when fabricating a handle.

b) The idea of having an easily removed handle as an aid to washing up didn't pan out, so to speak. Unless the handle is removed every time the pan gets wet, water will seep into the fitting and stay there. Also, an easily loosened handle could be a safety hazard at times.

I installed this handle with the threads smeared with Permatex Ultra Grey silicone gasket maker. It remains to be seen how that material stands up to the heat. I'll update this post if I find that heat resistance is an issue for either the Ultra Grey or the red threadlocker.

- - -

SUNDAY, OCTOBER 10, 2010

Whoops!

My press fit loosened up after this morning's use of the pan. The J-B Weld 'lock-rings' are keeping it from coming apart, but it's loose in the threaded fitting.

I unscrewed the handle from the pan and examined it. The heat shrank the hardwood handle considerably. I wasn't expecting that from such well-seasoned wood. Evidently, I was asking too much of my press fitted assembly for the temperatures it's subjected to in use, and the approach I took with the saucepan handle is the superior one.

But I'm not defeated yet. I'll apply CA adhesive so it can wick in and fill the shrinkage void, and pin the thing through with a 3/32" x 1" roll pin.

- - -

Here it is with the roll pin installed:

This time I'll wrap the threads with teflon tape before screwing the handle back in. I'd rather not have to deal with the silicone gasket maker should I have to take this apart again.

- - -

SUNDAY, OCTOBER 31, 2010

Update

The pan's been in use for two weeks now, and the handle still appears to be sound. Needless to say, I'll stick with the saucepan handle's construction method should I ever need to make another pan handle.

The heat-induced failure aside, I'm still quite pleased with how that press-fitting turned out. That could still prove to be a useful technique somewhere that's not subjected to high temperatures.

- - -

SUNDAY, JANUARY 2, 2011

Update

The handle attachment point of a frying pan is a hotter place than I expected it to be. After two full months of regular use, the end of my press-fitted wooden handle is showing signs of charring.

It's loosened somewhat again. The roll pin may be all that's really holding it in place by now. I'll reapply CA adhesive and reinstall it. It will be interesting to see if this effect ever stabilizes, or if I'll ultimately have to make another handle by my other method.

MONDAY, JULY 11, 2011

Update

The handle was forever loosening and being retightened. Red loctite is not up to withstanding the temperature that a frying pan routinely gets up to. Ultimately, the welded-on boss on the side of the pan gave way and came off. The hose fitting cap that receives the handle is now bolted directly to the side of the pan. It looks a bit odd, to say the least, but it actually functions remarkably well this way. It's pictured below. (Also in the shot is what's left of the boss that came off.)

The burner grates on our gas stove are fairly high, so the pan sits up high enough that the downward-sloping handle is not at all a bother.

Further to the charring that I was getting, the charring effect kept on keeping on and loosening the handle end in its threaded collar. (And I've since learned that CA adhesive is not terribly heat resistant.) I drove out the pin and removed the collar, cleaned everything up and smeared JB Weld on the interface before reassembling and repinning it. That seems to be holding up.

The inner wall of the pan now has a screw head in it, like so.

That's really not at all a bother, either. Attaching the hose fitting cap this way, with a screw and a nut, makes it possible to really tighten the cap in place -- it hasn't been coming loose since I attached it this way.

So, I may finally have a durable handle here.

If nothing else, this exercise points up something to consider when shopping for cooking pans; i.e. handles attached by a single screw are prone to become troublesome with age -- they're pretty much doomed to fail eventually. Handles attached with rivets will no doubt far outlast handles attached with a single screw. Here's an upside down photo of a good example.


Now that's a handle attachment that will no doubt last forever.

- - -

SUNDAY, FEBRUARY 26, 2012

Whoops II!

A few weeks ago, the handle snapped off right at the ferrule. Here's a view of the ruin.

I've replaced it with the saucepan handle for now.

It lasted for over a year, which is a bit shy of forever, which is how long I like things to last. A rethink is in order, evidently. I'd still like to find a way to make this handle construction last, but I may have to make another handle patterned after the saucepan handle.

# # #

FEEDBACK

# # #

Friday, February 15, 2013

Fractional Inch Vernier Caliper

[SUNDAY, AUGUST 14, 2011: I've added a brief note on how a fractional vernier is read. Scroll way down.]

I bought the pictured caliper at Lee Valley in 2006 for $21.50, and it's a wonder I haven't worn it out; I use it very frequently. (The caliper is still available -- the catalogue number is 88N70.01.)

Note that the inch scale is fractional, not decimal. That's what makes the thing so useful to me. A precision caliper that reads directly in fractions of an inch along with millimetres is a real blessing in the workshop. (And I don't mean to appear backward or unschooled here. I'm quite conversant with metric and decimal inch measure as well, and I make use of them both as it suits me to.)

It actually baffles me a bit that precision fractional inch vernier calipers have always been a somewhat obscure item, considering the ubiquity of fractional inch measure that still adheres throughout Canada and the USA.

Anyway, I wanted to introduce the tool and recommend it. If you're a boomer of a certain age for whom fractional inch measure is second nature, I think you may find it useful; I certainly have. And if you're beginning to think I'm some kind of shill for Lee Valley, read on. I'll tell you of the problem I encountered with this caliper, and how I solved it.


- - -

If you look closely at the caliper's inch cursor in the photograph, you'll notice that the screw recesses have a rather blank appearance, unlike those in the metric cursor, which obviously contain tiny screw heads. There's a reason for that; the inch cursor has no screws holding it in place.

When I got the caliper home and started using it, I noticed that the inch cursor was imperfectly zeroed. Rather than go through the aggravation of returning it to the store, I set about looking into what could be done to zero it.

I loosened the cursor and tried to zero it and retighten it -- no way. If anything, I'd made it worse. What no doubt happened at the factory was that the assembler encountered a marginal cursor fit, levered the thing into place as best he could with whatever means he had at his disposal, said, "Close enough for this outfit." and boxed the caliper. I doubt he'd have been thanked for doing otherwise.

Since I could see no way to zero the cursor and install the screws, I tried a different approach. I thoroughly degreased the cursor mounting area with lacquer thinner, got the cursor in place and zeroed, clamped it there and then filled the screw holes with epoxy. It worked remarkably well. The feel of the slide on the beam is flawless, and it's held together for four years now.

So there we are. When a twenty-buck 'precision' tool comes up a bit short on precision, there may be a way to deal with it. There certainly was in this case.

By the way, there's more to fractional inch measure with this caliper than meets the eye. See this post for a look at a practical application of some really tiny fractions of an inch.


- - -

SUNDAY, AUGUST 14, 2011

Addendum -- Reading a Fractional Vernier

It dawned on me recently that some may have found this post while looking for instruction on how to read a fractional vernier. I'm not a mathematician, and I'm not going to attempt a rigourous explanation, but following is how I understand it. It works for me.

If you enlarge the above photograph, you can clearly see that the caliper is reading zero -- the cursor's zero is directly aligned with the beam's zero. Now, look at where that puts the cursor's '8' -- directly aligned with the beam's '15/16'. So, we can think of the cursor as representing a 'short inch' that's 1/16" shy of a full inch.

That 'short inch' on the cursor is divided into eight equal parts ('short eighths'). Each of those 'short eighths' is 1/128" shy of a full eighth. (True. You're more than welcome to work it out and prove it.) So, moving the cursor rightward until the cursor's first 'short eighth' aligns with the beam's first full eighth represents a cursor displacement of 1/128". As each successive 'short eighth' aligns with each successive full eighth, another 1/128" of cursor displacement occurs until we arrive at a direct reading of 1/16".

Here's the sequence of eight 'short eighth'/full eighth alignments that occur within 1/16" of cursor motion to the right:

1/128"

1/64"

3/128"

1/32"

5/128"

3/64"

7/128"

1/16"

Think of it this way; what the cursor's divisions do for you is they give you a means of accurately interpolating eighths of sixteenths. One-eighth of one-sixteenth is 1/128th.

And that's the best I can do. I'd be delighted to read a better explanation if anyone has one.

And by the way, the vernier scale was invented by Pierre Vernier. He published the invention at Brussels in 1631. How's that for leaving a legacy?


- - -

MONDAY, AUGUST 15, 2011

Addendum No. 2 -- A Fractional Vernier Variant

As with everything, there's a variation on the preceding. Pictured below are a couple of examples of half-inch/'short half-inch' verniers.

The nominal resolution is the same at 1/128", but the eight-division vernier on the cursor is only 7/16" long. On these verniers, one is looking for successive 1/16" alignments, rather than successive 1/8" alignments. Apart from that, the operating principle is no different.

Obviously, though, the inch/'short inch' vernier has inherently better visual resolution owing to its increments being more spread out.


# # #

FEEDBACK

# # #

Saturday, February 9, 2013

Tubing As A Repair Material


Tubing, of all types, materials and sizes, is one of the most useful, versatile repair materials on earth. I salvage the stuff at every opportunity, and stash it in bins sorted by external diameter. Countless times I come up with neat repair methods by looking in on my supply of tubing. Here's a small, but telling, example of the sort of thing salvaged tubing can do for you.


That broken plastic clothes hanger is no heirloom, but it can still be made serviceable -- there's no need to add it to the landfill.

That bit of tubing in the photograph is the key to a strong, simple repair here. It's butt-seam tubing, about 10mm O.D. x 8mm I.D. x 45 mm long. I just have to trim some mould flash off the hanger where the tubing is to go, and the tubing will fit over the broken ends of the plastic just fine.

Here's the tubing installed.


I'll apply CA adhesive at the tubing's ends, and along its seam, and let it wick in. That will give me a repair that should last approximately forever.

# # #


# # #

Sunday, February 3, 2013

A Snap-Fit Plastic Hinge Repair


[When I began this, I was not at all certain that I could pull it off, but it turned out remarkably well.]

I have a very fine tire pressure gauge with a plastic case. The gauge is superb; the case leaves a bit to be desired. Here's a view of the two 'halves' of the case.


The problem is with the black portion of the upper hinge half. That's the 'female' portion of the hinge, and its socket wall is chipped and won't retain the 'pin' of the clear half of the hinge. It doesn't photograph well, but here's a close-up.


Those hinge halves are about 5/32" 'diameter' -- substantial enough to be drilled through 1/16" diameter for a pin. Drill 'reach' with a standard 1/16" twist drill is likely to be marginal on the black portion, and setting up the pieces on the drill press with acceptable axial alignment with the drill may be challenging.

The drill reach problem, fortunately, is something I solved quite some time ago with this technique. By lengthening a standard drill's shank with brass tubing, I'll have no trouble with reach. As for axial alignment, all I can do is do the best job I can of aligning the work to the drill by eye, and hope for the best. Here's the black portion's hinge half successfully drilled through.


(In the above photo you can see very clearly where the hinge socket is chipped.)

The clear portion's hinge half was rounded on top. I had to file that flat so I could dimple it with an awl for a reliable start to the drilling. That worked out ok -- here's the clear portion's hinge half successfully drilled through.


Both drilling operations went well; here's the hinge assembled with a length of 1/16" rod trial-fitted as a hinge pin.


It dawned on me at this point that a cotter pin would make an ideal hinge pin. Here's a 1/16" x 1" cotter pin installed.


Not a bad outcome at all.

That clear lid is begging for a paint job -- it's pretty shabby looking, and I don't need to be able to see through it to know what's inside.

- - -

I had grey primer, and a bit of leftover metallic silver enamel on hand. Here's the lid with the second coat of enamel just applied and still wet.


When that paint has hardened and I have this all done, I'll photograph it again along with the gauge that resides in it.

* * *

All Done -- FRIDAY, FEBRUARY 8, 2013

Here's the case reassembled with its painted lid.


(Some blemishes on the clear plastic 'telegraphed' through the paint. I don't know if there's a sure way to preclude that from happening -- sanding, possibly.)

And here's the gauge back in its renovated home.


Update -- SATURDAY, AUGUST 20, 2016

The lower hinge developed exactly the same fault that the upper hinge had, and I repaired that in exactly the same way. Here's a view of the case now that both hinges are pinned with cotter pins.


Having to repair both hinges in this manner introduces a slight complication -- both hinges' pin-bores ought to share the same axis, and that's a difficult condition to meet.

I've managed to get close enough that the repair does work, but there's a slight binding condition when the cover is fully opened. That binding is an indication that the two hinges' axes are not perfectly in line with one another.

As long as the hinge bodies can tolerate the stress that the slight misalignment introduces, the repair will continue to function ok. If the stress should result in a cracked hinge body, then it will be game over for this plastic case. We'll see if this repair lasts.

# # #

FEEDBACK

# # #

Sunday, January 20, 2013

A Broken Weld Repair


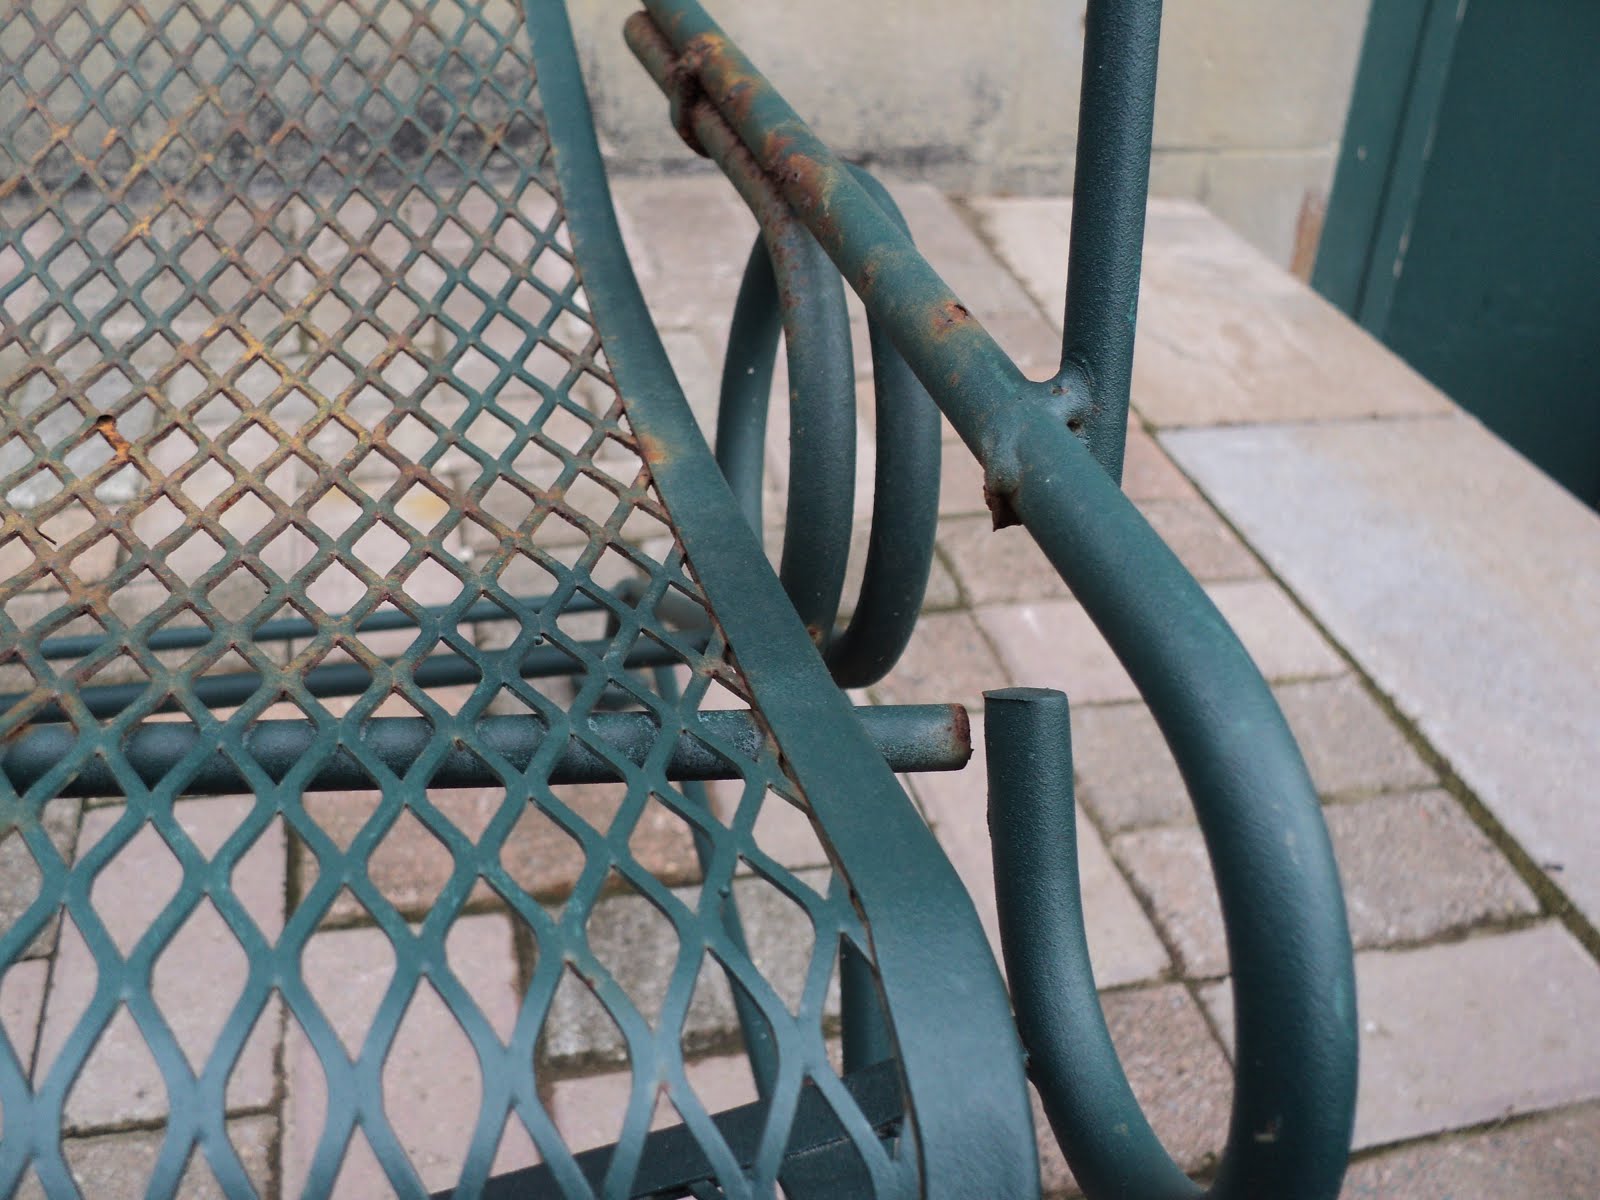
My wife found this iron patio chair some time ago.


It's quite an attractive piece, but it has a flaw -- a broken weld at the front left.


I don't have welding gear. I might be able to braze it, but I'm not all that practised at brazing; I'm not certain I could obtain a good outcome. That leaves me with the option of a mechanical repair method similar to one that's already been applied to this chair by someone in the past. Here's a view of that repair at the upper left of the back.


This will be a bit of a challenge. The repair pictured above would have been relatively easy to accomplish, since that  added strap was attaching to a flat piece. I need to do a similar repair, but I'll be attaching to a round piece -- that complicates things a little. Anyway, we'll see how it goes.

- - -

First off, what's left of the broken weld on the underside of the large diameter round has to be ground away -- it will interfere with installation of a strap.


That went reasonably well.


Then it turned out that the upper part of the old weld had to go as well; it would interfere with positioning the end of the  lateral round.


Now I can begin to fabricate the attachment strap, and figure out how to go about installing it.

- - -

Here's what I've rigged for a metal forming jig.


That 's a couple of pieces of 12mm diameter steel rod[1] clamped very tightly in the vise, and very tightly clamped across/to the work by Vice-Grips. The masking tape on the work gave a me a way to mark distinct positioning lines. The material is 1/2" wide mild steel flat stock, 1/8" thick. Here's the short end after forming with the aid of Channellocks.


And here it is almost fully formed.


This method doesn't yield a perfect result, but with a little more persuasion from another pair of Vise-Grips while the work is still in place there, I'll get an adequate approximation of the shape I need for my repair strap. Then I can cut off the excess material and carry on with fitting the strap to the chair.

- - -

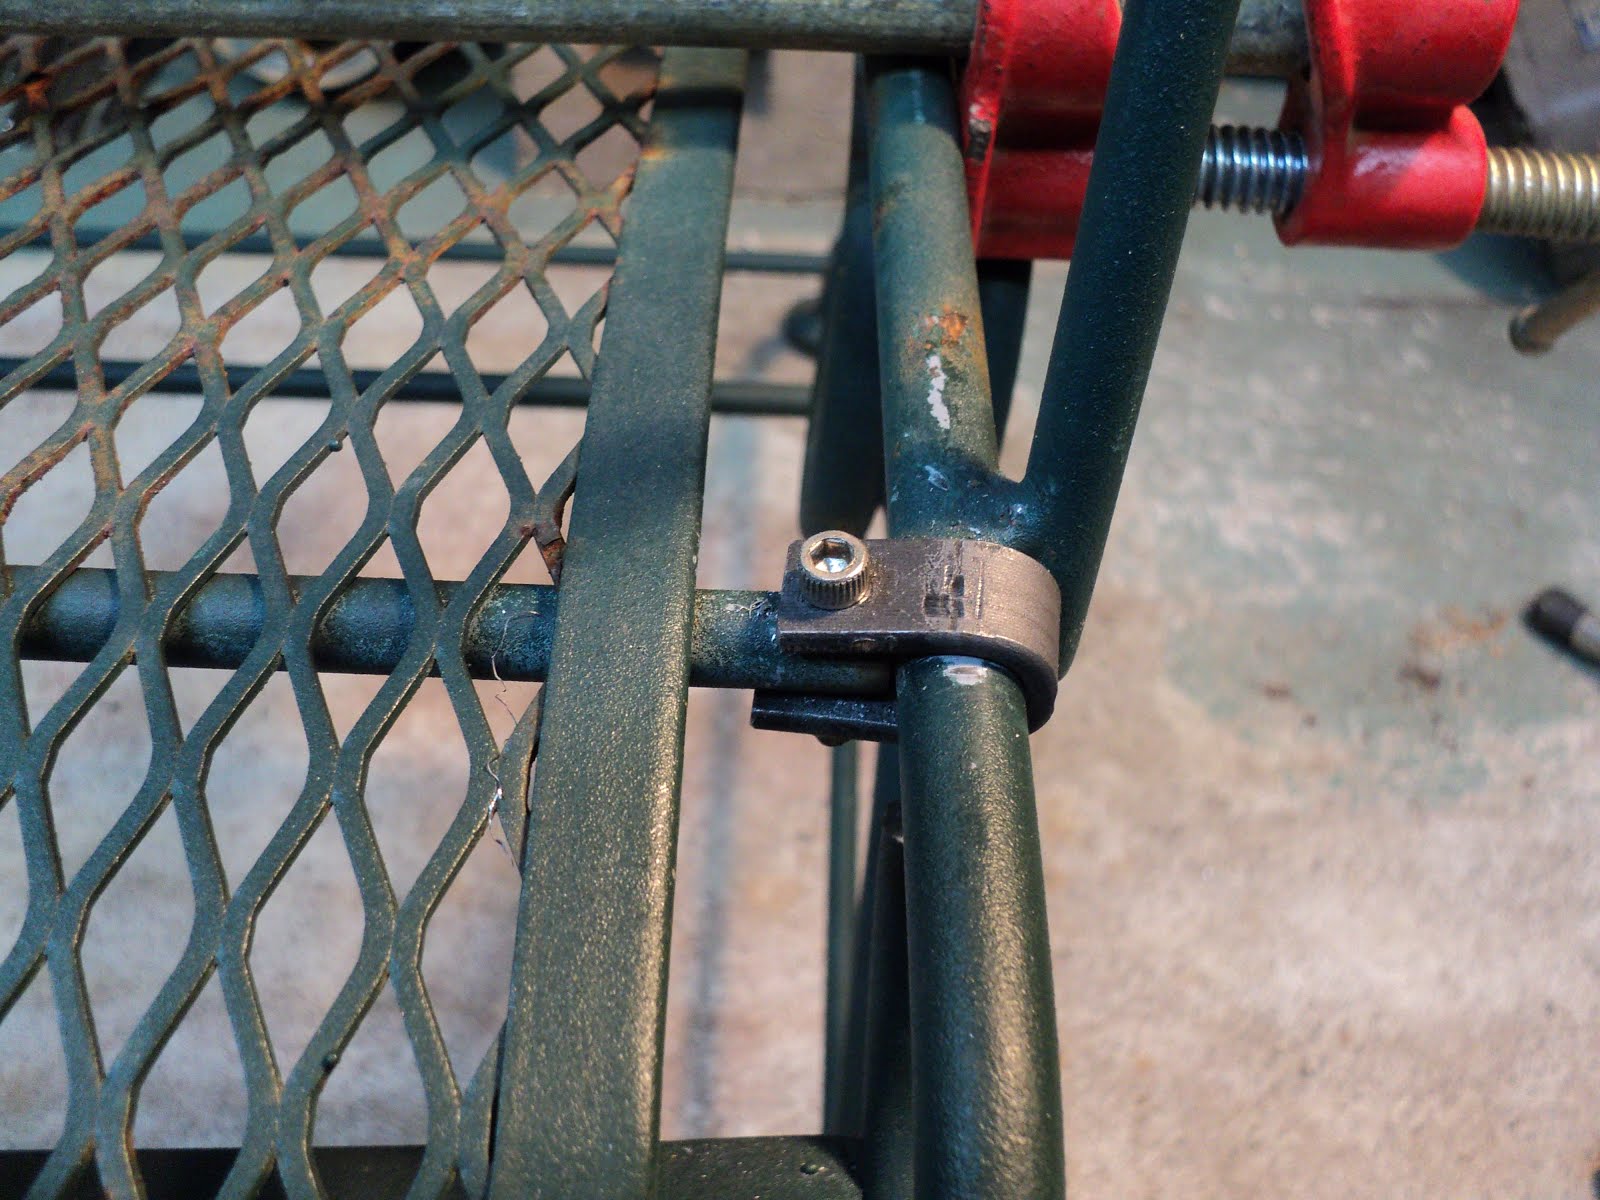
I've prepared the strap. I've drilled a 5/32" pilot hole through its upper side. Here it is clamped in place ready for the drilling to be completed.


And here it is done.


After drilling completely through 5/32" diameter, I bored the hole out to 11/64" diameter, and installed a stainless steel 8-32 screw. That will make for a more-than-adequately strong repair.

I'm not entirely done with this. I still want to refine that repair job a bit, and I need to plan out a repaint job for the entire chair. But I'm pleased that my methodology here panned out as I thought it would -- that's a sound repair that will never need attention again.

- - -

The Finished Repair -- SATURDAY, JANUARY 26, 2013

Here it is fully completed.


I've rounded off the strap's corners, and cinched the strap as snugly as I could around the large diameter rod. I shortened the screw by 1/8" so it would fit correctly with two stainless steel flat washers added, and an acorn nut installed with blue thread-locker. The repair is now well and truly done.

- - -

Note:

[1] My loathsome day job is as a laser and impact printer repair technician. That gives me access to an excellent supply of discarded steel rod material from parts replacements and from scrapped printers. For an amateur machinist, it's a treasure-trove of useful material.

If your workshop interests are similar to mine, you might want to make the acquaintance of a local printer repair shop -- you'll be amazed at the stuff they throw out.

# # #

Sunday, January 6, 2013

CA Adhesive As A Machinist's Aid


Cured CA adhesive ('Krazy' glue or 'Super' glue) is not terribly heat resistant -- boiling water temperature will soften it. While that's a weakness of the material for some applications, it's a characteristic that can be put to good use in the machine shop at times.

I have a small gland nut from the valve stem of a propane torch with ruined threading on it. [Long story.] If I can turn down the mashed threads so that the nut's shank can at least re-enter the valve's stem-hole, I can get the valve back in working order. The difficulty is in mounting the tiny nut for turning on the lathe. That's where CA adhesive comes in. Here's a view of what I've done up so that I can chuck the gland nut.


A length of 1/4" steel rod and 9/32" brass tubing provide a foundation on which I can squarely place the damaged nut. I've applied CA adhesive and let it cure. Now I've got a 'mandrel' that I can chuck in the lathe.


When I'm done turning that, I'll dismount it, heat it up a bit with a propane torch and the nut will come free of the mandrel easily.

- - -

That worked nicely.


Now I'll free the nut from the mandrel and I can reassemble the valve.

- - -

Here's the valve back together less the knob.


After inserting the now threadless gland nut, I applied CA adhesive all around the perimeter of the nut's hex,[1] and set the thing aside for awhile for the adhesive to cure. That adhesive-secured gland nut should work fine. That nut really doesn't do much -- all it's there for is to provide a sleeve bearing for the valve stem. The gland nut has no sealing function, and it really has no load to bear of any consequence, so held-in-place-by-glue is just as good as held-in-place-by-threads.[2]

- - -

Here's the torch fully assembled and operational.


CA adhesive is versatile stuff. I'm never without it on hand.

- - -

Notes:

[1] CA adhesive can be treacherous to work with in this sort of situation. The stuff is extremely runny, and it will wick in anyplace and everyplace it can. Never take the attitude 'if a little is good, more should be better'. You'll end up regretting it.

[2] This is a good example of the value of setting aside orthodoxy at times, and pondering what it is that a given component really does. As long as I remained fixated on having a proper screw-in gland nut, this torch just sat idle in a box under my workbench. Once I finally studied the problem more thoughtfully, it dawned on me that the repair method outlined above could work, and was worth pursuing.

# # #

Friday, October 26, 2012

Backyard Archaeology II


The first 'Backyard Archaeology' post I did was about an old 6" diameter wheel that turned up when some retaining wall work was being done at the back of the house.

Here's another item that got dug up along with the wheel:


The scantest remains of a garden fork. Turning that back into a useful tool will be a righteous challenge. I have the makings of a handle-shaft on hand. Some wire-brushing is in order for starters. We'll see how this goes.

# # #


# # #