I have an old Ryobi RY09466 leaf blower with an utterly worn out engine. It was a $2.00 garage sale find that didn't pan out, so it's pretty much landfill. (See this post for the back story, and some basic maintenance information.)
I've got plenty of time, and little else better to do, so I thought I'd tear the machine right down, and at least get a good look at its cylinder wall, to see what the damage looks like. Overhauling the engine is out of the question -- the parts, if I could even get them, would likely cost me at least as much as a new machine. But if I can learn more about small engine architecture, I'll be happy. So, here goes.
Here's a view of the complete machine as obtained.

Its external choke lever is broken off, and the air cleaner cover and filter element are missing. Judging by its very low compression, the machine has seen long service, and heaven only knows how long it was run without an air filter.
1) The Nozzle

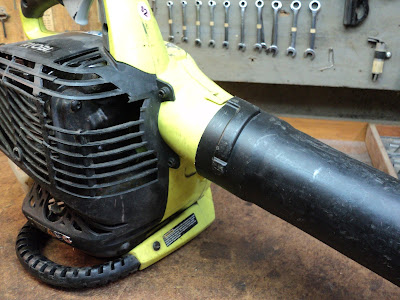
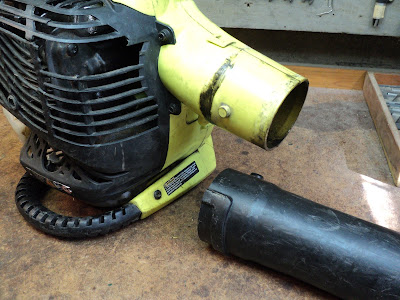
Shown above is the nozzle in its latched position. The latching effect is very secure. I needed a big pair of Channellocks to twist the nozzle out of its latched position. Twist CCW (as viewed nozzle-output-end-on) to unlatch it from its studs, then pull it off.

2) The Right Side Engine Cover
Four No. 8 x 11/16" threading screws, and one M4 special shoulder screw (all T20 Torx recess).
3) Right Side Of Handle
Three No. 10 x 3/4" threading screws (T25 Torx recess). Watch out for a little steel rod part (a ground wire) at the top of the handle -- it will be free to fall out once you take away the right side of the handle.
4) Throttle Cable Disconnection
Throttle cable anchor removed from air cleaner body. (One M4x16mm pan head screw -- T20 Torx recess.) Throttle cable disconnected from throttle crank.
5) Kill Switch Disconnection
Two spade terminals.
6) Bottom Right 'Handle'
Two No. 10 x 1/2" truss head screws (T25 Torx recess).
7) Fuel Tank
[The above photo is in error -- the bottom right 'handle' shouldn't be there.]
Two fuel line connections:
- The front-most line connects to the lower carburetor nipple; that's the fuel supply tube.
- The rear-most line connects to the right side primer bulb nipple; that's the fuel return tube.
Three No. 10 x 3/4" pan head screws (T25 Torx recess).
8) Left Side Cover
Seven No. 10 x 3/4" pan head screws (T25 Torx recess); one latch.
One 3/8" - 24 nylock hex nut (9/16" A/F). The nut is a right hand thread. Use an impact wrench to free it. NOTE the two oversize flat washers.
10) Impeller Housing W/Starter
Four M4x19mm cap screws in deep wells (T20 Torx recess). NOTE the sleeve and flat washer on the output shaft.
- - -
And there we have the engine free of its externalities.

I'll begin a new post for the engine tear down. This post is getting dangerously lengthy.
# # #
# # #


This article your very interesting.
ReplyDeleteThank you for giving me more information.
try here
You're very welcome.
DeleteI've just obtained a two-stroke Ryobi leaf blower. Carburetor removal for that machine is here:
http://rougeriverworkshop.blogspot.ca/2017/06/ryobi-ry09056-leaf-blower-carburetor.html
you write a very detail review about leaf blower. here i write black & decker BV6600 review on my blog. please check it out.
ReplyDeleteBrilliantly communicated.Breath taking quality. Worth Reading.
ReplyDeletebest-electric-leaf-blowers
I was surfing the Internet for information and came across your blog. I am impressed by the information you have on this blog. It shows how well you understand this subject. click for more info
ReplyDeleteThis is a great inspiring article.I am pretty much pleased with your good work.You put really very helpful information. Keep it up. Keep blogging. Looking to reading your next post. here
ReplyDeleteI havent any word to appreciate this post.....Really i am impressed from this post....the person who create this post it was a great human..thanks for shared this with us. water worker pressure tank reviews
ReplyDeleteI know your expertise on this. I must say we should have an online discussion on this. Writing only comments will close the discussion straight away! And will restrict the benefits from this information. flotec pressure tank reviews
ReplyDeleteHello I am so delighted I located your blog, I really located you by mistake, while I was watching on google for something else, Anyways I am here now and could just like to say thank for a tremendous post and a all round entertaining website. Please do keep up the great work. Vertical Reflow Oven
ReplyDelete