Pages

Monday, June 25, 2018

The Shed Chronicle Part III


This part of the chronicle will deal with all the wall framing. The previous part, Part II, is here.

Rear Wall Skeletally Framed -- MONDAY, JUNE 25, 2018


The studs are all 2"x3"s on 16" centres. I still have to add blocking members half way up, along the length of the wall.

The wall is 6'4" tall. The front wall will be 7' tall. Then the roof will be asymmetrical in the saltbox manner.[1]

Tomorrow, I'll get more 2"x3"s, construct the right side wall and install the blocking.

- - -

Right Side Wall Skeletally Framed -- TUESDAY, JUNE 26, 2018


And A Little Bit Of Blocking Done


Tomorrow's forecast is calling for rain, so I'll attend to some chores, and may make no progress on the shed.

- - -

Blocking Done For Now -- WEDNESDAY, JUNE 27, 2018

It rained in the morning, then it stayed grimly overcast all day, but at least the rain held off. So, I was able to return to the blocking and get as far as I could with that for now.


The blocking makes for a big improvement to the framing's rigidity.

Note the tripled-up stud in the right side wall. For a saltbox-style roof, that's where the roof's ridge board (peak) will be mounted, one-third of the way back from the front of the structure. Consequently, that point in the wall will have to bear a considerable load, hence the reinforced stud.

I've bought the two windows that I mean to install. The windows' manufacturer, Prestofen, offers the most amazing installation advice. They'd have you caulk the window's frame at the inside, not the outside -- that's a certain recipe for dry rot. I may write to them about that, just to see if I get a response. In my experience, corporations only want to hear praise for their products and services, and don't care to grapple with 'hard' questions. We'll see.

Anyway, weather permitting, tomorrow I can tackle framing the left side wall -- the one with a window in it. That will be challenging; windows complicate wall framing quite a bit.

- - -

Left Side Wall Skeletally Framed -- THURSDAY, JUNE 28, 2018


The odd spacing of the studs results from accommodating a window at the centre of the left side wall.

Tomorrow, I'll complete the window opening's framing, and add the blocking. Then I'll have to go to Lowe's for more 2"x3"s, for framing the front wall.

- - -

Blocking Done And Window Opening Framed -- FRIDAY, JUNE 29, 2018

Here are two views of the left side wall with the window perched in place.


Kreg pocket screws are helpful for dealing with awkward blocking members. I've used both the large 'HD' size.


And the regular size.


Next up is the front wall.

- - -

Front Wall Framing Begun -- SATURDAY, JUNE 30, 2018


Setting that top plate in place and fastening it was a delicate bit of business.

With the other three walls in place, one no longer has the use of the floor as a giant, unobstructed 'workbench' on which to assemble a wall. So, the front wall gets constructed piece-by-piece in situ.

- - -

Some Stud Doubling Done -- SUNDAY, JULY 1, 2018, 1245 HRS


And that may be all I get done today. It's getting pretty hot out, and I'm going to go visit my son later this afternoon, so I may as well call that a day.

- - -

Front Wall Almost Fully Framed -- MONDAY, JULY 2, 2018


Note the tripled up top plate over the wide door opening. That's to make up rigidity for the three studs that aren't there.


There'll be some more framing to be done at the top of the doorway, once I've decided on the exact height of the doors. I'll do that once I have the front eave in place.

And it's on to Part IV -- constructing the roof.

* * *

Notes:

[1] Note that I said 'saltbox manner'. My roof won't be a true saltbox design. Those have 45 degree slopes to their roof planes. My roof's slopes won't be that steep.

The author of "Building A Shed"[2], Joseph Truini, has strong opinions about the saltbox style of roof, and he would no doubt disapprove of my version. Here's what he has to say about the subject:

"Unfortunately, traditional saltbox design has been altered, distorted, and modernized so often that it's sometimes hard to recognize. Today's builders have tried to "improve" the design by changing the angle of the roof slope, raising the walls, and shortening the long roof plane. The result is an ugly, out-of-proportion building. To ensure that your saltbox roof remains true to its colonial roots, follow these two essential design rules. First, frame the roof to a 12-in-12 slope (that's 45 degrees). Second, create the proper proportions by situating the roof peak one-third of the way back from the front wall."

[2] The Taunton Press. Text © 2002 by Joseph Truini.

# # #


# # #

Friday, June 15, 2018

The Shed Chronicle Part II


This post will cover the construction of my shed's foundation, foundation frame and floor. See here for part I of the story.

- - -

A Start To The Foundation -- FRIDAY, JUNE 15, 2018


There's the first corner. That was the easy part; the nine remaining tiles/blocks all have to be levelled and aligned to that one.

It's a standard 4-way Dek-Block on top of a 2'x2' patio tile on top of limestone screening. The soil there is not terribly well drained, but it's been undisturbed for years. My thinking is that at 576 square inches per tile, the shed will actually bear fairly lightly on the earth, and should ride out freeze/thaw cycles without significant heaving. That's my theory, anyway, and I'm going to go with it and see what happens.

The cost and effort to bore holes four feet deep for poured concrete piers would have been outrageous. From what research I've managed to do, it seems that even piers of that depth don't absolutely guarantee against frost heaving. The method I'm using here is a reasonably sound one that should prove satisfactory for an 8'x12' shed. We'll see.

My work so far has shown me that I'll need way more limestone screening than the three sacks that I ordered. Tomorrow, I'll see how much limestone my Tucson can carry, and get on with adding tiles and Dek-Blocks.

- - -

At Least It Looks Like Someone Is Starting To Begin To Commence Building A Shed -- SATURDAY, JUNE 16, 2018


Three out of ten tiles/Dek-Blocks are now in place. It's nice work if you like heavy lifting. The tiles weigh 80 lbs., the Dek-Blocks weigh 48 lbs. and the sacks of limestone screening weigh 66 lbs.

Not only is the work physically taxing, it's intellectually taxing as well. There is much to mind as one attempts to get spacing, elevation and level to agree from one installation to the next. It's the sort of work that I call 'precision approximation'. Perfection is not going to happen -- reasonable serviceability is about all one can hope for.

A Tamper

While I was at the local Garden Supply Centre to get more limestone screenings, I spotted an array of tampers they had for sale. It dawned on me that tamping was what I hadn't done for my first tile installation, and that tamping was exactly what I should have done, so I bought a tamper.


It's an 8"x8" tamper, well made, and it looks to me like it's fairly effective at tamping down and compacting the limestone screenings. I undid my first tile/Dek-Block installation and gave its base a good tamping. Now I'm tamping all of my limestone screenings installations.

- - -

Rear Rim Joist In Place -- SUNDAY, JUNE 17, 2018


That joist in the above photo is almost but not quite level. I decided that 'almost but not quite' isn't good enough, so I got some shims and shimmed the joist to levelness.


Levelling is exacting, trying work; fraught with difficulties. The books and magazine articles have little to say about it, aside from saying that it's to be done.

Anyway, with the aid of the shims, I should be able to get a dead level floor built. It will be interesting to see how level it still is this time next year.

 A Parting Thought

Gripes about difficulties aside, the work is engrossing; it's fit work for a grown man, unlike so much of what passes for 'work' these days.

- - -

Further To Shims - - - MONDAY, JUNE 18, 2018

I've been strongly cautioned not to use wooden shims; I'm told that they'll compress and rot. So, I'll switch to composite shims, like these that I got at Home Depot long ago.


Home Depot no longer has that exact type of composite shim. They now carry these from Nelson Wood Shims.


Whatever shims one chooses to use, the things are essential. It's simply not possible to get the tiles and Dek-Blocks exactly levelled to one another. Shimming is unavoidable.

- - -

Rain -- MONDAY, JUNE 18, 2018

Today's a write-off for shed work. I'll give the rocking horse a coat of tung oil, and that will be about it for the day.

The Rain Backed Off

I managed to get something done.


Two rim joists in place and fastened at the corner.

- - -

Rim Joists Together And Levelled -- TUESDAY, JUNE 19, 2018


It's not quite square. I'll struggle with that tomorrow.

It's anybody's guess which side of that plywood[1][2] is the good side.

- - -

Squared Up; All The 2" x 8" Joists In Place And Fastened -- WEDNESDAY, JUNE 20, 2018, 1200 HRS


At each joint, three #10 x 3 1/2" deck screws make for a neat, strong fastening.


Next up is to add the six 2"x6" joists.

- - -

2" x 6" Joists Installed -- 1500 HRS


I'll lay down weed barrier cloth before I install the floor.

- - -

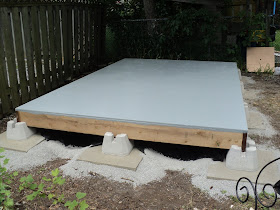
Weed Barrier Installed And Floor In Place -- THURSDAY, JUNE 21, 2018


Floor Nailed Down And First Coat Of Grey 'Paint & Primer'[3] Applied


One soon learns to keep an eye on the weather forecasts when embarked on such a project as this. Today was a beautiful clear day, perfect for exterior painting. Tomorrow's forecast is calling for increasing cloudiness, then rain in the night. I'll give the floor a second coat of paint tomorrow morning, then the plywood should be adequately protected from the coming rain.

- - -

Second Coat Of Paint Applied -- FRIDAY, JUNE 22, 2018


I've beaten the rain that's forecast to be coming tonight. It will likely be weeks before there's a roof over that floor, so I'm hoping that my paint job will protect the floor from the elements in the meantime.

- - -

Rained Out, And A Rainy Weekend Forecast -- SATURDAY, JUNE 23, 2018

It rained overnight as per the forecast.


The paint job appears to be coping with the water just fine, so that's a relief.

The forecast is calling for a rainy weekend, so progress on the shed is unlikely. I can maybe go the Home Depot, and load up the Tucson with 2"x3"s for construction of the rear wall. Then at least I'll be ready to carry on when the weather clears on Monday.

- - -

Shopping For 2" x 3"s

Disheartening. I went to the Pickering Home Depot, where they only carry finger-jointed 2"x3"s. The finger-jointed stuff is supposed to have the virtue of straightness, but you'd never know it from what I saw there. I picked through their stock for a while, and decided to look elsewhere for better material.

The Rona on Notion Road in Ajax carries solid 2"x3"s, so I thought I'd go there for a look-see. Their 2"x3"s were outside, minimally protected from the elements. The sign by the stack of them said "KD" (Kiln Dried, presumably), but the weight of the things suggested to me that they'd been weather wetted. I passed on those.

Tomorrow, I'll try the Lowe's in Pickering. If their stuff is unsatisfactory, I'll go to the Morningside Home Depot as a last resort and take my chances with their finger-jointed studs. It may be that I'll just have to pick and choose poor material as best I can, and cope with the complications that arise from its use.

- - -

Twenty 2" x 3"s Acquired -- SUNDAY, JUNE 24, 2018

'Went to the Lowe's in Pickering, and found that their solid 2"x3"s were reasonably good, so I bought twenty to get me started and then some on the rear wall of the shed. Here's what twenty eight-foot-long 2"x3"s in a Tucson looks like.


So, I'm set for tomorrow when the weather is forecast to have cleared. And with that, it's on to Part III.

* * *

Notes:

[1] The plywood is nominally 5/8" thick (15.5mm actual). I think what it is is sheathing grade (SHG) plywood. It has a 'face' side, but both sides are riddled with defects. I found that the sheets tended to be concave at one side, so I put the concave side down to make for easier manipulation and positioning. It looks to me like by doing that, I've put the 'face' side down, but I don't think it matters much, if at all. There's information here about Canadian plywood specifications.

[2] Carrying sheets of 5/8" plywood is not easy; a sheet weighs about 45 lbs., and would be awkward to carry even if it were much lighter. I had help with getting the first sheet to the site, but for the next two sheets I was on my own. I found a YouTube presentation of a design for a tote that looked pretty good, so I made one. Here are views of that.


It works fairly well; it did the job for me.

[3] Paint used was Canadian Tire's Premier Active exterior paint & primer, satin finish, base 3 - 3533. The grey colour was copied from a Behr colour chip, 'Moonquake N450-4'. The colour formula for a gallon[4] is as follows:
  • AGF   103
  • B        2Y214
  • E        23
  • KX     9Y48
What all that means I have no idea, but I thought I'd make a record of it here.

[4] That's a Yankee gallon, not an imperial gallon.

# # #


# # #

Wednesday, June 6, 2018

The Shed Chronicle


Here follows the ongoing story of the construction of an 8' x 12' saltbox style garden shed.

- - -

The shed's site is at the bottom of our property's back yard. The site is low-lying and poorly drained, but I'm not going to let that stop me from building there; I think the site will do in spite of its flaws. Here's a view of the site.


The site used to be quite a productive garden some years ago, but neighbouring evergreen trees grew and grew and shaded it too much. The garden was let go, and now it's just a mess of miscellaneous growth run rampant. Here's another view of it.


Today I started in on clearing out the vegetation. I was making progress, then I decided to get my two-stoke engine powered string trimmer in on the action. That got me a tiny bit of work done; then the string trimmer died. I mucked about with the string trimmer's carburetor for quite a while to no effect. All I managed to do was to waste time.

Anyway, I did get some work done. Here's a view of my progress so far.


At the rate that I'm able to go, it may take me all this summer just to get a foundation laid. We'll see.

- - -

The loss of my string trimmer's use is really bugging me. I may see about getting a new diaphragm kit for its carburetor tomorrow.

- - -

2330 Hours

It's late in the day, and I got the string trimmer to start after another round of dismantling and mucking about with the carburetor. I can't run the machine now; the thing is very noisy and it's much too late. I'll try it again tomorrow, and see what happens.

- - -

Progress -- THURSDAY, JUNE 7, 2018

Most of the vegetation is cleared out.


There are a couple of cedars left to be taken down, and some gooseberry bushes to be removed.


The String Trimmer

This morning, the machine started easily and ran fine. It's been ok all day. I have no idea what it is that I finally did that corrected its problem. Diaphragm type two-stroke carburetors are pure voodoo.

- - -

A Visitor To The Site -- FRIDAY, JUNE 8, 2018


Robins are very discerning birds. Whenever they see soil churned up at all, they're right there to feast on the worms and whatevers that turn up. The guy pictured above has been making frequent appearances since I started pulling up vegetation.

Site Cleared


I have a place to build a shed. Next up is to draw up a list of foundation materials, and get them delivered.

- - -

Nothing Done Today -- SATURDAY, JUNE 9, 2018

We had a funeral to attend.

- - -

Cedar Stumps Right Where I Don't Need Them -- SUNDAY, JUNE 10, 2018

In several places, I'm left with cedar stumps/root-wads right where foundation tiles have to go.


(The knife is there for scale.)


The stumps are firmly rooted; I've no way of pulling them out. I guess I'll have to dig down some alongside them, and chainsaw them off as low as possible. That'll likely be death to my chainsaw's chain, but so be it. I'll fill the resulting depressions with crushed limestone.

Anyway, I've got my foundation tile locations crudely staked out.


I didn't do a precision job of that. The Dek-Block-on-tile method that I'll be going with has a fair bit of leeway for error to it, so my staking job will serve.

- - -

Not Much Done Today -- MONDAY, JUNE 11, 2018

Other commitments. I managed to chainsaw a couple of cedar stumps out of the ground.


They're not very big, but they're tenacious. I've at least one more stump to deal with, then I'll be out of excuses for putting off ordering material, and getting on with actually constructing my shed's foundation. Once the material is ordered and delivered, I'll be well and truly committed.

- - -

Last Cedar Stump Out -- TUESDAY, JUNE 12, 2018

It was a tandem model.


'Disgusting what that did to my chainsaw.


I've since cleaned up that mess and gotten the saw fit for use again.

- - -

Bogus Weather Forecast -- WEDNESDAY, JUNE 13, 2018

There's been a severe thunderstorm warning out all day which has come to naught. I let it keep me from leaving the house, for fear that all hell would break loose at any minute. It's now 1730 hrs, the sun is shining, the storm warning has ended and I've accomplished nothing.

I had meant to go the Home Depot today and order up foundation material. Now that can be tomorrow's doing. In all honesty, I must admit that I was a little glad of the excuse not to go out; I'm not looking forward to constructing the foundation. It's going to be an ordeal.

- - -

Home Depot Weirdness -- THURSDAY, JUNE 14, 2018

I went to the Morningside Home Depot this morning to order up my foundation materials. I had with me a neatly hand-written list of what I needed, like so.


I was thinking, "This ought to be a breeze."

I went to the 'Pro Desk' where one orders materials to be delivered, and one of the Associates there offered to help me. I handed him my list, he looked at it and asked me to read it to him. [!?] Somewhat taken aback, I began to try to oblige him and read him the first item, the patio tiles. He proceeded to muck about at a computer, searching for patio tiles. I could scarcely believe what I was witnessing. It dawned on me that with this man's 'help', I'd be there for over an hour just to execute a straightforward materials order. I didn't want to cause a fuss about getting someone who knew what they were doing, so I blurted out something to the effect that I'd rather do this some other time, and hastily left the store and went home, wondering if God maybe has something against me having a shed.

After a smoke and a cool down, I went to the Home Depot in nearby Pickering, and was served promptly and competently by the Associate there. The materials will be delivered to my driveway tomorrow morning.

The Morningside Home Depot has a problem, and one less customer. The Pickering store is virtually the same distance from my home, and it's a bigger store. I won't be going back to Morningside.

- - -

Foundation Materials Delivered -- FRIDAY, JUNE 15, 2018


What we have there is:
  • Qty 3, 66 lb sacks limestone screening.
  • Qty 10, 2'x2' patio tile.
  • Qty 10, 4-Way Dek-Block.
  • Qty 2, 2"x8"x12' pressure treated.
  • Qty 4, 2"x8"x8' pressure treated.
  • Qty 6, 2"x6"x8' pressure treated.
  • Qty 3, 5/8"x 4'x8' spruce plywood.
And with that, this post is becoming a little unwieldy. I'll continue it on as Part II.

# # #


# # #